STL definition syntax
Table of Contents
- Overview
- STL Root
- Whitespace handling
- Styling
- Document Design
- Content Entities
- Content Items
- Layout Items
- Runtime Behavior
Overview
This document describes an XML syntax of STL definition file. The syntax can be validated programmatically against the following XSD schema.
Top level structure consists of a root <stl:stl> element and four optional sub-elements defining fixtures, data, styling
and a document.
STL Root
One of the DocBuilder++ design goals was to unify its XML structure with the output format of the Page Layout Driver.
Note that the driver was implemented before we started the DocBuilder++ design, so there are some notable differences in syntax. Also the fact is that Page Layout Driver output represents a paginated/rendered form of a document while the DocBuilder++ format represents a document design structure so they have many high-level and low-level differences. That being said we still believe that it is possible to unify both formats to a single common syntax, which will ultimately cover all the existing usecases and even will generate new ones.
It means that we reused the http://developer.opentext.com/schemas/storyteller/layout XML namespace and stl alias
(but renamed root element to stl) and so the root of the XML structure looks as follows:
There are three optional sub-elements under the stl:stl element, we will:
-
stl:fixtures… contains linked or embedded data streams (seexp:fixturein preprocessing) -
stl:data… contains data definition (astl:templateand one or morestl:sourceandstl:transformationelements) -
stl:document… it represents hierarchical document definition
Data
To make it usable in even more use cases, we decided to integrate data
aspect to the DocBuilder++ format. It means that it is possible to
define a stl:data XML element with following subelements:
-
stl:template… a single Data Template -
stl:source… one or more Data Sources (with variouskeyattribute) -
stl:transformation… one or more TDT Definitions (with variouskeyattribute)
Any entity can be either directly included in the definition file, or
referenced via uri attribute.
Top level of the data section can look as follows:
<stl:stl xmlns:stl="http://developer.opentext.com/schemas/storyteller/layout" version="0.1">
  <stl:data>
    <stl:source>
      ...
    </stl:source>
    <stl:template>
      ...
    </stl:template>
    <stl:transformation>
      ...
    </stl:transformation>
  </stl:data>
</stl:stl>
stl:template as well as stl:source elements can contain arbitrary
XML structure but stl:transformation must contain a valid TDT
Definitions. For more details how a TDT Data Transformation is
defined and implemented - see the TDT Documentation.
Following examples show a definition of Data Source, Data Template and Transformation a possibility to include or reference individual definitions as well as preview resulting Data Instances.
In all four case we also demonstrate a possibility to create an STL
defining just TDT Data Transformation - it means that no
stl:document definition is necessary for a meaningful STL
definition.
Book Reviews
In this example user defines a Data Template representing a simple HTML hierarchy containing annotated values (represented as XDC tags). It is then possible to Transforma a Data Source and save resulting Data Instance to an XML or HTML file.
All three entities - stl:source, stl:template and
stl:transformation are directly included in the definition file.
Dual Transformation
In this example we demonstrate a possibility of scenario when we process various formats of Data Sources and create a unified way to process them - create a single Document Design presenting Data Instances unified to a single format represented as a single Data Template.
The data part of the STL file can look as follows:
It is clearly visible that there is a single stl:template in the
definition but two kinds of stl:source and stl:transformation pairs.
This way we can process two formats of source data changing just the
active TDT key.
TDT-based document creation
Some examples of TDT-based document creation are described in the STL/SSDX Framework Documentation, chapter DocBuilder utilization.
Whitespace handling
Generally we try not to mix elements with text data at a single level of the STL format. That way any inter-element whitespace (created for example when the XML document is pretty printed) can be treated as sequence of discardable entities and safely ignored.
A different situation is for Story definition format - it is represented as a sequence of Mixed Content Elements. It means that there are Elements and Content Data mixed at the same level of XML hierarchy and we have to provide some level of a clever normalization so we make the syntax more robust for cases like XML pretty-print but also provide users with powerful enough means to create content they need (including whitespaces).
Consider the following example:
<stl:story>
  <stl:p>
    This is a single-line text
  </stl:p>
</stl:story>
… user probably does not expect a newline followed by several spaces to be inserted to a Story.
On the other hand in the following case:
<stl:story>
  <stl:p>Author: <stl:field xpath="/data/author/name"/></stl:p>
</stl:story>
… it is most probable that user expects the space after the colon to be preserved.
That is why we need some clever XML content normalization to provide an intuitive and user friendly behavior.
To achieve such a goal we consider the following two algorithms:
normalize-spacesplit-trim-joinnormalize-space-auto-trim
For detailed discussion about whitespace treatment possibilities see the XML Whitespace article on the Text Encoding Initiative Wiki.
normalize-space algorithm
XPath normalize-space algorithm does basically the following:
- replace all whitespace characters with spaces
- trim all leading and trailing space characters
- collapse all space sequences to a single space
This is relatively simple c++ implementation:
void normalize_data(
    std::string& data, bool trim_left = true, bool trim_right = true, bool collapse = true )
{
    auto const not_a_space = [](char ch) { return ch != ' '; };
    // replace all whitespaces with spaces in-place
    std::transform(
      std::begin(data),
      std::end(data),
      std::begin(data),
      []( char ch ) { return std::isspace(ch) ? ' ' : ch; } );
    // trim all leading and trailing space characters
    if ( trim_right ) {
      data.erase(
        std::find_if(std::rbegin(data), std::rend(data), not_a_space).base(),
        std::end(data) );
    }
    if ( trim_left ) {
      data.erase(
        std::begin(data),
        std::find_if(std::begin(data), std::end(data), not_a_space));
    }
    // collapse each space sequences to a single space
    if ( collapse ) {
      data.erase( std::unique(
        std::begin(data),
        std::end(data),
        []( char c1, char c2 ){ return (c1==' ' && c2==' '); }),
        std::end(data) );
    }
}
The advantage is that the algorithm and easy to understand and well known and frequently used (available in any XPath and XSLT processor). On the other hand we believe that such significant input modification may not be necessary.
That is why we also consider and alternative approach.
split-trim-join algorithm
We call the algorithm split-trim-join and it works as follows:
- split content to individual lines
- replace all whitespace characters with spaces
- for very first line - trim all trailing space characters
- for very last line - trim all leading characters
- for all remaining lines - trim all leading and trailing space characters
This is a c++ implementation:
void normalize_data( std::string& data )
{
    auto const not_a_space = [](auto c) { return c != ' '; };
    auto const replace_with_space = [](auto chars) {
        return [chars](auto ch) {
          return contains_char(chars, ch) ? ' ' : ch; };
    };

    auto const trim_left = [not_a_space](auto begin, auto end) {
        return std::find_if(++begin, end, not_a_space);
    };

    auto const trim_right = [not_a_space](auto begin, auto end) {
        return std::find_if(
            std::reverse_iterator<APIString::iterator>(begin),
            std::reverse_iterator<APIString::iterator>(end),
            not_a_space).base();
    };

    auto const next_split = [](auto begin, auto end) {
        return std::find(begin, end, '\n');
    };

    auto const limit = std::end(data);
    auto left = std::begin(data);
    std::transform(left, limit, left, replace_with_space("\t\r\f\v"));

    auto split = next_split(left, limit);
    // no trimming if there is just a single string
    if (split != limit) {
        // first token is not left-trimmed
        auto cursor = trim_right( split, left );
        auto right = cursor;
        while(true) {
            left = trim_left(split, limit);
            split = next_split(left, limit);
            if (split == limit) {
                // last token is not right-trimmed
                cursor = std::copy(left, limit, cursor);
                break;
            }
            right = trim_right(split, left);
            cursor = std::copy(left, right, cursor);
        }
        data.erase(cursor, limit);
    }
}
normalize-space-auto-trim
We believe that the normalization algorithm should better preserve
users’ intention and so we are also experimenting with a slightly
modified version of the XPath normalize-space.
The only difference is that we trim leading and trailing whitespace just in text-only elements. If there is a mixture of data and sub-elements at a single level then we are trying to preserve a single space where appropriate:
...
<stl:story>
  <stl:p> Both leading and trailing spaces are trimmed </stl:p>
  <stl:p> Just the leading space is trimmed here <stl:span/> and just the trailing space is trimmed here </stl:p>
</stl:story>
...
Consider the following encoding:
...
<stl:story>
  <stl:p>  The <stl:span style="font-style:italic"> cat </stl:span> ate  the <stl:span style="font-weight:bold">grande croissant</stl:span>. I didn't!
  </stl:p>
</stl:story>
...
By convention, it is presumed that this encodes a passage that could have been equivalently encoded as follows:
...
<stl:story>
  <stl:p>
    The
    <stl:span style="font-weight:italic">cat</stl:span>
    ate the
    <stl:span style="font-weight:bold">croissant</stl:span>.
    I didn't!
  </stl:p>
</stl:story>
...
The algorithm to normalize space in mixed content is:
- Collapse all white space, then trim:
- trim leading space on the first text node in an element and
- trim trailing space on the last text node in an element,
- trim both if a text node is both first and last, i.e., is the only text node in the element.
The result is as if the encoding had been
...
<stl:story>
  <stl:p>The <stl:span style="font-style:italic">cat</stl:span> ate the <stl:span style="font-weight:bold">grande croissant</stl:span>. I didn't!</stl:p>
</stl:story>
...
Note: The normalization process would have corrupted the text had the
encoder put spaces inside the stl:span elements, like this:
...
<stl:story>
  <stl:p>The<stl:span style="font-style:italic"> cat </stl:span>ate the<stl:span style="font-weight:bold"> grande croissant </stl:span>. I didn't!</stl:p>
</stl:story>
...
The resulting text would be:
Thecatate thegrande croissant. I didn’t!
So an encoder should assume that an element that includes nothing but text will get trimmed.
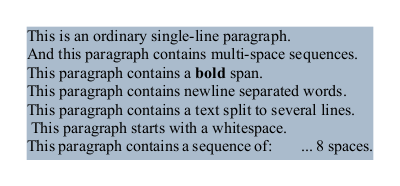
Example
Following example demonstrates that such normalization works relatively well and is very intuitive:
STL Definition
Resulting Document
Styling
For load-time styling in Docbuilder++ we use a subset of CSS syntax.
CSS stands for *C*ascading *S*tyle *S*heets.
CSS describes how individual document elements are to be formatted and rendered.
CSS saves a lot of work. It can control the layout of multiple objects in multiple documents all at once.
CSS Application
CSS can be added to HTML elements in 3 ways:
- Inline … by using the style attribute in HTML elements
-
Internal … by using a
stl:styleelement beforestl:document - External … by using an external CSS file
The most common way to add CSS, is to keep the styles in separate CSS files. However, here we will start with inline and internal styling, because this is easier to demonstrate.
Inline CSS
Setting the style of a particular document element (like stl:ellipse, stl:block, stl:p or stl:span),
can be done with the style attribute.
The style attribute has the following syntax:
<stl:p style="text-align:center;">
  Centered content ...
</stl:p>
Internal CSS
An internal CSS is used to define a style for a single STL definition.
An internal CSS is defined in the top-level section of a definition file, before stl:document element.
<stl:stl xmlns:stl="http://developer.opentext.com/schemas/storyteller/layout" version="0.1">
  <stl:style>
    .centered {
      text-align:center;
    }
  </stl:style>
  <stl:document>
    <stl:story>
      <stl:p class="centered">
        Centered content ...
      </stl:p>
    </stl:story>
    ...
  </stl:document>
</stl:stl>
External CSS
An external style sheet is used to define the style for many DocBuilder++ documents.
With an external style sheet, you can change the look of an entire library of documents by changing a single file!
<stl:stl xmlns:stl="http://developer.opentext.com/schemas/storyteller/layout" version="0.1">
  <stl:style src="wd:/default.css"/>
  <stl:document>
    <stl:story>
      <stl:p class="centered">
        Centered content ...
      </stl:p>
    </stl:story>
    ...
  </stl:document>
</stl:stl>
CSS Properties
While CSS is very rich and powerful language, only a very limited subset is supported by DocBuilder++.
It is possible that we’ll extend the support in future, but right now from the whole variety of CSS selectors only .class selectors are supported.
This way we can find out how far we get with such a limited functionality without closing some doors for future.
For example there may be an XSLT, TDT or other transformation converting
STL definition file directly to HTML output. And if we limit our users
to use only .class CSS selectors then we may be able to reuse a single
CSS stylesheet between DocBuilder++ and HTML output without any
additional changes. On the other hand if we add a support for element
name selectors or parent-child selectors then we accidentally expose
the structure of our document (element names and hierarchy) and make
such stylesheets incompatible and inapplicable for HTML output (without
a necessary stylesheet transformation).
Also the set of supported CSS properties is limited to the ones we are able to convert to StoryTeller document model. The list of currently supported properties is documented in following sections.
If there is an unsupported property in the associated stylesheet the DocBulder threats it as error. An alternative approach would be to ignore such properties, but for now we decided to be more strict and make possible extensions in future based on a feedback we get. Such narrow contract is typically easier to implement (we do not need to handle some cases like DocBuilder -> HTML conversion specially), is less surprising for users (user gets the error at loading time instead of delivering thousands of incorectly formatted documents because of a typo in a stylesheet) and is easily extensible in future (without worrying that we break backward compatibility).
Length Units
CSS offers a number of different units for expressing length. Some of them are currently supported in DocBuilder++ and so can be used throughout STL definition markup:
-
pt… Absolute length in points (1px = 1/72th of 1in) -
px… Absolute length in pixels (1px = 1/96th of 1in) -
in… Absolute length in inches (1in = 96px = 2.54cm) -
pc… Absolute length in picas (1pc = 12 pt) -
mm… Absolute length in millimeters -
cm… Absolute length in centimeters -
em… Relative to the font-size of the element (2em means 2 times the size of the current font) -
%… Relative to the length of same property of parent element
For more detailed CSS unit description see the W3C documentation.
Color Definition
Right now a six-digit (#rrggbb) and three-digit (#rgb) forms of hex format RGB color are implemented:
<stl:text x="20pt" y="20pt" w="260pt" h="180pt" style="fill:#0effff; stroke:#4b0082;">
  <stl:story>
    This is a
    <stl:span style="background-color:#d2691e; color:#0f0;">
      colored
    </stl:span>
    text.
  </stl:story>
</stl:text>
… and also CSS3 Extended Color Keywords are supported:
<stl:text x="20pt" y="20pt" w="260pt" h="180pt" style="fill:lightcyan; stroke:indigo;">
  <stl:story>
    This is a
    <stl:span style="background-color:chocolate; color:lime">
      colored
    </stl:span> text.
  </stl:story>
</stl:text>
… and finally decimal rgb() and rgba() notations are supported:
<stl:text x="20pt" y="20pt" w="260pt" h="180pt" style="fill:rgb(224,255,255); stroke:rgba(75,0,130,1.0);">
  <stl:story>
    This is a
    <stl:span style="background-color:rgba(210,105,30,1.0); color:rgb(0,255,0);">
      colored
    </stl:span>
    text.
  </stl:story>
</stl:text>
For genericity and user convenience we should implement a support for full
CSS color in future
(e.g. decimal hsl and hsla notations).
Pen Definition
-
border(color) … maps to Pen property -
stroke(color) … maps to Pen.Brush.Color property -
stroke-width(length) … maps to the Pen.Thickness property -
stroke-linecap(butt,dashed,dotted) … maps to the Pen.LineCap property -
stroke-linejoin(miter,round,bevel) … maps to the Pen.LineJoin property -
stroke-opacity(numeric) … maps to Pen.Brush.Color.Alpha property -
stroke-dasharay(sequence of lengths) … maps to Pen.DashStyle property (SOLID,DASH,DOT,DASHDOT,DASHDOTDOT) -
opacity… (number) … maps to Pen.Color.Alpha property
Brush definition
-
background-color(color) … maps to Brush.Color property -
fill(color) … maps to Brush.Color property -
fill-opacity(number) … maps to Brush.Color.Alpha property -
opacity(number) … maps to Brush.Color.Alpha property
Drawing Style Definition
Any layout item (stl:text, stl:input, stl:table, stl:rect,stl:circle, …) defining a style attribute
can use following optional CSS properties modifying item’s drawing style:
-
border-collapse… NOOP -
border(width + style + color) … maps to DrawingStyle.Pen propertyborder-topborder-bottomborder-leftborder-right
-
margin(one to four lengths) … maps to DrawingStyle.OuterMargin property-
margin-top(length) -
margin-bottom(length) -
margin-left(length) -
margin-right(length)
-
-
padding(one to four lengths) … maps to DrawingStyle.InnerMargin property-
padding-top(length) -
padding-bottom(length) -
padding-left(length) -
padding-right(length)
-
-
fill-rule(winding,evenodd) … maps to DrawingStyle.WindingFill
Right now only a solid Fill (Brush) and Stroke (Pen) is generated for given color.
In future we are going to support more advanced Fill and Stroke definitions, via inline CSS Style:
<stl:line x1="40pt" x2="120pt" y1="100pt" y2="100pt"
          style="stroke: black; stroke-width: 20pt; stroke-linecap: round;"/>
There are also following additional drawing style related properties with no direct mapping to HTML CSS,
so we used a CSS extension with -stl- “vendor” prefix:
-stl-content-rescale-stl-shape-resize-stl-placement-ratio-stl-alignment-stl-wrapping-stl-formatting
Paragraph Style Definition
Content elements defining a style attribute for paragraphs (stl:p, stl:list and stl:block)
can use following optional CSS properties modifying current paragraph style:
-
text-align(left,right,center,justify) … maps to Alignment property -
margin-top(length) … maps to the ParagraphSpacingBefore property -
margin-bottom(length) … maps to the ParagraphSpacingAfter property -
margin-left(length) … maps to the LeftIndent property -
margin-right(length) … maps to the RightIndent property -
text-indent(length) … maps to the FirstIndent property -
line-height(length) … maps to LineSpacing property with LineSpacingMode set to LS_RELATIVE -
page-break-before(alwaysorauto) …alwayssets StartPosition property to SP_PAGE (autoleaves it as SP_ANYWHERE) -
page-break-after(avoidorauto)avoidsets KeepWithNext property to 1 (autoleaves it 0) -
orphans(integral) … maps to the KeepTogetherFirst property -
widows(integral) … maps to the KeepTogetherLast property -
direction(ltr,rtl) … maps to Direction property -
column-count(integral),column-width(length),column-gap(length) … maps to ColumnSection command
There are also following additional paragraph style related properties with no direct mapping to HTML CSS,
so we used a CSS extension with -stl “vendor” prefix:
-
-stl-shaping(string) -
-stl-tabstab definition string (see Tab Stops section below) -
-stl-outline-level(numeric)
Character Style Definition
Content elements defining a style attribute (stl:p, stl:list, stl:block and stl:span) can use following optional CSS properties modifying current character style:
-
font-
font-family(string) … maps to Font.Name property -
font-size(length) … maps to Font.Size property -
font-weight(boldornormal) … maps to Font.Bold boolean property -
font-style(italicornormal) … maps to Font.Italic boolean property -
font-variant(normalorsmall-caps) … maps to Font.Smallcaps boolean property
-
-
text-decoration(line-through,underlineornone) … maps to Font.Underline and Font.Strikethrough boolean properties -
vertical-align(baseline,suborsuper) … maps to Font.Superscript and Font.Subscript boolean properties -
word-break(keep-allorbreak-all) … maps to Hyphenation property -
color(color) … maps to Foreground.Color property -
background-color(color) … maps to Background.Color property -
text-anchor… NOOP -
opacity(numeric) … maps to Foreground.Color.Alpha property
Then there is an attribute lang definition language for whole element subtree
CSS Parser
As an initial implementation of the CSS parser we used regex-based CCSS library based on css-parse and css-stringify libraries, all released under MIT licence.
The parsing code was very much rewritten, but we still consider a possibility to use more powerfull engine like LibCSS.
Document Design
Document
In principle it would be possible to define several documents and for example share a single data definition among them.
But right now user can define just a single stl:document element in the STL file. It’s structure consists of a list of (shared) Stories represented as stl:story elements and a sequence of Page Types represented as stl:page elements.
Following listing shows how the top level XML structure can look like:
<stl:stl xmlns:stl="http://developer.opentext.com/schemas/storyteller/layout" version="0.1">
  ...
  <stl:document>
    <stl:story>
      ...
    </stl:story>
    <stl:page w="300pt" h="500pt">
      ...
    </stl:page>
  </stl:document>
</stl:stl>
There can be a support for multiple stl:document definitions in future but right now only none or a single stl:document is supported.
Document Structure
Right now there is no DocBuilder++ support for advanced document structure.
Currently users can create individual stl:page elements (representing Page Types and Page References at the same time) and add an optional occurrence attribute to each such page.
The occurrence attribute value can be one of the following:
-
optional… there can be0or1page instance -
once-or-more… there can be1or more page instances -
repeatable… there can be0,1or more page instances -
<numeric value>… there will be exactly the specific number of page instances
If there is no occurrence attribute then the page will be instantiated exactly once.
Page
The stl:page represents a definition of a single Page Type. Right
now the sequence of Page Types leads to a flat Document Structure
referencing each individual Page Type with appropriate Occurrence.
It is possible that in future we extend the format with an optional
explicit Document Structure definition.
Single (repeatable) Page Type definition looks as follows:
...
  <stl:page w="300pt" h="500pt" occurrence="repeatable">
    ...
  </stl:page>
...
Each page typically contains a hierarchy of various Layout Items (like texts, images, fragments etc).
Following sections describe various Layout Items which user can include in stl:page hierarchy as page objects or inside native stl:story sequence as inline or paragraph objects.
Story
A single Story represents a linear content sequence sometimes containing one or more inline of paragraph layout objects (texts, tables, …) as well as data objects (switches, repeaters, substitutions) or other content objects (commands, hyperlinks, …).
Story Format
Story can be specified in various formats, right now a Native DocBuilder++ and XHTML format is supported. It is possible that other content formats (like RTF) will be supported in future.
Following listing shows a very simple example of a native content:
...
<stl:story>
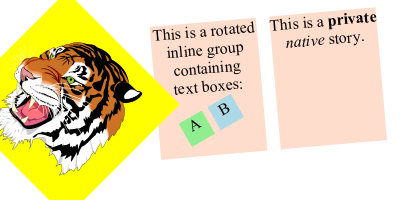
<stl:p>This is a private (and native) story...</stl:p>
</stl:story>
...
And here is an example of an XHTML content:
...
  <stl:story format="XHTML">
    <body>
      <p>This is a <b>shared</b> <i>story</i>...</p>
    </body>
  </stl:story>
...
Current XHTML filter implementation has many bugs and limitations but it is still a usable piece of software and integrating it with DocBuilder++ can fulfill at least some possible usecases.
Hopefully we’ll manage to replace the XHTML filter with more decent implementation in future.
Story Ownership
Just like in StoryTeller Document a Story can be either shared or private.
Shared Stories are owned directly by Document and so are defined at
the stl:document level of the STL definition.
A Shared Story has no effect on the formatted document until it gets referenced by some formatting object (be it a text or a story reference from the same or a different document).
Shared stories can be referenced via index or a name:
...
  <stl:document>
    <stl:story name="Shared">
      <stl:p>This is a shared story...</stl:p>
    </stl:story>
    ...
    <stl:page w="300pt" h="500pt">
      <stl:text x="120pt" y="20pt" w="60pt" h="60pt" story="Shared" style="stroke:#00ff00"/>
      ...
    </stl:page>
  </stl:document>
...
Some objects (e.g. texts, switches, repeaters) can define their Private Story right inside their corresponding XML element:
...
  <stl:text x="10pt" y="10pt" w="100pt" h="100pt" style="stroke:#0000ff">
    <stl:story>
      <stl:p>This is a private story...</stl:p>
    </stl:story>
  </stl:text>
...
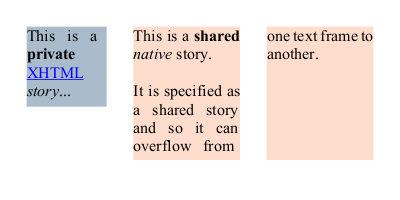
Example
Following example demonstrates various Story ownership modes and formats:
STL Definition
Resulting Document
Semantic Tags & Styling
It is possible to associate a Semantic Tag with any stl:story (even
one inside an stl:scope) and use the consequent associations for
styling.
User can associate a Stylesheet with a StoryTeller Document via
stl:stylesheet directive. The associated Stylesheet is identified
via a Resource URI representing either an external or embedded XML
stream.
An External Stylesheet can be associated as follows:
<stl:stl xmlns:stl="http://developer.opentext.com/schemas/storyteller/layout" version="0.1">
  ...
  <stl:document>
    <stl:stylesheet key="VW" src="wd:/stylesheets/vw.xml"/>
    <stl:stylesheet key="AUDI" src="wd:/stylesheets/audi.xml"/>
    <stl:stylesheet key="SKODA" src="wd:/stylesheets/skoda.xml"/>
    <stl:story tag="LetterBody">
      ...
    </stl:story>
    ...
  </stl:document>
</stl:stl>
And Embedded Stylesheet associations can look like this:
<stl:stl xmlns:xp="http://developer.opentext.com/schemas/storyteller/xmlpreprocessor"
         xmlns:stl="http://developer.opentext.com/schemas/storyteller/layout" version="0.1">
  <stl:fixtures>
    <xp:fixture key="link:/stylesheets/vw.xml">
      <stylesheet name="VW Brand Stylesheet">
        <style selector="LetterBody">
          <character>
            <font>
              <name>Trebuchet MS</name>
            </font>
          </character>
          ...
        </style>
        ...
      </stylesheet>
    </xp:fixture>
    <xp:fixture key="link:/stylesheets/audi.xml">
      <stylesheet name="Audi Brand Stylesheet">
        ...
      </stylesheet>
    </xp:fixture>
    <xp:fixture key="link:/stylesheets/skoda.xml">
      <stylesheet name="Skoda Brand Stylesheet">
        ...
      </stylesheet>
    </xp:fixture>
  </stl:fixtures>
  <stl:document>
    <stl:stylesheet key="VW" src="link:/stylesheets/vw.xml"/>
    <stl:stylesheet key="AUDI" src="link:/stylesheets/audi.xml"/>
    <stl:stylesheet key="SKODA" src="link:/stylesheets/skoda.xml"/>
    <stl:story tag="LetterBody">
      ...
    </stl:story>
    ...
  </stl:document>
</stl:stl>
Example
Following example demonstrates an embedded stylesheet and it’s application to a story:
STL Definition
Resulting Document
Content Entities
Paragraph
Users can use stl:p element to create a paragraph.
Any stl:p element can optionally re-define any /paragraph style/ attribute.
/Paragraph style/ properties are specified for every single paragraph and do not get propagated to potentially nested paragraphs (e.g. paragraphs inside a nested switch).
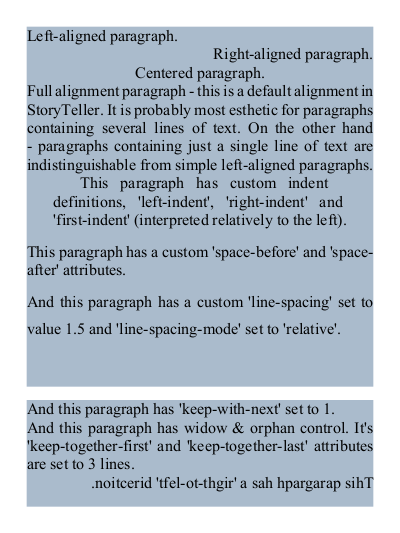
Example
This example demonstrates a variety of stl:p attributes:
STL Definition
Resulting Document
Span
Users can use stl:span element to change style for enclosed content.
Style changes are propagated even to stories associated with nested
repeaters or switches.
The fact is that there is no support for hierachical Span entities inside the StoryTeller Document Model (story content contains just special style-change commands changing the current style for all subsequent content in that particular story), but we believe that supporting more HTML-like style support is more user friendly than exposing the internal representation.
Any stl:span element can optionally re-define any character style
attribute.
You can change style of a text span as follows:
...
<stl:story>
  <stl:p>This is a <stl:span style="font-weight:bold">bold</stl:span> text</stl:p>
</stl:story>
...
Spans can be nested and associated styles can be arbitrarily combined:
...
<stl:story>
  <stl:p>
    This one contains a span with custom
    <stl:span style="font-family:Arial">
      font and
      <stl:span style="font-size:20pt">
        size
      </stl:span>
    </stl:span>
    .
  </stl:p>
</stl:story>
...
and toggled:
...
<stl:story>
  <stl:p>
    <stl:span style="font-weight:bold; font-style:italic">
      Style properties can be
      <stl:span style="font-weight:normal">individually</stl:span>
      <stl:span style="font-style:normal">toggled</stl:span>.
    </stl:span>
  </stl:p>
</stl:story>
...
Block
A stl:block can span over several stl:p paragraphs as follows:
...
<stl:story>
  <stl:block style="font-family:Courier New">
    <stl:p>This is a monospace styled paragraph</stl:p>
    <stl:p>And this one is monospace too</stl:p>
  </stl:block>
</stl:story>
...
DocBuilder++ Engine makes sure that changed styles get propagated to nested stories:
...
<stl:story>
<stl:block style="font-family:Courier New">
<stl:p>
Span can <stl:span style="font-style:italic">span</stl:span> over several paragraphs and it's style propagates to nested sub-stories:
</stl:p>
<stl:p>
<stl:switch xpath="true">
<stl:case>
<stl:story>a) <stl:span style="font-weight:bold">native</stl:span> story</stl:story>
</stl:case>
</stl:switch>
</stl:p>
<stl:p>
<stl:repeater xpath="/data">
<stl:story format="XHTML"><html><body>b) <b>XHTML</b> story</body></html></stl:story>
</stl:repeater>
</stl:p>
<stl:p>
<stl:content xpath="'<html><body>c) <b>rich</b> substitution</body></html>'"/>
</stl:p>
</stl:block>
</stl:story>
...
Example
This example demonstrates the usage of a Span:
STL Definition
Resulting Document
Lists
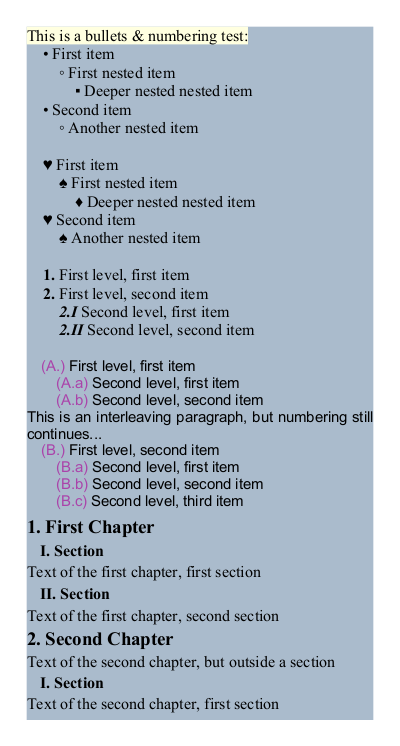
A relatively frequent use-case is to create a bulleted or numbered list.
STL definition provides an stl:list element and also several -stl-list-
prefixed CSS properties for that purpose.
The fact is that there is no List object implemented internally in StoryTeller Document Model (list definitions are internally represented as ListStyleSpec resources and referenced from individual paragraphs), but we believe that supporting more HTML-like list creation is more user-friendly than exposing the internal StoryTeller representation (a nice size-effect of such approach is that it also significantly simplifies a direct STL -> HTML conversion).
It means that users can generally create an arbitrary hierarchy of
nested stl:list elements (each element representing a definition of
the whole list) containing stl:p sub-elements with or without associated bullet/numbering
style definition (each sub-element represents either a single list item or it is a plain
paragraph with no bullet/numbering).
The Bullets & Numbering syntax is described in a separate document.
Example
This example demonstrates the usage of Lists:
STL Definition
Resulting Document
Breaks
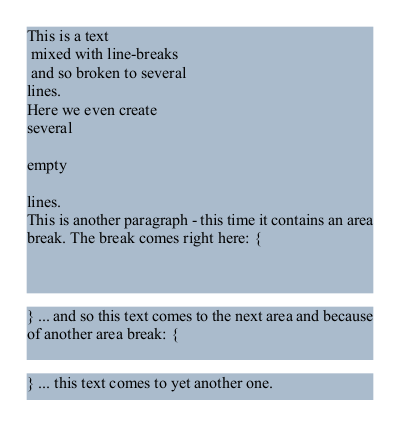
Users can use an stl:break command to explicitly break formatting of a
current line or area. Line breaks can be created as follows:
...
<stl:story>
  <stl:p>
    This is a text
    <stl:break type="line"/>mixed with line-breaks
    <stl:break/>and so broken to several
    <stl:break/>lines.
  </stl:p>
  <stl:p>
    Here we even create
    <stl:break/>several
    <stl:break/>
    <stl:break/>empty
    <stl:break/>
    <stl:break/>lines.
  </stl:p>
</stl:story>
...
Area breaks can help users to create a single paragraph spanning across several areas:
...
<stl:story>
  <stl:p>
    This is another paragraph - this time it contains an area break.
    The break comes right here: {<stl:break type="area"/>}
    ... and so this text comes to the next area and because
    of another area break: {<stl:break type="area"/>}
    ... this text comes to yet another one.
  </stl:p>
</stl:story>
...
Example:
This example demonstrates various kinds of Break commands:
STL Definition
Resulting Document
Tab Stops
There is another type of command - stl:tab, which can be used for
creation of Tab Stops.
Users can simply mix individual stl:tab commands with rest of the text
and utilize default Tab Stop definitions as follows:
...
<stl:story>
  <stl:p>
    (left)<stl:tab/>(middle)<stl:tab/>(right)
  </stl:p>
</stl:story>
...
Or they can define their own set of tab definitions for each individual paragraph. Tab stop definition is a plain string with the following syntax:
The tabs attribute colon separated list of tab definitions:
<tdef>:...:<tdef> where single definition is a semicolon list:
<indent>;<alignment>;<leader>:
-
indent(numeric) -
alignmentoptional (left,right,center,decimal) -
leaderoptional leader character
This is an example of custom Tab Stop definition:
...
<stl:story>
  <stl:p tabs="100pt:200pt">
    (left)<stl:tab/>(middle)<stl:tab/>(right)
  </stl:p>
</stl:story>
...
Users can even utilize an stl:list for a common Tab Stop definition:
...
<stl:story>
<stl:list list-mask="%0!1.	" tabs="20pt:250pt;decimal;.">
<stl:p>Item<stl:tab/> 25,- CZK</stl:p>
<stl:p>Item<stl:tab/> 138,- CZK</stl:p>
<stl:p>Item<stl:tab/> 11 324,- CZK</stl:p>
<stl:p>Item<stl:tab/> 15,- CZK</stl:p>
<stl:p>Item<stl:tab/> 123 344,- CZK</stl:p>
</stl:list>
</stl:story>
...
Example:
This example demonstrates usage of Tab Stops:
STL Definition
Resulting Document
Commands
TBD
TOC styles
TBD
Content Items
Any Content Item can have following optional properties:
namedescription- …
Mapping overview
There is untrivial mapping between STL elements and internal DocModel entities. Here is the overview:
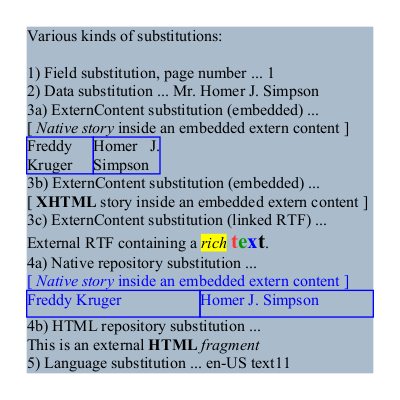
-
Substitution
- Rich data substitution …
<stl:content xpath="..." /> - Repository substitution …
<stl:content uri="..." /> - Extern content substitution …
<stl:content uri="..." selector="..." /> - Data substitution …
<stl:field xpath="..." /> - Field (page-of-pages, page-type, …) …
<stl:field type="..." /> - Metadata lookup …
<stl:field key="..." /> - Translation substitution …
<stl:translation phrase="..." />
- Rich data substitution …
-
Switch
- Translation switch …
<stl:translation><stl:phrase locale="..." />...</stl:translation> - Data switch …
<stl:switch xpath="..."><stl:case key="..." />...<stl:switch> - Interactive form …
<stl:scope relation="...">...</stl:scope> - Hyperlink …
<stl:scope hyperlink="..." screentip="...">...</stl:scope> - Story reference …
<stl:scope story="..." />
- Translation switch …
Substitution
A substitution serves as an item to be substituted with some
externally retrieved content or data. There are various kinds and
flavors of substitutions, each behaving bit differently from users’
perspective. Instead of presenting all kinds of substitutions as a
single stl:substitution element, we expose individual kinds of
substitutions as separate elements:
<stl:field .../><stl:content .../><stl:translation .../>
Data Source
Data Substitution evaluates a given XPath and retrieves a string value from Data Instance:
...
<stl:story>
  <stl:p>
    <stl:field xpath="concat( 'Mr. ', /data/page[@number=2]/heading )"/>
  </stl:p>
</stl:story>
...
Field
Field Substitution evaluates a special value like current page number or number of pages in current document.
...
<stl:story>
  <stl:p>
    <stl:field type="page-number"/>
    <stl:field type="number-of-pages"/>
  </stl:p>
</stl:story>
...
External Content & Repository
External Content Substitution loads an external document (e.g. SSD, DocBuilder++ or RTF) into a cache and evaluates a specific story based on a specified src attribute content a Moniker selector:
...
<stl:fixtures>
  <xp:fixture key="link:/fragments/content.xml">
    <stl:stl xmlns:stl="http://developer.opentext.com/schemas/storyteller/layout" version="0.1">
      <stl:document>
        <stl:story name='Main'>
          <stl:p>[ Published <stl:span style="font-style:italic">story</stl:span> inside an embedded fragment ]</stl:p>
        </stl:story>
      </stl:document>
    </stl:stl>
  </xp:fixture>
</stl:fixtures>
...
<stl:story>
  <stl:p>
    <stl:content uri='wd:/Fragment.rtf' selector='/story[1]'/>
    <stl:content uri='wd:/Fragment.ssd' selector='/story[3]'/>
    <stl:content uri='link:/fragments/content.xml' selector='/story[@name="Main"]'/>
  </stl:p>
</stl:story>
...
Repository Substitution directly converts comlete content of an external document (e.g. HTML) with no caching:
...
<stl:story>
  <stl:p>
    <stl:content uri="wd:/Fragment.html"/>
  </stl:p>
</stl:story>
...
Translation
Translation Substitution realizes special phrase -> value lookup.
...
<stl:story>
  <stl:p>
    <stl:translation phrase="Label1"/>
  </stl:p>
</stl:story>
...
Examples
Kitchen sink
This example demonstrates various kinds of Substitutions:
STL Definition
Resulting Document
External section references
So far we kept the tools for creating design and filling external content separate. Users can use the StoryTeller Editor to create a document design and put any number of Section References to it and then a (possibly different) user can open the StoryBoeard web application and fill individual Sections with actual content (a mixture of HTML text and images).
But what if the business user wants to reorder the existing Section References, delete existing ones or even create new ones from scratch? Would not it be nice if there was an easy way to extend the StoryBoard web editor with such functionality?
One possible approach is to learn the StoryBoard (at least a subset of) STL file syntax. Imagine we provide a set of predefined DocBuilder++ templates containing all the layout but not the main story. Such designs could look like the following:
<stl:stl xmlns:xp="http://developer.opentext.com/schemas/storyteller/xmlpreprocessor"
         xmlns:stl="http://developer.opentext.com/schemas/storyteller/layout" version="0.1">
  <stl:document>
    <xp:include src="wd:/sections-story.xml" />
    <stl:page w="370pt" h="500pt">
    <!-- Two Text Frames (observe a shared story) -->
      <stl:text x="20pt" y="50pt" w="150pt" h="430pt" style="fill:#ffddcc" story="Sections"/>
      <stl:text x="200pt" y="50pt" w="150pt" h="430pt" style="fill:#ffddcc" story="Sections"/>
    </stl:page>
  </stl:document>
</stl:stl>
… note that the main story is not present, but rather externally included.
Let’s say we have the following Section definitions (section_html, section_tables, section_image and
section_mixed):
<definition name="DocDefSections" templateVersion="1" templateName="DocDefSections">
  <section id="section_html">
    <resource displayName="Text" path="Fragment.html" type="html" uri="www.example.com/text">
      ...
    </resource>
  </section>
  <section id="section_tables">
    <resource displayName="Tables" path="tables.html" type="html" uri="www.example.com/tables">
      ...
    </resource>
  </section>
  <section id="section_image">
    <resource displayName="Image" path="ducks.png" type="image" uri="www.example.com/image">
      ...
    </resource>
  </section>
  <section id="section_mixed">
    ...
  </section>
</definition>
Then the StoryBoard web editor could let user edit the sequence of the sections and based on his choice generate the actual content of the main story, for example as follows:
<stl:story name="Sections" xmlns:stl="http://developer.opentext.com/schemas/storyteller/layout" version="0.1">
  <stl:content uri="strssec:section_html" />
  <stl:content uri="strssec:section_tables" />
  <stl:content uri="strssec:section_image" />
  <stl:content uri="strssec:section_mixed" />
</stl:story>
… and DocBuilder interpreting the STL definition file would simply do the right thing - it would generate a Document Design containing main Story with appropriate sequence of Section References. Document Formatter would then retrieve the corresponding content for each Section Reference and generate the resulting Document Instance.
There is also an alternative approach - utilizing Extenal Content Substitution and postponing interpretation of the dynamic story to runtime. The top level design could look as follows:
<stl:stl xmlns:xp="http://developer.opentext.com/schemas/storyteller/xmlpreprocessor"
         xmlns:stl="http://developer.opentext.com/schemas/storyteller/layout" version="0.1">
  <stl:fixtures>
    <xp:fixture key="link:/story-fragment.xml">
      <stl:stl xmlns:stl="http://developer.opentext.com/schemas/storyteller/layout" version="0.1">
        <stl:document>
          <xp:include src="wd:/sections-story.xml" />
        </stl:document>
      </stl:stl>
    </xp:fixture>
  </stl:fixtures>

  <stl:document>
    <stl:story name="ExternContent">
      <stl:content uri="link:/story-fragment.xml" selector="/story[1]"/>
    </stl:story>

     <stl:page w="370pt" h="500pt">
      <!-- Two Text Frames (observe a shared story) -->
      <stl:text x="20pt" y="50pt" w="150pt" h="430pt" style="fill:#ffddcc" story="ExternContent"/>
      <stl:text x="200pt" y="50pt" w="150pt" h="430pt" style="fill:#ffddcc" story="ExternContent"/>
    </stl:page>
  </stl:document>
</stl:stl>
There is a disadvantage that the dynamic story is created in runtime
with each formatting invoke (obviously there can be some caching
involved, but in principle it can be slower than xp:include based
solution). On the other hand there is a big advantage that the main
document definition does not have to be DocBuilder-based, it is
possible to have an SSD created in StoryTeller editor and reference
a single DocBuilder-based story via external content substitution.
This way we can gradually extend existing documents without
supporting full DocBuilder syntax
- instead we may just incrementally extend StoryBoard editor with just additions necessary to fulfill given use cases.
See the following links for details:
- Main STL
- Story STL
- Section Definition (referencing HTML text, Tables and Image)
- Resulting Page Layout HTML
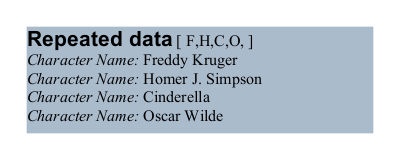
Repeater
Repeater can repeat it’s content several times based on an associated data query.
Data query is specified as xpath attribute.
There are two kinds of a repeater:
-
paragraphrepeater … each iteration creates one or more paragraphs -
inlinerepeater … all iterations are hosted inside a single paragraph
Paragraph Repeater
...
<stl:story>
  <stl:p>
    Paragraph Repeater:
    <stl:repeater xpath="/data/character">
      <stl:story>
        <stl:p>Character Name: <stl:field xpath="name"/></stl:p>
      </stl:story>
    </stl:repeater>
  </stl:p>
</stl:story>
...
Inline Repeater
...
<stl:story>
  <stl:p>
    Inline Repeater:
    <stl:repeater xpath="/data/character">
      <stl:story><stl:field xpath="substring(name, 0, 2)"/>, </stl:story>
    </stl:repeater>
  </stl:p>
</stl:story>
...
Example
This example demonstrates the usage of a Repeater:
STL Definition
Resulting Document
Switch & Scope
Switch
Switch can select a single variant of a sub-content based on an associated data query.
Data query is specified as xpath attribute. There is a stl:switch
element with nested stl:case elements. Each nested stl:case element
has a unique key attribute which is matched to a result of the data
query. There can be a single stl:case element with no key attribute
- it is picked by default if no better match is found.
...
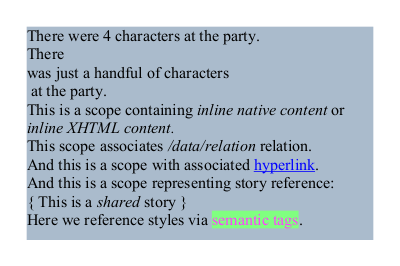
<stl:story>
<stl:p>
There
<stl:switch xpath="count(/data/character)">
<stl:case key="0">
<stl:story>were no characters</stl:story>
</stl:case>
<stl:case key="1">
<stl:story>was one character</stl:story>
</stl:case>
<stl:case>
<stl:story>were <stl:field xpath="count(/data/character)"/> characters</stl:story>
</stl:case>
</stl:switch>
at the party.
</stl:p>
</stl:story>
...
Any stl:case can reference a shared referencable story which has
been previously defined, this was a single content definition can be
shared several times as in the following example:
...
<stl:story name="Shared #1" type="referencable">
  was just a handful of characters
</stl:story>
...
<stl:story>
  <stl:p>
    There
    <stl:switch xpath="count(/data/character)">
      <stl:case key="0">
        <stl:story>were no characters</stl:story>
      </stl:case>
      <stl:case key="1" story="Shared #1"/>
      <stl:case key="2" story="Shared #1"/>
      <stl:case key="3" story="Shared #1"/>
      <stl:case key="4" story="Shared #1"/>
      <stl:case>
        <stl:story>were <stl:field xpath="count(/data/character)"/> characters</stl:story>
      </stl:case>
    </stl:switch>
    at the party.
  </stl:p>
</stl:story>
...
Scope
Scope is internally represented as a switch but is slightly different
from user standpoint because it has just a single (default) case. Thus
the whole stl:case indirection is not necessary and associated
sub-content can be nested directly under the stl:scope element.
A scope can be used for nesting a separate story (native or XHTML) inside a hosting story:
...
<stl:story>
  <stl:p>
    This is a scope containing
    <stl:scope>
      <stl:story>
        <stl:span style="font-style:italic">inline native content</stl:span>
      </stl:story>
    </stl:scope>
    or
    <stl:scope>
      <stl:story format="XHTML"><body><i>inline XHTML content.</i></body></stl:story>
    </stl:scope>
  </stl:p>
</stl:story>
...
An stl:scope can also be used as a hyperlink:
...
<stl:story>
  <stl:p>
    And this is a scope with associated
    <stl:scope hyperlink="http://www.python.org" screentip="Python Web">
      <stl:story>
        <stl:span style="text-decoration:underline; color:#0000ff">hyperlink</stl:span>
      </stl:story>
    </stl:scope>.
  </stl:p>
</stl:story>
...
… or as a form if it associates content with a data relation:
...
<stl:story>
  <stl:p>
    This scope associates
    <stl:scope relation="/data/relation">
      <stl:story>
        <stl:span style="font-style:italic">/data/relation</stl:span>
      </stl:story>
    </stl:scope>
    relation.
  </stl:p>
</stl:story>
...
Scope can be also used as a direct story reference:
<stl:story name="Shared #2" type="referencable">
  <stl:p>
    { This is a
    <stl:span style="font-style:italic">shared</stl:span>
    story }
  </stl:p>
</stl:story>
...
<stl:story>
  <stl:p>
    And this is a scope representing story reference:
    <stl:scope story="Shared #2"/>
  </stl:p>
</stl:story>
...
And finally - users can use scope to associate semantic tags with content ranges. If a stylesheet is associated with the document, then semantic tags can be utilized for dynamic styling:
<stl:stylesheet>
  <stylesheet name="First set of tests">
    <style selector="hilighted">
      <character>
        <foreground>RGB(255,64,255)</foreground>
        <background>RGBA(128,255,128)</background>
      </character>
    </style>
  </stylesheet>
</stl:stylesheet>
...
<stl:document>
  <stl:story>
    <stl:p>
      Here we reference styles via
      <stl:scope>
        <stl:story tag="hilighted">semantic tags</stl:story>
      </stl:scope>.
    </stl:p>
  </stl:story>
  ...
</stl:document>
...
Example
This example demonstrates the usage of a Switch:
STL Definition
Resulting Document
Layout Items
Any Layout Item can have following optional properties:
namedescription-
x,y,w,h classstyletransformhyperlinkscreentip- …
Text
The stl:text element can represent either a Text Box or a Text
Frame depending on the ownership of associated story (it can either
define it’s own story or be associated with an existing shared story).
Following listing demonstrates a Text Box defining it’s own private story:
...
<stl:text x="20pt" y="20pt" w="60pt" h="60pt" style="fill:#aabbcc">
  <stl:story>
    <stl:p>This is a private (and native) story...</stl:p>
  </stl:story>
</stl:text>
...
And this listing demonstrates a Text Frame referending a shared story:
...
<stl:text x="120pt" y="20pt" w="60pt" h="60pt" story="Main" style="stroke:#00ff00"/>
...
Example
For Text Box and Text Frame demonstration we can use identical example like for stories:
STL Definition
Resulting Document
Image
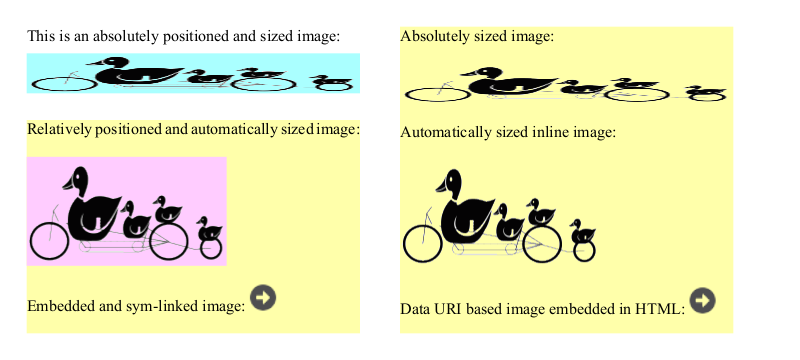
The stl:image element allows to create an Image Item on a Page
(inside an stl:page element) or as an inline item inside a story
(stl:story element).
Following code creates an absolutely positioned and sized Image on a Page:
...
<stl:page>
  <stl:image x="20pt" y="120pt" w="60pt" h="60pt" src="wd:/ducks.png" style="fill:#aaffff"/>
  ...
</stl:page>
...
Following code creates a relatively positioned and auto-sized inline Image inside a Story:
...
<stl:story>
  <stl:p>
    <stl:image src="wd:/ducks.png" style="stroke:#ff0000"/>
  </stl:p>
</stl:story>
...
Following code creates an inline Image from XHTML embedded Data URI:
...
<stl:story format="XHTML">
  <body style="font-family: Arial">
    <p>
      HTML with embedded image:
      <img alt="alt text" src="data:image/png;base64,iVBORw0K ... K5CYII="/>
    </p>
  </body>
</stl:story>
...
Following code creates an Image showing 3rd page from a multipage TIFF:
...
<stl:page>
  <stl:image x="20pt" y="20pt" w="100pt" h="50pt" src="wd:/multipage.tiff" page="2"/>
  ...
</stl:page>
...
Example
For demonstration of Image item variants we can look at the following example:
STL Definition
Resulting Document
Fragment
The stl:fragment element creates a Fragment Item on a Page (inside
an stl:page element) or as an inline item inside a story
(stl:story element).
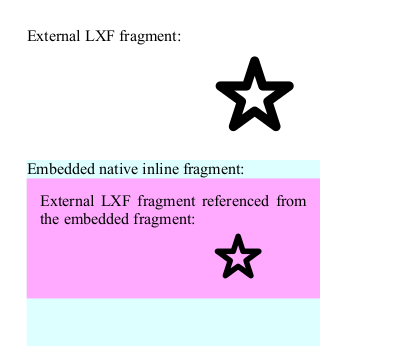
Fragments can be either external referenced via an Absolute Moniker like in this case:
...
<stl:fragment x="20pt" y="220pt" w="80pt" h="80pt" transform="scale(10)" category="load-time" src="wd:/fragment.lxf!/item[1]" style="stroke:#ff0000"/>
...
… or embedded using symlink moniker:
...
<stl:fixtures>
  <xp:fixture key="link:/fragments/embedded.xml">
    <stl:stl xmlns:stl="http://developer.opentext.com/schemas/storyteller/layout" version="0.1">
      <stl:document>
        <stl:page w="120pt" h="120pt">
          ...
        </stl:page>
      </stl:document>
    </stl:stl>
  </xp:fixture>
</stl:fixtures>
...
<stl:document>
  ...
  <stl:fragment x="120pt" y="220pt" category="load-time" src="link:/fragments/embedded.xml!/item[1]" style="fill:#ffaaff"/>
</stl:document>
...
Fragments can be absolute positioned on a page:
...
<stl:page w="120pt" h="120pt">
  <stl:fragment x="20pt" y="20pt" category="load-time" src="link:/fragments/embedded.xml!/item[1]" style="fill:#ffaaff"/>
</stl:page>
...
… or relatively positioned as inline object inside a story:
...
<stl:story>
  <stl:p>
    <stl:fragment category="load-time" src="link:/fragments/embedded.xml!/item[1]" style="fill:#ffaaff"/>
  </stl:p>
</stl:story>
...
Example
Folowing example demonstrates definition of Referenced and Embedded Fragments on a Page and inside a Story:
STL Definition
Resulting Document
Shape
Line & Polyline
Following open shapes are supported:
-
stl:line… single straight line from start point (x1,y1) to end point (x2,y2) -
stl:polyline… sequence of lines connecting points defined bypointsattribute
...
<stl:page w="600pt" h="800pt">
  <stl:line style="stroke:#ff0000" x1="420pt" y1="450pt" x2="550pt" y2="400pt" />
  <stl:polyline style="stroke:#0000ff" points="200,340 240,340 240,380 280,380 280,420 320,420 320,460" />
</stl:page>
...
Rectangle, Circle, Ellipse, Polygon
A variety of closed shapes is also supported:
-
stl:rect… rectangle -
stl:circle… circular shape specified by center point (cx,cy) and radiusr -
stl:ellipse… elliptic shape specified by center point (cx,cy) and radii (rxandry) -
stl:polygon… closed shape made of straight lines connecting points defined by thepointsattribute
User can optionally associate a story with any closed shape. Then the story (either shared or private) gets formatted inside the closed shape.
...
<stl:page w="600pt" h="800pt">
  <stl:rect style="fill:#aaffff" x="20pt" y="20pt" w="200pt" h="100pt" story="Main"/>
  <stl:ellipse style="fill:#ffaaff" cx="350pt" cy="70pt" rx="100pt" ry="50pt" story="Main"/>
  <stl:polygon style="fill:#ccffcc" points="250 150 450 200 550 300 300 350" story="Main"/>
  <stl:circle style="fill:#ccccff" cx="120pt" cy="450pt" r="80pt" story="Main"/>
</stl:page>
...
Example:
For demonstration of various shape variants we can look at the following example:
STL Definition
Resulting Document
Path
There is also a support for very powerfull and generic SVG-like path.
The stl:path element has data attribute containing a SVG Path Data
sequence containing commands like moveto, lineto and curveto and
can look as follows:
...
<stl:page w="600pt" h="800pt">
  <stl:path fill="#ff0000" data="M10 610 H 100 V 700 H 10 Z"/>
</stl:page>
...
The following commands are available for path data:
-
M… moveto -
L… lineto -
H… horizontal lineto -
V… vertical lineto -
C… curveto -
S… smooth curveto -
Q… quadratic Bézier curve -
T… smooth quadratic Bézier curveto -
A… elliptical Arc -
Z… closepath
All of the commands above can also be expressed with lower letters. Capital letters means absolutely positioned, lower cases means relatively positioned.
References:
Example:
For demonstration of SVG-like path variants we can look at the following example. It also demonstrates how easy it is to migrate an SVG vector image to DocBuilder++ (either manually or programmatically):
SVG Pumpkin

STL Definition
Resulting Document

Note that some of the arc handling code has been inspired by the Paul LeBeau’s androidsvg library (which has Apache-2 licence), which borrowed some of the arc-handling code from the Apache Batik library (Apache-2 license as well). Both libraries are implemented in Java programming language.
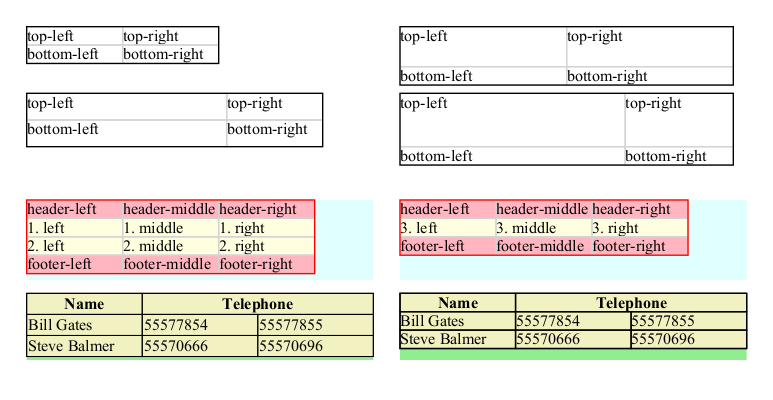
Table
For Table Item creation there are several docbuilder elements
available, namely stl:table, stl:row and stl:cell.
Page Table
User can create an absolutely positioned table as a page item:
The following table has implicit dimensions - it means that it’s width and height are not explicitly specified, but computed based on it’s rows heights and cell/column widths instead:
...
<stl:page w="600pt" h="800pt">
  <!-- Table with implicit dimensions -->
  <stl:table x="20pt" y="20pt">
    <stl:story>
      <stl:row>
        <stl:cell><stl:p>top-left</stl:p></stl:cell>
        <stl:cell><stl:p>top-right</stl:p></stl:cell>
      </stl:row>
      <stl:row>
        <stl:cell><stl:p>bottom-left</stl:p></stl:cell>
        <stl:cell><stl:p>bottom-right</stl:p></stl:cell>
      </stl:row>
    </stl:story>
  </stl:table>
</stl:page>
...
In the example above the rows have zero height by default and are set as growable with its’ content. All cells have 72.0 point width by default (if not stated otherwise).
Alternatively users can explicitly specify height of each individual row and/or specify a width of the whole table:
...
<stl:page w="600pt" h="800pt">
  <!-- Table with explicit width -->
  <stl:table x="300pt" y="20pt" w="250pt">
    <stl:story>
      <stl:row h="30pt">
        <stl:cell><stl:p>top-left</stl:p></stl:cell>
        <stl:cell><stl:p>top-right</stl:p></stl:cell>
      </stl:row>
      <stl:row>
        <stl:cell><stl:p>bottom-left</stl:p></stl:cell>
        <stl:cell><stl:p>bottom-right</stl:p></stl:cell>
      </stl:row>
    </stl:story>
  </stl:table>
</stl:page>
...
Or users can specify column width with specifying w attribute of the
cells inside the very first row and also specify a height of the
whole table:
...
<stl:page w="600pt" h="800pt">
  <!-- Table with explicit height -->
  <stl:table x="20pt" y="70pt" h="40pt">
    <stl:story>
      <stl:row>
        <stl:cell w="150pt"><stl:p>top-left</stl:p></stl:cell>
        <stl:cell><stl:p>top-right</stl:p></stl:cell>
      </stl:row>
      <stl:row>
        <stl:cell><stl:p>bottom-left</stl:p></stl:cell>
        <stl:cell><stl:p>bottom-right</stl:p></stl:cell>
      </stl:row>
    </stl:story>
  </stl:table>
</stl:page>
...
Or users can combine both concepts - specify all or some of the row heights and cell widths and explicitly specify table width, height or both. The resulting table has the specified table dimensions and row and column dimensions get rescaled accordingly:
...
<stl:page w="600pt" h="800pt">
  <!-- Table with explicit width & height -->
  <stl:table x="300pt" y="70pt" w="250pt" h="40pt">
    <stl:story>
      <stl:row h="30pt">
        <stl:cell w="150pt"><stl:p>top-left</stl:p></stl:cell>
        <stl:cell><stl:p>top-right</stl:p></stl:cell>
      </stl:row>
      <stl:row>
        <stl:cell><stl:p>bottom-left</stl:p></stl:cell>
        <stl:cell><stl:p>bottom-right</stl:p></stl:cell>
      </stl:row>
    </stl:story>
  </stl:table>
</stl:page>
...
Paragraph Table
So far we have seen only simple tables placed absolutely on a page and containing just a body content with no headers and footers.
A content of a table is stored in a private body story by default, but users can create other kinds of stories to achieve various overflow event effects.
It is also possible to repeat one or more rows with a stl:repeater.
Following example demonstrates a paragraph table containing header, footer and a body story with a repeatable row:
...
<stl:document>
  <stl:story name="Main">
    <!-- Paragraph story with header, footer and repeatable body row -->
    <stl:table style="stroke:red; fill:lightyellow">
      <stl:story occurrence="header">
        <stl:row>
          <stl:cell><stl:p>header-left</stl:p></stl:cell>
          <stl:cell><stl:p>header-middle</stl:p></stl:cell>
          <stl:cell><stl:p>header-right</stl:p></stl:cell>
        </stl:row>
      </stl:story>
      <stl:story>
        <stl:repeater xpath="/data/row">
          <stl:row>
            <stl:cell><stl:p><stl:field xpath="position()" />. left</stl:p></stl:cell>
            <stl:cell><stl:p><stl:field xpath="position()" />. middle</stl:p></stl:cell>
            <stl:cell><stl:p><stl:field xpath="position()" />. right</stl:p></stl:cell>
          </stl:row>
        </stl:repeater>
      </stl:story>
      <stl:story occurrence="footer">
        <stl:row>
          <stl:cell><stl:p>footer-left</stl:p></stl:cell>
          <stl:cell><stl:p>footer-middle</stl:p></stl:cell>
          <stl:cell><stl:p>footer-right</stl:p></stl:cell>
        </stl:row>
      </stl:story>
    </stl:table>
  </stl:story>
  <stl:page w="580pt" h="220pt">
    <!-- Two text frames consuming a paragraph table -->
    <stl:text x="20pt" y="150pt" w="260pt" h="60pt" style="fill:lightcyan" story="Main" />
    <stl:text x="300pt" y="150pt" w="260pt" h="60pt" style="fill:lightcyan" story="Main" />
  </stl:page>
</stl:document>
...
Column span
User can modify a number of columns a cell should span with colspan
attribute.
Consider the following example:
...
<stl:table>
  <stl:story>
    <stl:row>
      <stl:cell><stl:p>Name</stl:p></stl:cell>
      <stl:cell colspan="2"><stl:p>Telephone</stl:p></stl:cell>
    </stl:row>
    <stl:row>
      <stl:cell><stl:p>Bill Gates</stl:p></stl:cell>
      <stl:cell><stl:p>55577854</stl:p></stl:cell>
      <stl:cell><stl:p>55577855</stl:p></stl:cell>
    </stl:row>
    ...
  </stl:story>
</stl:table>
… the cell containing text Telephone actually spans across two table columns.
Example
This example demonstrates the usage of various kinds of Tables:
STL Definition
Resulting Document
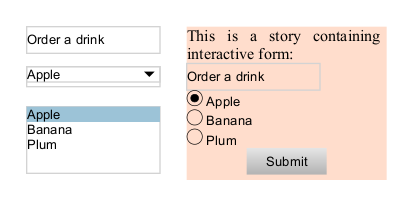
Interactive Item
User can use stl:input element to create an interactive item.
The following attributes can be specified:
-
type… enumeration represengin a type of the interactive item, following values are supported:-
button… clickable button (mostly used with a JavaScript to activate a script) -
checkbox… checkbox boolean input (typically part of a multiselect choice) -
date… date control (year, month and day (no time)) -
dropdown… drop-down list selection -
email… field for an e-mail address -
file… file-select field and a “Browse…” button (for file uploads) -
hidden… hidden input field -
listbox… listbox selection -
multiline… multi-line text input field (a text area) -
number… field for entering a number -
password… password field (characters are masked) -
radio… radio boolean button (typically part of a singleselect choice) -
reset… reset button (resets all form values to default values) -
submit… submit button (submits whole form) -
tel… field for entering a telephone number -
text… single-line text field -
url… field for entering a URL
-
-
xpath… xpath representing data link -
readonly… boolean flag if item is read-only -
required… boolean flag if input value is required
Then also generic Layout Item, Character Style and Paragraph Style attributes are available.
Interactive items must be always associated with corresponding data hierarchy. For documentation of data structure expected for various kinds of interactive items see:
Following definition creates a simple text input field:
...
<stl:data>
  <stl:template>
    <data xmlns:ddi="http://developer.opentext.com/schemas/storyteller/layout/ddi/v1">
      <ddi:form>
        <plain_input>
          <ddi:input name="drink">Order a drink</ddi:input>
          <ddi:label>Drink</ddi:label>
          <ddi:tooltip>Pick a drink you like, please</ddi:tooltip>
        </plain_input>
        ...
      </ddi:form>
    </data>
  </stl:template>
  <stl:transformation>
    <tdt:transformation xmlns:tdt="http://developer.opentext.com/schemas/storyteller/transformation/tdt" version="1.0"/>
  </stl:transformation>
</stl:data>
<stl:document>
  <stl:page w="300pt" h="150pt">
    <stl:input x="20pt" y="20pt" w="100pt" h="20pt" type="text" xpath="/data/ddi:form/plain_input"
               style="stroke:lightgray; font-family:Arial; font-size:10pt"/>
    ...
  </stl:page>
</stl:document>
...
And following definition creates a single-select (radio button) choice and submit button:
...
<stl:data>
  <stl:template>
    <data xmlns:ddi="http://developer.opentext.com/schemas/storyteller/layout/ddi/v1">
      <ddi:form>
        <group_input>
          <ddi:input-group multiselect="false" name="Fruits">
            <choice>
              <ddi:choice selected="true">apple</ddi:choice>
              <ddi:label>Apple</ddi:label>
            </choice>
            <choice>
              <ddi:choice selected="false">banana</ddi:choice>
              <ddi:label>Banana</ddi:label>
            </choice>
            <choice>
              <ddi:choice selected="false">plum</ddi:choice>
              <ddi:label>Plum</ddi:label>
            </choice>
          </ddi:input-group>
          <ddi:label/>
          <ddi:tooltip/>
        </group_input>
        <submit>
          <ddi:input name="submit-button">X</ddi:input>
          <ddi:label>Submit</ddi:label>
          <ddi:tooltip>Send form X</ddi:tooltip>
        </submit>
      </ddi:form>
    </data>
  </stl:template>
  <stl:transformation>
    <tdt:transformation xmlns:tdt="http://developer.opentext.com/schemas/storyteller/transformation/tdt" version="1.0"/>
  </stl:transformation>
</stl:data>
<stl:document>
  <stl:page w="300pt" h="150pt">
    <stl:text x="140pt" y="20pt" w="150pt" h="115pt" style="fill:#ffddcc">
      <stl:story name="Shared">
        <stl:p>This is a story containing interactive form:</stl:p>
        <stl:block style="font-family:Arial; font-size:10pt">
          <stl:p>
            <stl:scope relation="/data/ddi:form">
              <stl:story>
                <stl:repeater xpath="/data/ddi:form/group_input/ddi:input-group/choice">
                  <stl:story>
                    <stl:p>
                      <stl:input w="12pt" h="12pt" type="radio" xpath="."/>
                      <stl:field xpath='string(ddi:label)'/>
                    </stl:p>
                  </stl:story>
                </stl:repeater>
                <stl:p style="text-align:center;">
                  <stl:input w="60pt" h="20pt" type="submit" xpath="/data/ddi:form/submit"/>
                </stl:p>
              </stl:story>
            </stl:scope>
          </stl:p>
        </stl:block>
      </stl:story>
    </stl:text>
    ...
  </stl:page>
</stl:document>
...
Example
Following example demonstrates some types of interactive items:
STL Definition
Resulting Document
Group
User can use stl:group element for page object grouping:
...
<stl:page w="300pt" h="150pt">
  <stl:group transform="rotate(-5)">
    <stl:text x="110pt" y="30pt" w="80pt" h="100pt" style="fill:#ffddcc">
      ...
    </stl:text>
    <stl:rect x="-200pt" y="-200pt" w="600pt" h="600pt" style="fill:yellow" />
  </stl:group>
</stl:page>
...
as well as inline object grouping:
...
<stl:text x="110pt" y="30pt" w="80pt" h="100pt" style="fill:#ffddcc">
  <stl:story>
    <stl:p style="text-align:center;">
      This is a rotated inline group containing text boxes:
      <stl:group transform="rotate(-25)">
        <stl:text x="0pt" y="0pt" w="20pt" h="20pt" style="fill:lightgreen">
          <stl:story><stl:p style="text-align:center;">A</stl:p></stl:story>
        </stl:text>
        <stl:text x="25pt" y="0pt" w="20pt" h="20pt" style="fill:lightblue">
          <stl:story><stl:p style="text-align:center;">B</stl:p></stl:story>
        </stl:text>
      </stl:group>
    </stl:p>
  </stl:story>
</stl:text>
...
Groups can be used for coordinate space transformations (scaling, rotation and translation) or just for organizing the design to collapsable and named groups.
Example
Following example demonstrates the grouping in action:
SVG

STL Definition
Resulting Document
Barcode
Users can use stl:barcode element for creating an instance of page or
inline barcode.
Following barcode specific attributes are supported:
-
type… type of the barcode -
data… barcode data
User can create a barcode right on a page as follows:
...
<stl:page w="300pt" h="150pt">
  <stl:group transform="rotate(-5)">
    <stl:barcode x="20pt" y="20pt" w="50pt" h="50pt" type="Royal Mail" data="123456" />
  </stl:group>
</stl:page>
...
If data must be dynamic (for example if we repeat barcodes based on
input data), then it is possible to use stl:script as follows:
...
<stl:story>
  <stl:p>
    This is a sequence of invoice barcodes:
    <stl:repeater xpath="/data/invoice">
      <stl:story>
        <stl:barcode w="30pt" h="20pt" type="Code 39" data=".">
          <stl:attribute name="modulesize">0.3</stl:attribute>
          <stl:attribute name="widetonarrow">2.0</stl:attribute>
          <stl:attribute name="printtext">true</stl:attribute>
          <stl:attribute name="textlocation">Above</stl:attribute>
          <stl:attribute name="checkchar">true</stl:attribute>
          <stl:script language="js">require('layout').item().Data = require('data').js('string(@number)');</stl:script>
        </stl:barcode>
        ,
      </stl:story>
    </stl:repeater>
  </stl:p>
</stl:story>
...
Example
For demonstration of barcodes we can look at the following example:
STL Definition
Resulting Document
Charts
Chart syntax documetation is described in a separate document.
Runtime Behavior
Another level of power lies in a possibility to associate runtime elements with individual design items and modify them based on runtime criteria.
Script
Users can associate custom scripts with various items via the
stl:script element. Even in a single document design there can be a
mixture of languages, each stl:script must have it’s language
explicitly specified via the language attribute. Currently supported
variants are:
-
strs… StreamServe script -
js… JavaScript -
py… Python script
While for Content items there is just a single script, for Layout
Items there are two script events Before and After formatting the
item. Users can specify the event via the when attribute (either
before or after).
...
<stl:image src="wd:/logo.png">
  <stl:script language="js" when="before">
    console.log('Before image');
  </stl:script>
  <stl:script language="py" when="after">
    print('After image');
  </stl:script>
</stl:image>
...
One annoying thing is that you cannot use <, > and & characters in
XML PCDATA (which is by default
everything in XML). So for example a simple javascript for loop must
be escaped as folllows:
...
<stl:script language="js">
for ( var i=0; i < item.PageCount; ++i )
console.log(i);
</stl:script>
...
If users find this encoding annoying, they can explicitly switch to CDATA mode as follows:
...
<stl:script language="js"><![CDATA[
 for ( var i=0; i < item.PageCount; ++i )
   console.log(i);
]]></stl:script>
...
Another alternative is to keep scripts separate and use xp:include
directive to include them:
...
<stl:script language="js">
  <xp:include src="wd:/scripts/printPageCounts.js" parse="text" />
</stl:script>
...
Modification (deprecated since 16.4)
For simple property modifications users can use the stl:modification
element.
Following snipped repeats an image reference and modifies it’s Page
property in order to visualize all individual pages of an multipage TIFF
image:
...
<stl:repeater xpath="$pages">
  <stl:story>
    <stl:image w="100pt" h="50pt" src="wd:/multipage.tiff">
      <stl:modification key="@IImageItem/Image/Page">.</stl:modification>
    </stl:image>
  </stl:story>
</stl:repeater>
...
Example
For demonstration of runtime modifications we can look at the following example enumerating all pages of an multipage TIFF image: