Table of Contents
StoryTeller Javascript Embedding
This Section describes the motivation and technology behind the DocPlatform Javascript Embedding. It is the second part of the Javascript Documentation.
- First we describe the scripting support currently implemented in StoryTeller.
- Then we will compare some existing Javascript Hosting Platforms as a source of inspiration.
- We will are also provide a detailed description of the Javascript Embedding approach we decided to follow including C++ Bindings and Core Libraries.
- Then we will conclude this section with some example use cases using exposed DocPlatform services and also 3rd Party Javascript Libraries as well as external On-line Services.
Current Scripting Support
StreamServe Script
So far the only scripting language officially supported in StoryTeller is the StreamServe scripting language.
Now there is a new requirement to support Javascript for DocPlatform Runtime Scripting as well. Unfortunately the actual requirements for what should be achieved with it are formulated relatively vaguely, with very few or no relevant use cases.
What is most likely required is that users should be able to achieve similar results with Javascript as they do now with StreamServe script.
The JIRA user story for javascript embedding is available here: STRSER-5932
Architecture
The high level architecture of the StreamServe script integration to StoryTeller looks as follows:
Documentation
The following list contains some of the areas relevant to StoryTeller Runtime Scripting. All the listed functionality should be in some form available in Javascript as well. Most likely the form and syntax will differ significantly, but the Javascript approach should be similar or better in terms of functionality available to users.
- Variables (Scalar, Array)
- Functions (StoryTeller, Other)
- Property Access (String Variants, Pt Variants, Mm Variants)
- Data Access (StEvalXPath)
- Modules (Function Files)
Python/Ruby Script
Besides the StreamServe Script it is already possible to use Python scripting and for some time it was possible to use Ruby scripting as well.
Not only it is possible to associate Runtime Scripts with individual objects but it is also possible to use the scripting via REPL Python Console in Design Time. User is able to enumerate and even modify existing objects as well as create new ones from scratch.
There is a limited kind of IntelliSense to ease the Design Time Scripting.
Similar Design Time scripting could be implemented for Javascript as well but it is out of scope in regards to current requirements.
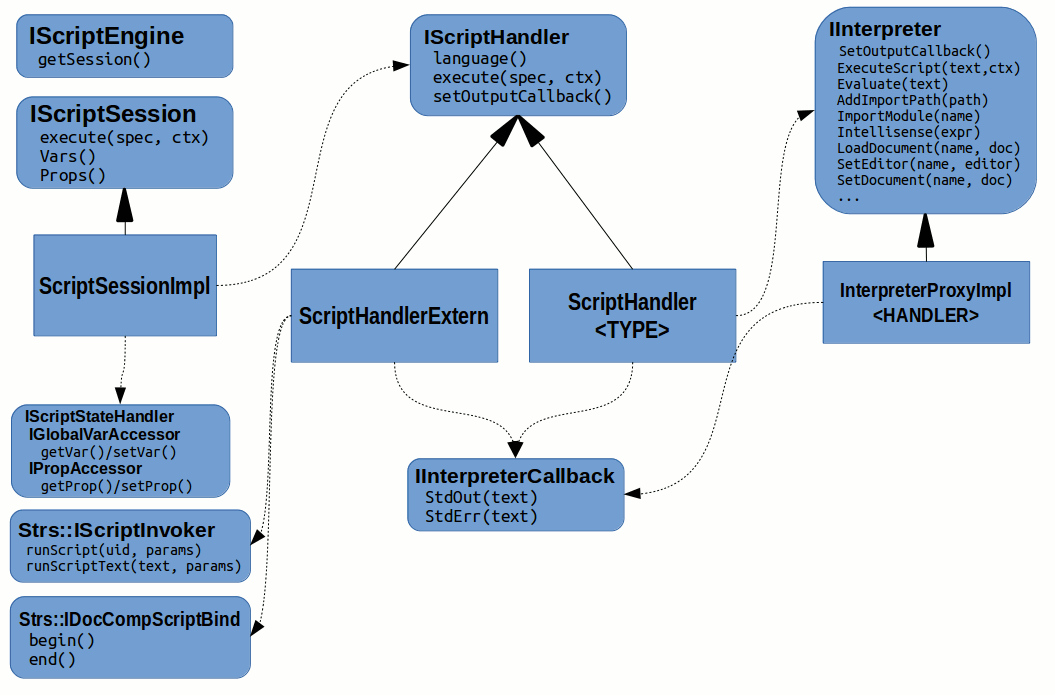
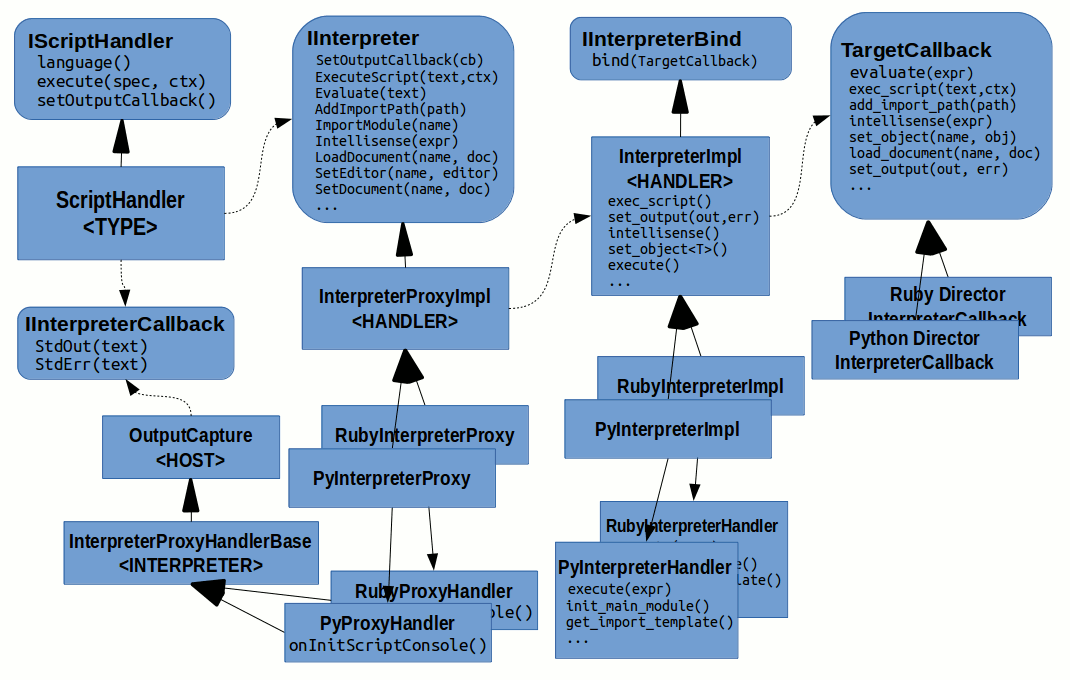
Architecture
The architecture of the Python/Ruby scripting feels too bit complicated (probably for some historical reasons) and should probably by re-factored before it could be seriously used in production:
Javascript Scripting Support
Hosting Architectures
Javascript is a very popular programming language and so there are many systems using it as an embedded language. Even though the individual systems differ a lot, there are still some similarities so we can see a common pattern and use it as an inspiration when making DocPlatform another system embedding Javascript.
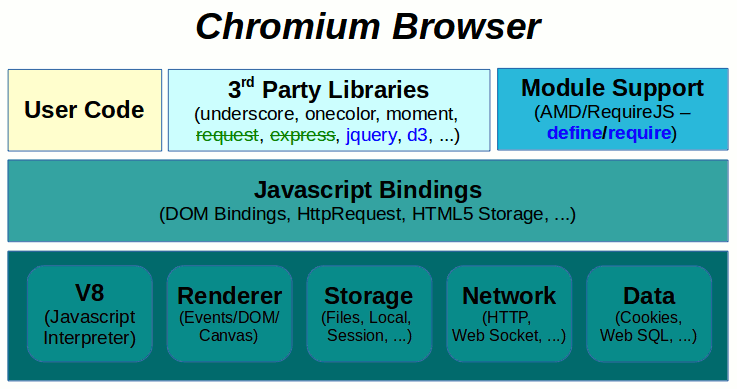
Chromium Browser
As you can see on the Chromium Browser diagram below, there is typically a set of native interfaces and services at the very bottom provided by the platform (Of course there is some kind of a Javascript Interpreter as well - the v8 engine is used in case of the Chromium Browser).
The Native Services are then exposed to the Javascript Environment in a form of C++ Bindings.
On top of the c++ Bindings it is possible to use 3rd Party Libraries as well as User Code. There is no built-in Module Support and so every Web Application is free to use any Module System it desires. AMD systems like RequireJS are popular for browser code.
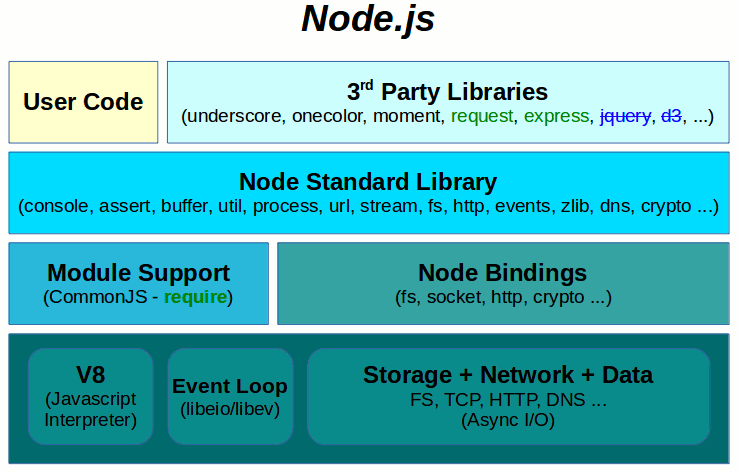
Node.js Server
The Node.js architecture looks relatively similar to the one of the Chromium Browser from such a high level point of view. The v8 engine is used as a Javascript Interpreter as well. Similarly there are Native Services provided by the platform at the very bottom.
The Native Services are also exposed in a form of C++ Bindings.
The notable difference is that Node.js platform provides a set of Core Modules on top of the C++ Bindings as a Node Standard Library. It also establishes a unified Module system based on the CommonJS standard as a part of the Node.js library layer.
So it is not up to individual Node.js Server Applications what Module System they pick; each such application must play well with the rules specified by the Node.js Platform.
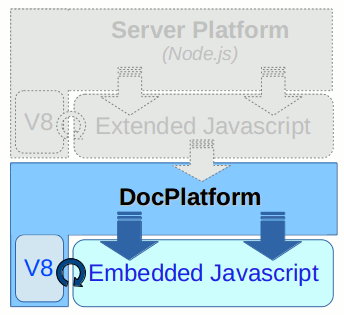
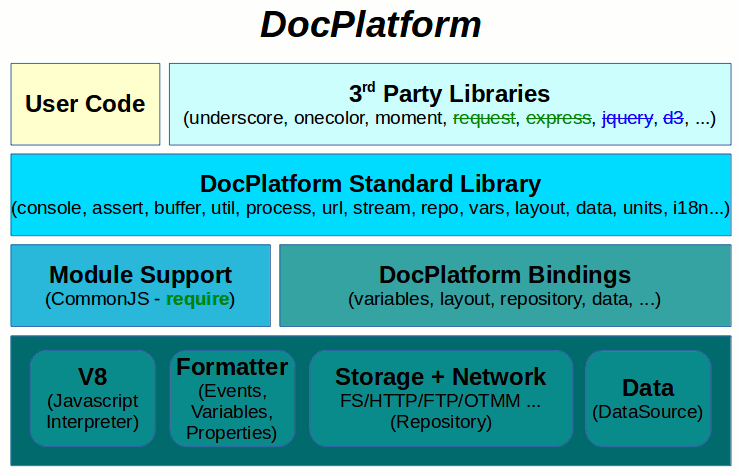
StoryTeller
After a careful consideration we decided to partly mimic the Node.js Architecture in DocPlatform. It was one of the reasons we decided to integrate the v8 engine as a Javascript Interpreter.
At the very bottom of the diagram there are also Native Services provided as part of the DocPlatform API. Some of the services are then exposed to javascript in a form of C++ Binding.
On top of the C++ Bindings layer there is are several Core Modules providing more convenient access to individual Native Services. Part of this layer is also a Module System based on the CommonJS standard and intentionally similar to the one used in Node.js.
Naturally it is possible to write Client Code as well as use suitable 3rd Party Libraries on top of the provided Core Modules.
There are several reasons why we decided to mimic the Node.js platform architecture:
- The Node.js architecture is well established (it was invented in 2009) and carefully designed (if Node.js works so well, there is no reason to invent something completely different)
- There is a huge amount of 3rd party libraries available for Node.js (the more similar our platform is to Node.js the easier is to adopt available libraries for DocPlatform)
- There are huge amounts of developers in the world who know how to write Node.js applications (if DocPlatform looks and works similar then it is easier and cheaper to find and bring up StoryTeller application developers)
Recently there is a trend to write Javascript Libraries which can be used both in Browser and in a Server environment like Node.js. Such kinds of libraries are the obvious candidates for adapting to DocPlatform as well. The reason is that such libraries rarely depend on platform specific services and are mostly written in pure (VanillaJS) javascript instead.
Language Interpreter
During the design we decided that all Javascript inside DocPlatform will be executed by the V8 Javascript engine. V8 is a part of Chrome Browser and Node.js framework and it proved to be a great solution for Javascript both in Client and Server side. There are lots of reasons for this choice, V8’s speed is a very important factor. Besides speed, another reason for using V8 is that it is platform independent C++ project and Google engineers made a very good job in making V8 relatively easy to integrate into other projects.
Following document describes the high level design of the v8 engine:
Following documentation helps to understand how v8 can be embedded to a C++ application:
V8 JavaScript Engine Embedder’s Guide
Module Support
Modularity of Computer Programs is a key to make the code more correct, maintainable and reusable. Modules divide programs into smaller chunks and force programmer to define Interfaces on Module Boundary.
ECMAScript modules
Unfortunately in the current standardized version of Javascript programming language (ECMAScript currently in version 5.1 since June 2011) has no notion of module support at all. Definitely there will be a language based support for modules in the new standard ECMAScript 6 (Harmony) (approved as fourth edition of the standard these days - June 2015), but so far the prevalent Module Systems are created inside the language as a library functionality (thankfully Javascript as a language is extensible enough that even the library-based module implementations are relatively seamless).
There evolved two main Library-based Module Systems over time:
CommonJS Modules
The dominant implementation of this standard is in Node.js.
Main characteristics of CommonJS are:
- Compact syntax
- Synchronous module loading
- Mainly used in servers
Asynchronous Module Definition (AMD)
The most popular implementation of this standard is RequireJS.
Main characteristics of AMD are:
- Slightly more complicated syntax (or a compilation step)
- Asynchronous module loading
- Mainly used in browsers
DocPlatform Modules
If we want to support modularity in DocPlatform then we must decide what Module System are we going to support.
It is obvious that using some well established standard for Module Support is a key to be able to reuse available libraries even though they were not written for DocPlatform in the first place.
Thanks to our experience with Node.js platform we were able to evaluate the CommonJS standard and decided to support this standard in DocPlatform as a part of the available library framework.
The reasons are mainly the following:
- The easier the syntax will be for our users, the better
- There is no significant need of asynchrony for Embedded Scripts, all the embedded scripts are run synchronously
- DocPlatform embedding Javascript is basically a server platform
Language Features
In this section we more elaborate about the actual version of javascript language used in DocPlatform.
Strict Mode
Starting with ECMAScript 5, developers are able to place their code into a more constrained form of execution known as strict mode. Strict mode improves JavaScript code by enforcing better programming practices and eliminating some of the language’s insecure and ill-advised features. Strict mode is enabled by adding the following directive to your code:
"use strict";
See this blog post for some arguments, why it is desirable to use strict mode whenever possible.
All inline scripts and modules in StoryTeller document are implicitly run in strict mode. We believe that such decision enhances long term maintainability of the code included in StoryTeller projects. As we have no backward compatibility constrains we are in a position to do the “right thing”.
Note:
For 3rd Party Libraries there could be compatibility reasons to be
able to disable strict mode optionally on a case-by-case basis, but so
far we did not encounter situation where such option would be necessary.
The only library having some issues was the xmldom/dom.js (there were
two functions defined in a nested block so it was really easy to move
them to a top of corresponding function scope), the descriptive error
message really helped in this regard:
SyntaxError: In strict mode code, functions can only be declared at top level
             or immediately within another function.
The strict_mode.xml regression test (along with strict_mode.js module) demonstrates how strict mode makes javascript a better language.
ES6 Harmony
The new language standard ECMAScript 6 (Harmony) is designed to allow safer and more efficient code.
Here are the main goals behind the new standard:
- Be a better language
- Improve inter-operation (Modules, Classes, …)
- Keep versioning as simple and linear as possible (One Javascript)
- Support a statically verifiable, secure subset (Strict mode whenever possible)
For more details see the Exploring ES6 (free on-line book).
Even though the latest language standard not fully approved yet, the Javascript Engine implementations (including v8) are already adapting some of the new language features.
The current v8 version 4.5.75 allows enabling some ES6 Harmony features it already implements. As the new language version is fully backward compatible (there should be no harm to enable it even for the old source code), several known platforms tend to enable the new language features as early as possible (see Node.js Harmony Features, or Arrow Functions Coming to Chrome 45).
For the reasons described above we decided to enable some ES6 features in DocPlatform as well.
So the following is a valid javascript code:
const a = ["Hydrogen", "Helium", "Lithium", "Beryllium"];
console.log(a.map(s => s.length));
// [8, 6, 7, 9]
The harmony.xml regression test (along with harmony.js module) demonstrates some of the supported ES6 language features.
JSLint
To further enhance the quality of javascript source code we optionally enabled the Douglas Crockford’s
JSLint runtime checker for all loaded modules.
It can be configured in the jslint section of the
__init__.json
configuration file.
If the JSLint functionality is enabled and you require a module with the following code:
function find_key( obj, val ) {
  var key;
  for( key in obj ) {
    if( obj.hasOwnProperty(key) && obj[key] === val) {
      return key;
    }
  }
}
… you get the following errors:
 wd:/lint-semantics.js:1:9 JSLintError: Unused 'find_key'.
 wd:/lint-semantics.js:1:19 JSLintError: Unexpected space between '(' and 'obj'.
 wd:/lint-semantics.js:1:28 JSLintError: Unexpected space between 'val' and ')'.
 wd:/lint-semantics.js:3:4 JSLintError: Expected 'Object.keys' and instead saw 'for in'.
 wd:/lint-semantics.js:3:7 JSLintError: Expected one space between 'for' and '('.
 wd:/lint-semantics.js:3:9 JSLintError: Unexpected space between '(' and 'key'.
 wd:/lint-semantics.js:3:20 JSLintError: Unexpected space between 'obj' and ')'.
 wd:/lint-semantics.js:4:10 JSLintError: Expected one space between 'if' and '('.
 wd:/lint-semantics.js:4:12 JSLintError: Unexpected space between '(' and 'obj'.
 wd:/lint-semantics.js:5:25 JSLintError: Unexpected trailing space.
The JSLint hints then may lead to a refined and compliant version of the code, which can for example look as follows:
function find_key(obj, val) {
  return Object.keys(obj).filter(function (key) {
    return obj[key] === val;
  })[0];
}
As you can see the reported warnings are relatively strict, they very often reject a perfectly functional javascript, but it is all done in order to archive better and more easily maintainable code.
JSLint applies principles of the Good Parts:
If a feature is sometimes useful and sometimes dangerous and if there is a better option then always use the better option.
For more details see the JSLint Help Page.
The lint.py regression test (along with lint.xml definition and lint-syntax.js + lint-semantics.js modules) demonstrates the JSLint behavior.
It seems that community starts to aggree that naked loops (traditional forms of the for statement)
are considered a bad practice in general (such opinion is by no means specific to javascript, similar opinions are formulated
by Sean Parent in his inspiring C++ Seasoning talk).
JSLint does not recommend use of the for statement. Use array methods like forEach instead. The for option will suppress some warnings. The forms of for that accepts are restricted, excluding the new ES6 forms – Douglas Crockford
The only situation when it is hard to replace for statement with an array method is a creation of a new array of given length.
Consider the following code:
function createCells(count) {
  var cells = [];
  for (var i = 0; i < count; i += 1) {
    cells.push(new TableCell(i));
  }
  return cells;
}
For such cases there is a helper module called range. It implements a single function
range( start : number [, end :number, step : number] )
similar to the python range built-in function. With
the range tool it is possible to write the previous code as follows:
var range = require('range');
...
function createCells(count) {
  return range(count).map(i => new TableCell(i));
}
The range.xml
regression test demonstrates the range module functionality.
StoryTellerJS Embedding Framework
This section describes the available C++ Bindings and Core Modules provides as a part of the StoryTeller Javascript Embedding Framework.
Bindings
The most basic DocPlatform related functionality is provided in a form of javascript/c++ bindings.
Binding interfaces are available via the __bindings global javascript
variable, but that variable is accessible only for core libraries listed
in this next section. For user code the raw bindings are not available
as all the necessary functionality exposed by the c++ layer is wrapped
to a higher level constructs implemented in javascript in core
libraries.
While the following code would be accepted in a core module if fails in a user module:
__bindings.process.stdout('Hello!');
^
ReferenceError: __bindings is not defined
    at wd:/user_module.js:1:1
All the c++ bindings are initialized in the InterpreterContext constructor
and passed as a __bindings global variable to the bootstrapping script
Module Support
In DocPlatform we decided to implement the CommonJS based module system, we basically mimic a subset of module system used in Node.js.
The Node.js module system is documented here.
Right now we support Core modules, File modules (.js|.json) and Folder modules (index.js|index.json) but support neither the node_modules folder lookup nor the package.json manifest for Folders as modules.
The implementation of the globally available require( id: string ) function is available in the
__init__.js
bootstrap script. The list of all currently used core modules is available in the
__init__.json file.
The require() implementation uses the __bindings.functions.eval( code: string ) c++ binding which evaluates
given javascript in given globals variable context. It also uses the repo core module described below.
Client code then looks as simple as this:
var module = require('./module');
module.foo('bar');
Tracing
All tracing is realized through the IInterpreterCallback DocPlatform interface.
It has two methods for writing to Stdout and Stderr streams and it’s implementation takes care of writing traced
messages to appropriate destinations (be it process’s standard streams, storyteller output window,
StreamServer log file, or whatever else).
The corresponding c++/javascript binding is available as __binding.process variable.
getProp( key: string ) : string- returns process-level property with given name
setProp( key: string, value: string )- sets process-level with given name
On top of this interface there is a very thin wrapper - the process core library.
There are following additional properties and methods available:
platform : string- string representing a current platform (
win32orlinux)
- string representing a current platform (
cwd() : uri- returns current working directory
stdin() : stream- returns input stream representing standard input
stdout() : stream- returns output stream representing standard output
stderr() : stream- returns output stream representing standard error
stdinfo() : stream- returns output stream representing a log with INFO severity
stdwarn() : stream- returns output stream representing a log with WARNING severity
Thanks to the fact that the process javascript module mimics the Node.js process module, it is very easy to provide users with other core libraries for user convenience - the console and util. The implementation of both modules is taken from Node.js and works as it is (with no necessary porting or other kinds of changes).
The documentation of both modules is available here:
Following code demonstrates some of the console functionality:
console.time('test');
var abc = {a:1, b:2, c:3};
console.log(abc);
// { a: 1, b: 2, c: 3 }
console.timeEnd('test');
// test: 6ms
The tracing.py regression test (along with tracing.xml definition) demonstrates the tracing possibilities.
Binary Buffer
For representing binary data there is a Buffer object, just like it is available in Node.js framework. It’s documentation is available in Node.js buffer module page.
The actual implementation is taken from this project.
The Buffer is introduced to global namespace just like it is in the Node.js, so it is possible to write code like the following:
var str = '\u00bd + \u00bc = \u00be';
console.log(str + ": " + str.length + " characters, "
            + Buffer.byteLength(str, 'utf8') + " bytes");
// 1/2 + 1/4 = 3/4: 9 characters, 12 bytes
The buffer.xml regression test demonstrates the available functionality.
Helper Modules
There are several more modules we have adopted from Node.js framework. Such modules should help user’s convenience when writing his user scripts.
For example the following core modules are available:
- assert
- used for writing unit tests of applications; can be accessed with
require('assert').
- used for writing unit tests of applications; can be accessed with
- path
- utilities for handling and transforming file paths (only string transformations, no FS access),
can be accessed with
require('path').
- utilities for handling and transforming file paths (only string transformations, no FS access),
can be accessed with
- url
- utilities for URL resolution and parsing; use
require('url').
- utilities for URL resolution and parsing; use
- querystring
- utilities for dealing with query strings; use
require('querystring').
- utilities for dealing with query strings; use
- stream
- an abstract interface implemented by various objects with a need to stream data
- …
The complete list of all currently used core modules is available in the __init__.json file.
Following code shows some of the possibilities:
var assert = require('assert');
var path = require('path');
var url = require('url');
var querystring = require('querystring');
assert('/foo/bar/baz/asdf' === path.normalize('/foo/bar//baz/asdf/quux/..'));
var u = 'http://usr:pwd@host.com:8080/p/a/t/h?par1=1&par2=2a&par2=2b&par3#hsh';
console.log(querystring.parse(url.parse(u).query));
// { par1: '1', par2: [ '2a', '2b' ], par3: '' }
Shared Variables
In browsers, the top-level scope is the global scope. That means that in
browsers if you’re in the global scope var something will define a
global variable. In DocPlatform and Node.js this is different. The
top-level scope is not the global scope; var something inside a module
will be local to that module.
The important aspect towards maintainability of the StoryTeller
Designs containing scripts is the fact that each script can be executed
in a separate context (represented internally as an instance of
v8::Context class). It means that neither local nor global
variables are guaranteed to be shared between individual scripts of the
same StoryTeller Design. In strict mode it is not even possible to
use implicitly declared global variables the following exception is
thrown:
ReferenceError: <var> is not defined
In Node.js there is a global variable representing all variables
visible in top level scope. Making some variable global may seem like a
handy shortcut, however using global variable goes against the modular
design, kills maintainability in the long term and so generally is
considered as a bad practice.
After careful consideration we decided not to provide the global
variable even though it may make porting of some libraries more
difficult.
If user really wants to share some state between various scripts (or
various executions of the same script) he can use the built-in module
caching mechanism for that purpose. It is possible to use any (user)
module for that purpose, but for convenience (and as a general
convention) there is a core module share created for that purpose.
In any case it is user’s responsibility to avoid any name collisions between individual scripts of the particular StoryTeller Design.
The following design structure shows how two scripts can share a single variable:
<page>
  <script when="docapi.BEFORE" language="js">
    var share = require('share');
    share.counter = 0;
  </script>
  <text pos='20,20' size='550,50'>
    <script language="js">
      var share = require('share');
      share.counter += 1;
    </script>
    <p>First Text</p>
  </text>
</page>
The share.xml regression test demonstrates the concept of shared variables.
StreamServe Variables
Variable access is based on the IGlobalVarAccessor DocPlatform interface.
The javascript/c++ binding is available as __binding.variables.
There are following methods available:
has( name: string )- determines whether a variable with given name already exists
set( name: string, value: string [, indices : number[]] )- set a scalar or an array slot value
get( name: string [, indices : number[]] ) : string- get a scalar value or an array slot value
dim( name: string ) : number[]- get variable dimensions
list() : string[]- list all variable names
For client code there is the vars
core library available. It is built in javascript on top of the
__binding.variables c++ bindings.
For user convenience it implements the following methods:
vars.dump( name?: string ) : string|string[]|{ string: ... }- dump value of a scalar variable, all values of an array variable or dump all variable values
vars.all- proxy object providing direct read and write access to all variables
var vars = require('vars');
// scalar variable
vars.set('scalar', 10);
// array variable
vars.set('array2d', 20, [0, 0]);
vars.set('array2d', 30, [0, 1]);
vars.set('array2d', 40, [1, 0]);
console.log(vars.dump());
// { array2d: [ [ '20', '30' ], [ '40', undefined ] ],
//   scalar: '10'
//   ...
// }
For vars.all proxy object implementation we utilized ES6 Harmony
Proxies, but
unfortunately currently implemented as –harmony-proxies v8
feature,
which is now obsolete. As far as it is replaced by true ES6 spec based
implementation, we rewrite the relate code in vars.js to utilize the
new API. Hopefully the API visible to our users will not change because
of it.
The following code is possible thanks to the convenience syntax sugar:
var vars = require('vars').all;
// we can set existing and new scalar variables
vars.scalar = 10;
vars.new_scalar = 20;
// we can set existing array variable values
vars.array2d[1][1] = 50;
// unfortunately we cannot create new arrays
vars.new_array[0] = 'test';     // Error: Undefined variable 'new_array'.
// Read access works as expected (throws for undefined variables)
console.log(vars.scalar);       // 10
console.log(vars.new_scalar);   // 20
console.log(vars.array2d[1][1]);// 50
console.log(vars.new_array[0]); // Error: Undefined variable 'new_array'.
For StreamServer variables representing arrays the proxy implements very limited array-like interface. Following methods/properties are guaranteed to be available for users:
lengthproperty (setting this property is limited - only array shortening is supported)push( item )method - given item is appended to the end of the arraypop()method - last item is removed from the array and returned (empty array returnsundefined)join( separator )method - returns a string created by joining all items with given separatortoString()method - equivalent tojoin(',')method call
The variables.xml regression test demonstrates the StreamServe Variable accessibility.
The following code is possible thanks to the array-like interface described above:
vars.set( 'array1d', 'a', [ 0 ] );
var arr = vars.all.array1d;
console.log( arr.length );     // 1
arr.push( 'b' );
console.log( arr.length );     // 2
console.log( arr.toString() ); // 'a,b'
arr.length = 1;
console.log( arr.pop() );      // 'a'
console.log( arr.pop() );      // undefined
arr.length = 10;
// Error: Array enlargement not supported.
The array.xml regression test demonstrates the StreamServe Variable array accessibility.
User can clear a variable by setting a null to it. But an existing variable can never be fully deleted. (This is a limitation of the current StreamServe Variable back-end implementation and javascript binding can do nothing about it).
vars.array1d = null;
vars.scalar = null;
console.log(vars.dump());
// {
//   array1d: undefined,
//   scalar: undefined,
//   ...
// }
While Shared Variables can contain any kinds javascript object (objects, functions, arrays, …) the StreamServe Variables can contain only strings and multidimensional arrays of strings. However there are scenarios where the StreamServe Variables cannot be replaces with Shared Variables. Shared Variables are local to javascript, but StreamServe Variables are reachable outside javascript - it is possible to read and write such variables in a different scripting language or possibly even in a different StreamServe Process.
The multilang.xml regression test demonstrates how a single variable can be shared between Javascript scripts and Python scripts inside a single design. This is simply not possible with Javascript Shared Variables.
Layout Item Property Access
Layout Item Property access is based on the IProperties DocPlatform interface. The Item currently being formatted is
accessible via the IFormattingContext interface.
The javascript/c++ binding is available as __binding.properties.
There are following methods available:
set( key: string, value: string|number )- set a property value to current item
get( key: string ) : string|number- get a property value from current item
On top of this simple key -> value interface an object model is built. The object model is implemented in the layout core library.
Right now there is following hierarchy of objects:
- Document
- TableColumn … Width
(number) - TableCell … ColumnSpan
(number) - Box … X:
(number), Y(number), W(number), H(number) - Border … Color, Thickness
(number) - Fill … Type
{'Solid', 'Linear', 'Radial', 'Gradient'}, Color, SecondaryColor - Item … Name, Description, Empty
- Repeater
- Switch
- Substitution … Uri, Mask, Data
- LayoutItem … Box, Border, Fill, Rotation
(number), Visibility{'Visible', 'Hidden', 'Invisible'}- Page
- Group
- Image … Uri, Moniker, PageCount
- Fragment … Uri, Moniker, PageCount
- Text
- Barcode … Type, Data
- Chart … BidiAndShaping, Direction
{'None', 'L2R', 'R2L'} - Shape
- Table … Columns, Direction
{'None', 'L2R', 'R2L'} - TableRow … Cells
(TableCell[])
User can get the proxy of the current item with following code:
var item = require('layout').item();
Then he is ready to read and write the individual properties as follows:
console.log(item);     // {Text "My Text"}
console.log(item.Box); // {Box [20, 25, 50, 15]}
item.Box.X += 10;
item.Name = 'Right-Shifted Text';
The layout_item.xml regression test demonstrates the available possibilities.
DocPlatform works internally in 72 DPI and so its internal units correspond to typographic Point units. However sometimes it is more convenient for user to work in different units (like millimeters).
In StreamServe Script this problem is solved by duplicating all the functions returning numeric properties (there are Pt and Mm suffices for all corresponding property getters). Such design not only pollutes the namespace with many redundant functions and loads unnecessary maintenance burden on developers but also fails to be scalable enough for future extensions. What options do we have if an additional unit (e.g. centimeter, meter, inch, feet, pica, cicero, ligne, Em, En, …) is required?
The proper solution is to provide a separate unit conversion module and let users to make conversions explicitly.
The units core module is such a library - right now it contains just two helper functions:
pt2mm( points: number ) : number- converts numeric value in points to millimeters
mm2pt( millimeters: number ) : number- converts numeric value in millimeters to points
pt2in( points: number ) : number- converts numeric value in points to inches
in2pt( inches: number ) : number- converts numeric value in inches to points
mm2in( millimeters: number ) : number- converts numeric value in millimeters to inches
in2mm( inches: number ) : number- converts numeric value in inches to millimeters
Unit conversion of layout item properties represented in typographic points to millimeters looks as follows:
var units = require('units');
console.log(item.Box.W + 'pt -> ' + units.pt2mm(item.Box.W) + 'mm');
// 50pt -> 17.63888888888889mm
console.log(item.Box.H + 'pt -> ' + units.pt2mm(item.Box.H) + 'mm');
// 15pt -> 5.291666666666667mm
The units.xml regression test demonstrates the available functionality.
We could probably use some 3rd party library for unit conversion, like math.js, or convert-units.
Layout Cursor Access
User can access layout cursor of the paragraph currently formatted via the layout core library.
The following function is available:
layout.cursor( [absolute : bool] )- Returns the
X,Ycoordinates of the top-left point of current paragraph relative to currentareaorpagebased on the optionalabsoluteboolean.
- Returns the
If this function is called outside an area then an exception is thrown.
Following code make sure the layout cursor has expected values:
var assert = require('assert');
var layout = require('layout');
assert.deepEqual({X:20, Y:25}, layout.cursor());
The layout_cursor.xml regression test demonstrates the available functionality.
Repository
Stream access is based on the IRepository DocPlatform interface.
Any constraints regarding what files or streams a tenant can reach depend on underlying IRepository implementations.
Javascript binding does not address user identity and rights and so does not limit users in any way.
The javascript/c++ binding is available as __binding.repository.
There are following methods available:
stat( uri: string ) : { type: number, size: number }- returns the
statsinfo for givenuri
- returns the
load( uri: string [, binary : bool] ) : string|Buffer- load data from given
URI
- load data from given
save( data: string|Buffer [, uri : string] )- save given data to given
URIor upload it to blob manager and returns contend based URI
- save given data to given
The load method returns either a String or a Buffer based on the
binary argument. The save method accepts either a String or a
Buffer and optional uri.
On top of this binding we created the repo
core module. This module adds functionality for encoding and returns
Node.js like Buffer instead of Uint8Array for binary data. It also
provides a Stream API described in the following section.
There are following URI related methods available for users:
repo.stat( uri: string ): { type: string, size: number}- returns the
stats(typeandsize) info for givenuri
- returns the
repo.load( uri: string [, encoding : string|null] ): string|Buffer- load data from given
uri(decode it based on givenencoding)
- load data from given
repo.save( uri: string, data: string|Buffer [, encoding : string|null] ): string- save given data to given
uri(encode it based on givenencoding) and return URI
- save given data to given
repo.upload( data: string|Buffer [, encoding : string|null] ): string- upload given data to Blob Manager and returns content based
URI (encode it based on given
encoding)
- upload given data to Blob Manager and returns content based
URI (encode it based on given
Default encoding is utf8, null encoding means no encoding - data
is interpreted as binary
var data = 'test data';
var uri = repo.upload(data);
console.log(uri);
// local:f48dd853820860816c75d54d0f584dc863327a7c
console.log(repo.load(uri));
// test data
console.log(repo.load(uri, null));
// <Buffer 74 65 73 74 20 64 61 74 61>
console.log(repo.load(uri, 'hex'));
// 746573742064617461
console.log(repo.load(uri, 'base64'));
// dGVzdCBkYXRh
The repo.xml regression test demonstrates the available functionality.
Streams
In order to unify String Data, Binary Data or URI in our API we introduced a concept of Streams. A stream is an object representing some readable or writable buffer optionally associated with an URI. Stream concept is implemented in the streams core module.
This is the Javascript API for Stream creation:
streams.stream( [uri : string] ): stream- this function creates a Stream optionally associated with given
uri.
- this function creates a Stream optionally associated with given
util.isStream( obj ): boolean- this function determines whether the given argument is a Stream instance.
Stream instance has the followign methods:
stream.uri: string|null- set/get URI to associate it with the stream (
nullfor memory streams)
- set/get URI to associate it with the stream (
stream.stat(): { type: string, size?: number, uri?: string }- returns the
stats(type,sizeanduri) info associated with the stream
- returns the
stream.read( [encoding : string|null] ): string|Buffer- read stream content data (decode it based on given
encoding)
- read stream content data (decode it based on given
stream.write( data: string|Buffer [, encoding : string|null] ) : stream- write given data to the stream (encode it based on given
encoding) and return self
- write given data to the stream (encode it based on given
It is recommended to use the described Stream API for any repository related operations (reading or writing from/to an URI) and much more.
Here are some usage examples:
Copy local files:
var src = streams.stream('wd:/input.dat');
var dst = streams.stream('wd:/output.dat').write(src.read());
Cache some remote data to local file system:
var src = streams.stream('http://www.example.com/static/data.xml');
var dst = streams.stream('file:///tmp/data.xml').write(src.read());
Upload data to Blob Manager:
var blob = streams.stream('local:').write(data.dump('/data/svg'));
fragment.Uri = blob.uri;
Encode data as Data URI scheme:
var src = streams.stream('https://upload.wikimedia.org/wikipedia/commons/7/7f/Wikipedia-logo-en.png');
var encoder = streams.stream('data:').write(src.read());
image.Uri = blob.uri;
Read from standard input and write to standard output:
var stdin = streams.stream('stdin:');
var stdout = streams.stream('stdout:').write(stdin.read());
Note, that previous example uses sequential streams - you cannot read same data twice from standard input. However, it is possible to create a memory stream, “cache” data to it and use it many times:
var stdin = streams.stream('stdin:');
var stdout = streams.stream('stdout:');
var cache = streams.stream().write(stdin.read());
if (validate_data(cache)) {
  stdout.write(cache.read());
}
The stream.xml regression test demonstrates some of the available functionality.
Data Access
To full-fill some of the use cases it is necessary to provide access from script to currently loaded Data Instance as well as current Data Cursor.
Data Instance is typically a product of TDT Transformation and internally is
represented as an instance of the IDataSourceWrapper interface and the current Data Cursor is represented inside the
IFormattingContext interface.
The javascript/c++ binding is available as __binding.data.
XML Data Selection
There is a low level select method wrapped to the following public
method available:
data.dump( xpath: string ): string- evaluates given xpath relatively to the current data cursor and dumps the result
Given xpath can be either relative - it is then evaluated
relatively to current Data Cursor - or absolute - then even whole
data tree can be retrieved.
Resulting value is can be a number, boolean or a string containing various kinds of data:
- Whole Data Instance Tree … the full XML is serialized
- A nodeset … an artificial element
<tdt:root>is created as a common parent of all nodes - A single string value … it is simply stringized
For example with the following Data Instance:
<items>
  <item>1</item>
  <item>
    <subitem>2a</subitem>
    <subitem>2b</subitem>
  </item>
</items>
User gets the following results:
var data = require('data');
console.log(data.dump('/'));
// '<?xml version="1.0" encoding="UTF-8"?>
// <items><item>1</item><item><subitem>2a</subitem>\
//  <subitem>2b</subitem></item></items>'
console.log(data.dump('//subitem'));
// '<?xml version="1.0" encoding="UTF-8"?>
// <tdt:root xmlns:tdt="http://.../storyteller/transformation/tdt">\
//  <subitem>2a</subitem><subitem>2b</subitem></tdt:root>'
console.log(data.dump('string(//subitem[1])'));
// '2a'
console.log(data.dump('count(//subitem)'));
// 2
console.log(data.dump('position(//subitem[1])=1'));
// true
It is important to understand that right now there is no way to modify current Data Instance. All data access is read-only. The reason is that it is not a good idea to modify data during its enumeration - it is a special kind of Self-modifying code, or Mutating collection while enumeration which complicates the maintenance and is often considered as a bad practice. If there were requirements for modifying data from javascript then it would be reasonable to introduce a separate processing phase (like TDT) or possibly extend the TDT toolset to embed javascript routines.
On top of the raw data access functionality the data core module implements another layer for improved user convenience:
XML2JS Data Conversion
With help of the xml2js 3rd party library it is possible to convert the retrieved string data to a corresponding hierarchy of javascript objects if user explicitly asks for it.
data.xml2js( xml: string [, options : {...}] ): object- converts xml data to a corresponding hierarchy of Javascript objects
data.js( xpath: string [, options : {...}] ): object- shortcut method roughly corresponnding to the
data.xml2js(data.dump(xpath), options)call
- shortcut method roughly corresponnding to the
So it is possible to do the following:
console.log(util.inspect(data.js('/'), false, 10));
// { item: [ '1', { subitem: [ '2a', '2b' ] } ] }
console.log(data.js('//subitem'));
// {'xmlns:tdt':'http://.../storyteller/transformation/tdt', subitem:['2a','2b']}
console.log(data.js( 'string(//subitem[1])'));
// 2a
console.log(data.js('/').item[1].subitem[1]);
// 2b
console.log(data.js('//subitem').subitem[1]);
// 2b
That way it is really easy to traverse the retrieved data and utilize selected results in any way. Many options are available for fine tuning how the XML -> JS conversion is performed, for example:
console.log(data.js('//subitem', {explicitRoot: true, ignoreAttrs: true }));
// { 'tdt:root': { subitem: [ '2a', '2b' ] } }
For more details about the available options consult the xml2js library documentation.
XMLDOM Data Conversion
With help of the xmldom and xpath.js 3rd party libraries it is possible to convert the retrieved string data to a W3C compliant DOM and apply XPath based selections on it.
data.xml2dom( xml: string ): object- converts xml data to a corresponding DOM
data.dom( xpath: string ): object- shortcut method corresponding to the
data.xml2dom(data.dump(xpath))call
- shortcut method corresponding to the
So if user prefers the XPath based data access then he can do for example the following (DOM calls can be nested):
var items = data.dom('//item');
var subitems = items.dom('item/subitem');

console.log(items.dump('count(item)'));
// 2
console.log(subitems.length);
// 2
console.log(subitems[0].dump('string(.)'));
// 2a
console.log(subitems[1].dom('text()').node.data);
// 2b
The data.xml regression test demonstrates most of the available functionality.
Runtime Services
We are going to expose some services provided by our platform for usage from javascript.
Examples of such services could be:
- XML Preprocessing
- TDT transformation
- XSD validation
- XSLT transformation
- StoryTeller formatting
- …
The javascript/c++ binding for services is available as __binding.services and exposed via services javascript module.
XML Processor
Thanks to Javascript API it is now possible to call XML Processor in runtime directly from StoryTeller runtime script or a JSFilter implementation.
services.xp(): service- this function instantiates a XML Processor instance.
The service instance can be called (once or many times) with
following signature:
service( src: stream, dst: stream ) : stream- this method processes given
srcand produces processed XML to givendst srcis astreamcontaining an Input XML markup containing directives likexp:fixtureorxp:includedstis astreamto represent resulting XML output - product of XML processing- function also returns the given
dststream instance for convenience
- this method processes given
Following example demonstrates usage of the described API:
var streams = require('streams');
var services = require('services');

var src = streams.stream('wd:/include.xml');
var dst = streams.stream();
var xp = services.xp();
xp(src, dst);
The xp.xml regression test demonstrates the available functionality.
TDT
Thanks to Javascript API it is now possible to call TDT Transformation in runtime directly from StoryTeller runtime script or a JSFilter implementation.
services.tdt( template: stream, rules: stream [, mode: integral] ): service- this function creates a TDT processor instance for given
rulesandtemplate templateis astreamcontaining XML markup representing TDT templaterulesis astreamcontaining XML persistence of TDT rulesmodeis an optional parameter specifying TDT compilation modeserviceis ready to execute one or more TDT transformations each for givendataandparams
- this function creates a TDT processor instance for given
The service instance can be called (once or many times) with
following signature:
service( src: stream, dst: stream [, params: object] ) : stream- this method transforms given
srcandparams(according to processor’srulesandtemplate) srcis astreamcontaining XML markup representing XML input datadstis astreamto represent resulting XML output - product of TDT transformationparamsis an optionalobjectcontaining any number of variable names with corresponding (string|number|bool) values- function also returns the given
dststream instance for convenience
- this method transforms given
Following example demonstrates usage of the described API:
var streams = require('streams');
var data = require('data');
var services = require('services');
var item = require('layout').item();

// load SVG template and TDT rules
var template = streams.stream('wd:/clock.svg');
var rules = streams.stream('wd:/clock-tdt.xml');
// instantiate TDT processor
var tdt = services.tdt(template, rules);
// prepare data and params
var params = {time: new Date().toLocaleTimeString()};
var src = streams.stream().write(data.dump('/data/svg_related_data'));
var dst = streams.stream('local:');

// perform TDT transformation
tdt(src, dst);

// update fragment Uri with local: uri representing dynamically generated SVG markup
item.Uri = dst.uri;
The previous example demonstrates a possibility to use TDT in runtime to dynamically modify an SVG and use it as a dynamic fragment.
The tdtjs.xml regression test demonstrates the available functionality.
XSLT
We can also call XSLT Transformation in runtime directly from StoryTeller runtime script or a JSFilter implementation.
services.xslt( template: stream ): service- this function creates an XSLT processor instance for given
XSLT
template templateis astreamcontaining XML markup representing TDT templateserviceis ready to execute one or more XSLT transformations each for givendataandparams
- this function creates an XSLT processor instance for given
XSLT
The service instance can be called (once or many times) with
following signature:
service( src: stream, dst: stream [, params: object] )- this method transforms given
srcandparams(according to processor’s XSLTtemplate) srcis astreamcontaining XML markup representing XML input datadstis astreamto represent resulting XML output - product of TDT transformationparamsis an optionalobjectcontaining any number of variable names with corresponding (string|number|bool) values- function also returns the given
dststream instance for convenience
- this method transforms given
Following example demonstrates usage of the described API:
var assert = require('assert');
var streams = require('streams');
var services = require('services');

// instantiate XSLT processor with given template stream
var xslt = services.xslt(streams.stream('wd:/cdcatalog.xslt'));
var src = streams.stream('wd:/cdcatalog.xml');
var expected = streams.stream('wd:/cdcatalog.html');
var dst = streams.stream();
// perform XSLT transformation
xslt(src, dst);
The xslt.xml regression test demonstrates the available functionality.
XSD Validation
Thanks to Javascript API it is now possible to call XSD Validation in runtime directly from StoryTeller runtime script or a JSFilter implementation.
services.xsd( uri : string ): service- this function creates an XSD Validator instance for given
uri uriis an URI representing XSD schema for validation
- this function creates an XSD Validator instance for given
The service instance can be called (once or many times) with
following signature:
service( src: stream )- this method validates given
src srcis astreamcontaining a XML markup to be validated.
- this method validates given
Following example demonstrates usage of the described API:
var streams = require('streams');
var services = require('services');

var xsd = services.xsd('stinst:/js/docbuilder/xmlschema/stl.xsd');
var stl = streams.stream('wd:/stl.xml');
xsd(stl);
The xsd.xml regression test demonstrates the available functionality.
Processing Properties
The retrieval of the Processing Properties is realized via the IPropAccessor interface.
The javascript/c++ binding is available as __binding.process.
There is the following method available:
get( name: string ): string- get processing property with given
name
- get processing property with given
Language Lookup
The lookup is realized via the ILookupProvider interface.
The javascript/c++ binding is available as __binding.function.
There is the following method available:
translate( key: string, language: string ): string- use the configured Language Lookup Tables to translate given
keyto givenlanguage
- use the configured Language Lookup Tables to translate given
On top of the raw lookup functionality there is the i18n
core module implementing another layer for improved user convenience. Right now it does not do much,
it just makes the language argument optional - in such case a default language (retrieved via the
__binding.process.get('language') call) is used for lookup.
The translate.py regression test (along with translate.xml definition) demonstrates the available functionality.
Syntax Check
In order to provide an early feedback to users in design-time we decided to implement a syntax check service for javascript (and possibly for other scripts as well).
A new simple API was created to provide this functionality - a new method of the IViewDebug interface.
    class IViewDebug
    {
    public:
      virtual APIString CheckSyntax( ScriptSpec const& spec ) = 0;
      ...
    };
Client passes a reference to a ScriptSpec (it is not necessary to
upload it to ScriptManager, holding a instance as automatic stack
variable is enough), and gets a human readable error string (or
alternatively an empty string if no errors were found) back.
So far this functionality is available just for javascript, other
languages (Strs, Python and Ruby) throw an
ExceptionNotImplemented.
Newly it is possible to add an origin parameter to the ScriptSpec in
order to get better error location:
For example:
    ScriptSpec spec( "js", "return 42", "TEST" );
    std::cout << view.ViewDebug().CheckSyntax(spec) << std::endl;
    // TEST:1: SyntaxError: Illegal return statement
    // return 42
    // ^^^^^^
    // SyntaxError: Illegal return statement
There is also a new regression test pfdesigns/javascript/check~syntax~.py available testing this new functionality from python (pfdesigns/javascript/check~syntax~.py).
Runtime Scripts In StoryTeller
The possibilities to attach individual Runtime Scripts to StoryTeller objects have not changed in comparison to StreamServe Scripting.
It is possible to attach Before Scripts to individual Items and also After Scripts to some Layout Items.
Following python code snippet demonstrates such possibility:
text = factory.Text( 72, 72, 72, 72 )
text.setName( "My Text" );
script = text.Script( docapi.BEFORE );
script.setLanguage( "js" )
script.setScript( "console.log( 'Hello from javascript!' );" )
There is a potential to add more Scripting Events to the StoryTeller Formatting Process (Load-Time Scripts, Data Processing Scripts, Rendering Scripts, Post-Processing Scripts, …), but it is beyond the scope of this document.
Right now the individual script fragments can be uploaded to a
ScriptSpec or modified via the Script Proxy. Each script has a
Language tag specifying a Scripting Language the script is written
in (it may be strs, py, js, …).
The programmatic.py regression test demonstrates the possibility to attach a Script to a Layout Item programmatically via DocPlatform API.
It is possible to use the DocBuilder Declarative Syntax for script definitions as well. User can combine several scripting languages in a single Document.
<text pos='72,72' size='72,72' name="My Text">
  <script when="docapi.BEFORE" language="js">
    console.log( 'Hello from javascript!' );
  </script>
</text>
The multilang.xml regression test demonstrates how such a declarative definition can look like and how one can combine scripts in different languages to a single Document Design.
JSFilter framework
It is now possible to implement pipeline filters in javascript.
Original implementation [deprecated]
The original implementation used two ‘magic’ repository methods:
repo.loadInput() and repo.saveOutput(). Back then the filter code
could look as follows:
var repo = require('repo');
var input = repo.loadInput();
// make all image uris absolute
input.replace(/<img src="([^"]+)"\/>/gi, "<img src="http://www.example.com/$1");
repo.saveOutput(input);
Such approach is still supported due to backward compatibility, but it is now deprecated.
Module-based implementation
The new module-based implementation is more generic and has a potential to be much more efficient in some cases (especially in case when there are many invokes of a single filter instance).
The idea is to separate filter implementation to two different phases:
setup( cfg : object ) : invoke… filter initialization for given configuration (called only once and returns aninvokecallable)invoke( input: stream, output: stream )… invoke phase (can be called many times for a singlesetup)
With configuration and setup-invoke separation we can do a much better job implementing generic and reusable filters.
For example we can rewrite the previous replace-image-uris filter with the following general-purpose search-and-replace filter:
module.exports = function setup(cfg) {
  var search = new RegExp(cfg.search, cfg.options || 'g');
  var replace = cfg.replace;

  return function invoke(input, output) {
    output.write(input.read().replace(search, replace).toString());
  }
};
This approach also much better integrates with services API. The following example shows how to implement a polymorfic XML transformer in javascript. Such filter can perform either an XSLT Transformation or TDT Transformation based on user configuration:
var services = require('services');
var streams = require('streams');

module.exports = function setup(cfg) {
  var template = streams.stream(cfg.template);
  // instantiate transformer (template+rules => TDT, template => XSLT)
  var transformer = cfg.rules
    ? services.tdt(template, streams.stream(cfg.rules))
    : services.xslt(template);
  // transformer instance can directly act as an invoke function
  return transformer;
};
We believe that this approach gives JSFilters a potential to act
similarly as a Process. For example we can implement relatively
efficient STL2HTML conversion as a JSFilter. In setup phase it
performs a complete conversion from STL markup to HTML DOM and
invoke phase then just calls a TDT transformation to convert input
data, injects resulting data island to DOM and serializes the DOM to
output stream. It means that the actual conversion is performed only
once even though there can be thousands of invoke calls.
module.exports = function (config) {
  // perform complete STL -> cheerio DOM conversion
  var ctx = convert_design(config);
  var tdt;
  // conditionally instantiate TDT transformer
  if (ctx.data && ctx.data.rules && ctx.data.template)
    tdt = services.tdt(ctx.data.template, ctx.data.rules);

  function invoke(input, output) {
    // perform TDT if it was specified in the STL, otherwise inject the input data
    var data = tdt
      ? tdt(input, streams.stream())
      : input;
    inject_text(ctx.doc, "#stl-data", data.read());
    // dump cheerio DOM to HTML markup
    output.write(ctx.doc.html());
  }
  return invoke;
};
A full experimental implementation of such filter can be seen here: stl2html.js.
Use Cases
This section demonstrates various use case which can be fulfilled with help of the available infrastucture and 3rd party libraries.
3rd Party Libraries
Underscore
This section shows a possibility to integrate 3rd party general purpose library like underscore. Underscore library provides a set of Functional Programming Helpers and can simplify the javascript programming a lot. See this blog post for some examples how dramatically can such a library change the user code.
If user downloads the library source code locally, then he can require() it like this:
var _ = require('wd:/lib/underscore');
Thanks to the HTTP capabilities implemented in repository it is possible
to require() a remote library (e.g. the
underscore-min.js) directly
like this (not that is is considered a good practice for production):
var _ = require('http://underscorejs.org/underscore-min.js');
Full source code of this example is available here: underscore.xml
Localization
This usecase demonstrates possibility to use external libraries for proper data presentation and internationalization.
Let’s say we have the following XML data:
<people>
  <person>
    <name>Deron Eriksson</name>
    <allowance>$2,000.00</allowance>
    <birth>1972-01-20 09:32</birth>
    <eyes>blue</eyes>
    <locale>sv</locale>
  </person>
  ...
  <person>
    <name>Pierre Gautier</name>
    <allowance>$2,000.00</allowance>
    <birth>1933-05-22 22:37</birth>
    <eyes>black</eyes>
    <locale>fr</locale>
  </person>
  ...
</people>
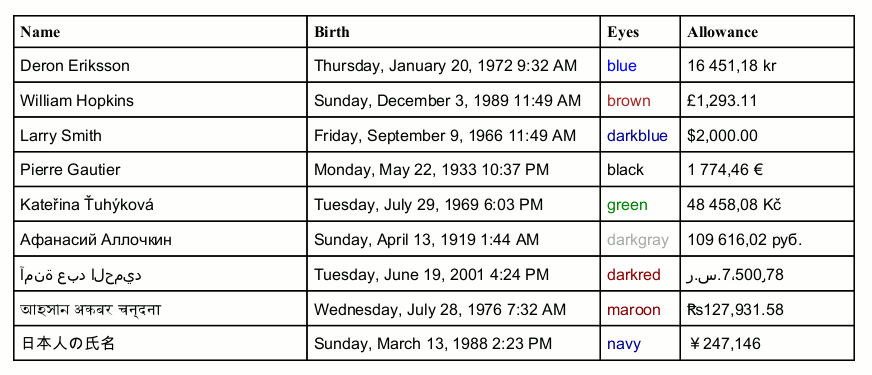
With help of various 3rd party libraries it is possible to write a very simple script to retrieve data corresponding to each person and create a corresponding presentation by localizing data based on person’s locale.
It is also possible to convert allowance represented initially in US Dollars to person’s currency. Currency conversion rates can be stored locally in a JSON file or can be retrieved in runtime from an on-line service like Open Exchange Rates.
Another 3rd party library is used for converting color names to corresponding RGB triplets.
As a result we get the following table:
The code attached to each Table Row looks roughly as follows; first we fetch person’s data:
// retrieve data corresponding to current person
var person = require('data').js('.').person;
console.log(person);
// { name: 'Deron Eriksson',
//  allowance: '$2,000.00',
//  birth: '1972-01-20 09:32',
//  eyes: 'blue',
//  locale: 'sv' }
The code transforming individual person’s data items looks as follows:
var vars = require('vars').all;
// format birth date for person's locale
var locales = require('./locales');
vars.birth = locales.reformat_date(
  person.birth, person.locale, 'YYYY-MM-DD HH:mm', 'LLLL');
// convert dollar allowance to person's currency
// and format it based on person's locale
vars.allowance = locales.reformat_money(
  person.allowance, person.locale);
// convert color name to RGB
var color = require('onecolor');
vars.color = color(person.eyes).css();
Library function reformat_date() implementation is roughly the following:
var moment = require('moment');

exports.reformat_date = function (value, locale, from, to) {
  var m = moment(value, from);
  m.locale(locale);
  return m.format(to);
};
And here is remaining reformat_money() library function implementation:
var money = require('money');
var accounting = require('accounting');
...
exports.reformat_money = function (value, locale, from) {
  from = from || "USD";
  var currency = currencies[locale];
  value = accounting.unformat(value);
  value = money.convert(value, {from: from, to: currency.code});
  var options = { symbol: currency.symbol_native, ... };
  return accounting.formatMoney(value, options);
};
The full regression test is available in the following files:
- locales.xml
- main document definition
- locales.js
- user module containing some helper services
- currencies.json
- JSON file containing locale information (based on the currencymap.json on-line map)
- rates.json
- JSON file containing cached currency conversion rates
The following 3rd party libraries are used:
- Date Manipulation … moment.js
- Color Manipulation … onecolor.js
- Currency conversions and formatting … money.js + accounting.js
And here is the Resulting PDF.
CSV parsing
Imagine that we get input data in o form of CSV file.
The content of the file can look as follows (full example data available here):
"first_name","last_name","company_name","address","city","county","state","zip"...
"James","Butt","Benton, John B Jr","6649 N Blue Gum St","New Orleans","Orleans"...
"Josephine","Darakjy","Chanay, Jeffrey A Esq","4 B Blue Ridge Blvd","Brighton",...
"Art","Venere","Chemel, James L Cpa","8 W Cerritos Ave #54","Bridgeport","Glouc...
"Lenna","Paprocki","Feltz Printing Service","639 Main St","Anchorage","Anchorag...
"Donette","Foller","Printing Dimensions","34 Center St","Hamilton","Butler","OH...
"Simona","Morasca","Chapman, Ross E Esq","3 Mcauley Dr","Ashland","Ashland","OH...
...
And we want to present given data as follows:
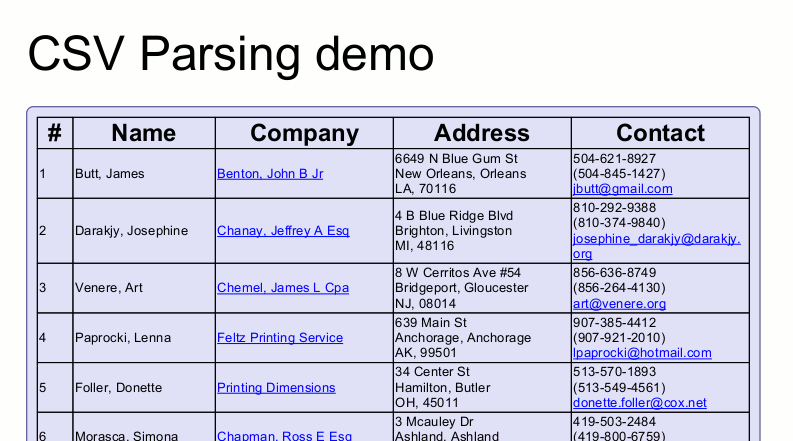
Thanks to a 3rd party library called papaparse.js implementing CSV Parser & Writer it is really easy to handle such data:
var repo = require('repo');
var Papa = require('babyparse');
addresses = Papa.parse('wd:/addresses.csv', {header: true }).data;
The result of the Papa.parse() call is a hierarchy of javascript objects.
For example we can inspect it as follows:
console.log(addresses.slice(0, 2));
// [ { first_name: 'James',
//     last_name: 'Butt',
//     company_name: 'Benton, John B Jr',
//     address: '6649 N Blue Gum St',
//     city: 'New Orleans',
//     county: 'Orleans',
//     state: 'LA',
//     zip: '70116',
//     phone1: '504-621-8927',
//     phone2: '504-845-1427',
//     email: 'jbutt@gmail.com',
//     web: 'http://www.bentonjohnbjr.com' },
//   { first_name: 'Josephine',
//     last_name: 'Darakjy',
//     company_name: 'Chanay, Jeffrey A Esq',
//     address: '4 B Blue Ridge Blvd',
//     city: 'Brighton',
//     county: 'Livingston',
//     state: 'MI',
//     zip: '48116',
//     phone1: '810-292-9388',
//     phone2: '810-374-9840',
//     email: 'josephine_darakjy@darakjy.org',
//     web: 'http://www.chanayjeffreyaesq.com' } ]
Let’s say we want to format data in a form of a table. The easiest way to do it is to create a HTML and feed it to a Repository Substitution.
As a first step we create the HTML markup. For that purpose we can utilize a Template Engine like Markup.js.
So we create the following HTML template: addresses.html
<html>
  ...
  <body>
    <table border="1">
      <tr>...</tr>

      <tr>
        <td></td>
        <td>, </td>
        <td><a href=""></a></td>
        <td><br/>, <br/>, </td>
        <td>
          <br/>
          ()<br/>
          <a href="mailto:"></a>
        </td>
      </tr>

    </table>
  </body>
</html>
Now we feed the template and address data to the template engine and retrieve the resuting HTML markup (we use the U+FEFF BOM prefix to make sure the internal HTML driver interprets the content properly as Unicode input):
var Mark = require('markup-js');
var template = repo.load('wd:/addresses.html');
var html = '\ufeff' + Mark.up(template, {addresses: addresses.data});
Then we upload the markup to Blob Manager and set the resulting (hash based) URI to the Repository Substitution:
var subst = require('layout').item();
subst.Uri = repo.upload(html);
Full source code of this example is available here: addresses.xml
And here is the Resulting PDF.
Web Scraping
In the Javascript Extending documentation there were several examples when HTML Content Fragments were generated externally and then processed by the StoryTeller Formatter. This example demonstrates that thanks to the Javascript Embedding it is really easy to generate HTML Content Fragment from inside the Formatter itself.
Here we demonstrate a simple web scraping example - generating a PDF Document by mining several comics and articles from the XKCD web-comic site and associated What-if blog.
Let’s say we have the following data representing a simple configuration specific for each user:
<client>
  <settings>
    <comics>
      <current>1200</current>
      <count>7</count>
    </comics>
    <articles>
      <count>3</count>
    </articles>
  </settings>
</client>
In the XML structure above each user can specify how many recent comics and how many articles he wants to include to the generated output document:
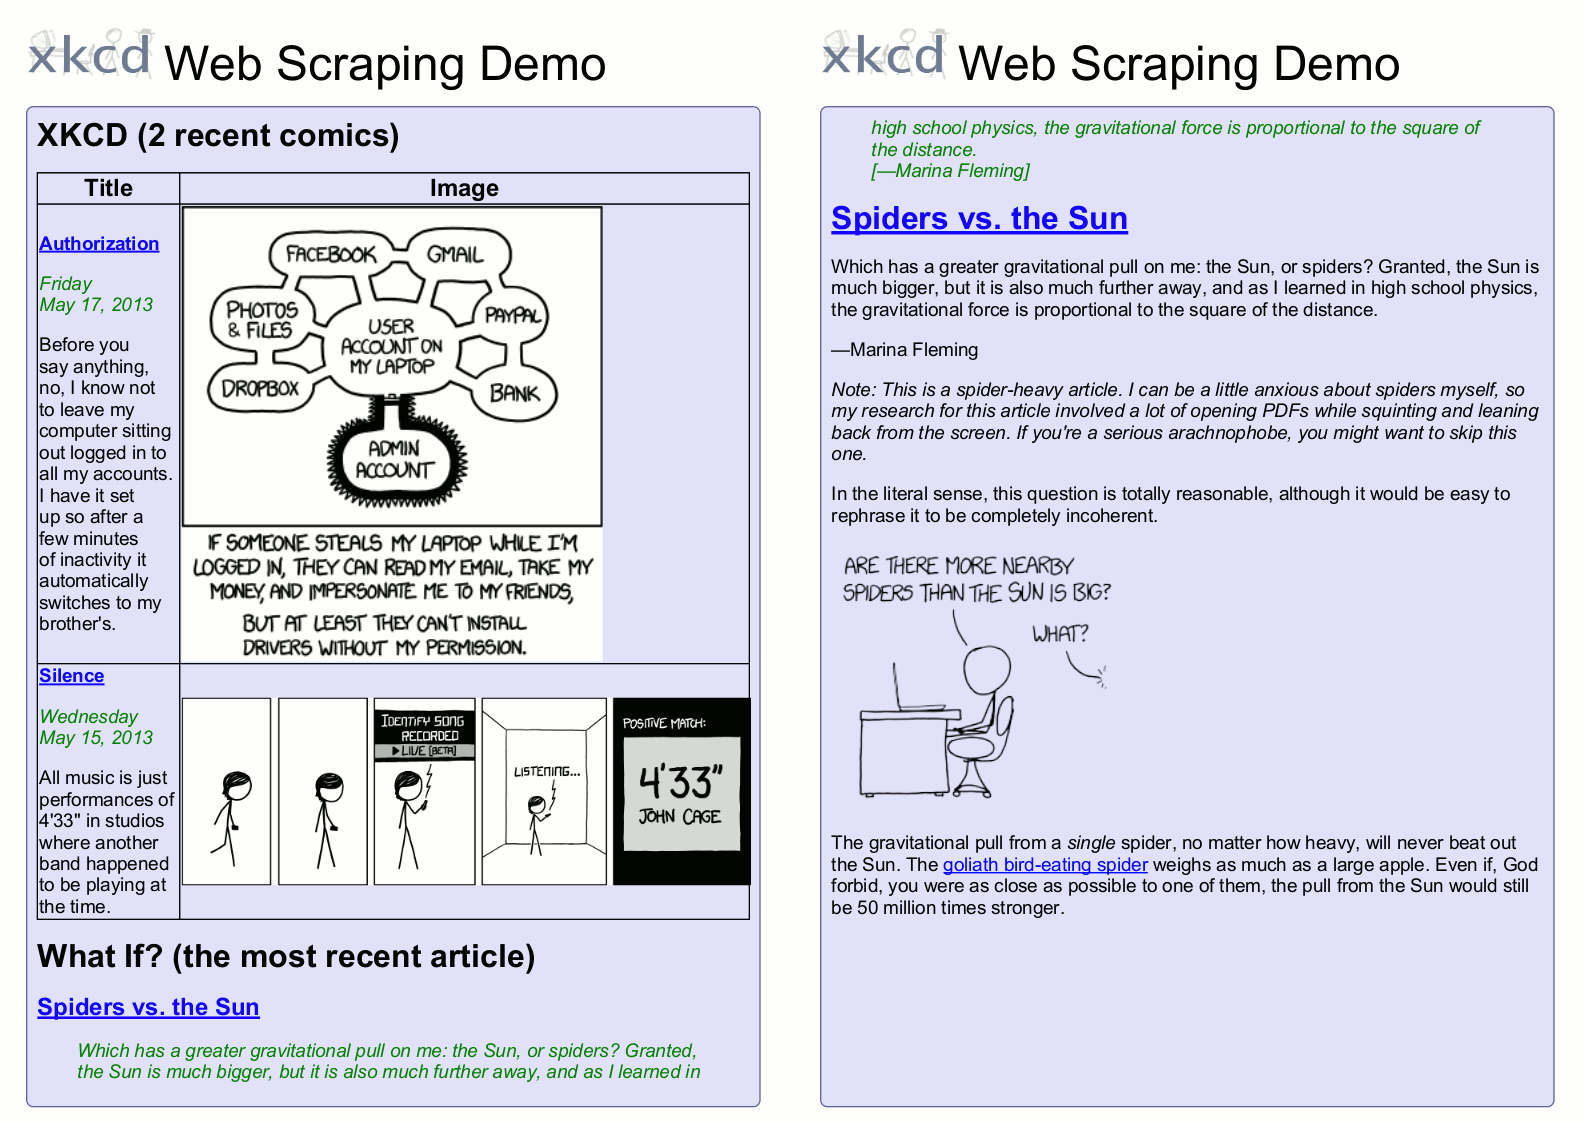
The top level script on a Substitution object calls the
scraping.xkcd( settings : {...} ) : string helper function, uploads
the resulting HTML to the Blob Manager and sets the resulting local
URL to the Substitution:
var settings = data.js('//settings/*');
var html = scraping.xkcd({ /* settings */ });
subst.Uri = repo.upload(html);
In the scraping.js
helper module there is a xkcd( settings ) : string method generating a
HTML fragment configured by given settings.
This module internally utilizes the XKCD JSON Feed and downloads an appropriate number of comic strips. Then it downloads an appropriate number of articles and and does some post-processing to each of them (it is necessary to absolutize all relative URLs and also remove some helper scripts for tooltips). Either a xmldom / xpath.js or cheerio / css-select 3rd party libraries are used for HTML post-processing.
A single resulting HTML is then generated with help of the Markup.js Template Engine.
The following HTML Template is used for that purpose: xkcd.html
Full source code of this example is available here: xkcd.xml + scraping.js
And here is the Resulting PDF.
On-line Services
Thanks to DocPlatform Repository we have an access to HTTP/FTP streams available. One possibility how to utilize that is to integrate with external On-line Services accessible over HTTP.
yUML diagrams
There exists a great on-line service for an easy creation of nice looking diagrams - the yUML.me on-line service.
Let’s say we have the following XML data representing a Book Catalog:
<catalog>
  <book id="bk102">
    <author>Ralls, Kim</author>
    <title>Midnight Rain</title>
    <genre>Fantasy</genre>
    <price>5.95</price>
    <publish_date>2000-12-16</publish_date>
    <description>
      A former architect battles corporate zombies, an evil sorceress,
      and her own childhood to become queen of the world.
    </description>
  </book>
  <book id="bk103">
    <author>Corets, Eva</author>
    <title>Maeve Ascendant</title>
    <genre>Fantasy</genre>
    <price>5.95</price>
    <publish_date>2000-11-17</publish_date>
    <description>
      After the collapse of a nanotechnology society in England, the young
      survivors lay the foundation for a new society.
    </description>
  </book>
  ...
</catalog>
Let’s say we want to create a nice looking diagram showing a relation between Genres, individual Books and their Authors:

First we must create to create a yUML markup from the Catalog Data. So we make a simple XPath query to get data in a form of javascript objects:
// retrieve all books and modify book author names
var books = data.js('/catalog/book').book;
books.forEach(function (book) {
  book.author = book.author.split(', ').reverse().join(' ');
});
We can inspect the retrieved (and slightly transformed) javascript objects and get the following listing:
console.log( books );
// [ { id: 'bk102',
//     author: 'Kim Ralls',
//     title: 'Midnight Rain',
//     genre: 'Fantasy',
//     price: '5.95',
//     publish_date: '2000-12-16',
//     description: 'A former architect battles corporate zombies, ...' },
//   { id: 'bk101',
//     author: 'Eva Corets',
//     title: 'Oberon\'s Legacy',
//     genre: 'Fantasy',
//     price: '5.95',
//     publish_date: '2001-09-10',
//     description: 'In post-apocalypse England, the mysterious agent ...' },
//   ...
// ]
Now we need to create a yUML markup corresponding to our data.
To avoid laborious and error-prone text manipulation we can utilize a great Template Engine - Markup.js.
It has support repeating, substitutions and all the great stuff, so we can just let it process the array of javascript objects directly:
// use markup template processor to create yUML markup
var template = '[] - (), '
             + '()<(),\n';
var yuml = Mark.up(template, {books: books });
We can inspect the result and see that the yUML markup was created as expected:
console.log( yuml );
// [Kim Ralls] - (Midnight Rain), (Midnight Rain)<(Fantasy),
// [Eva Corets] - (Oberon's Legacy), (Oberon's Legacy)<(Fantasy),
// ...
// [Matthew Gambardella] - (XML Dev's Guide), (XML Dev's Guide)<(Computer),
Let’s now send the created markup to the on-line service. To encapsuate on-line service URI creation we have created a separate javascript module - services.js.
There is a diagram() method accepting yuml and options arguments.
It’s implementation is relatively simple and looks roughly like this:
// Simple UML diagrams on-line (see http://yuml.me/)
exports.diagram = function (yuml, options) {
  options = options || {};
  var type = options.type || "usecase";
  var scale = options.scale || 100;
  var style = options.style || "plain";
  var baseuri = "http://yuml.me/diagram/";
  var uri = baseuri + style + ";scale:" + scale + "/" + type + "/" + yuml;
  return uri;
};
So it is clear that the diagram() method just constructs an URI
based on given markup and options and that’s it. When some other
client code fetches data from such URI then it gets an image like this
On-line Diagram.
So the remaining code is really simple - we just set the URI to the current Image Item and let the Document Formatter to fetch the corresponding diagram image for us:
// use on-line service to rasterize the diagram
image.Uri = services.diagram(yuml, {type:'usecase', style:'scruffy', scale:200});
The whole implementation is visible here: diagram.xml
Here is the Resulting PDF.
LaTeX Formulas
Another example quite similar to the one above is using On-line Service for editing and rendering LaTeX based Formulas & Equations:
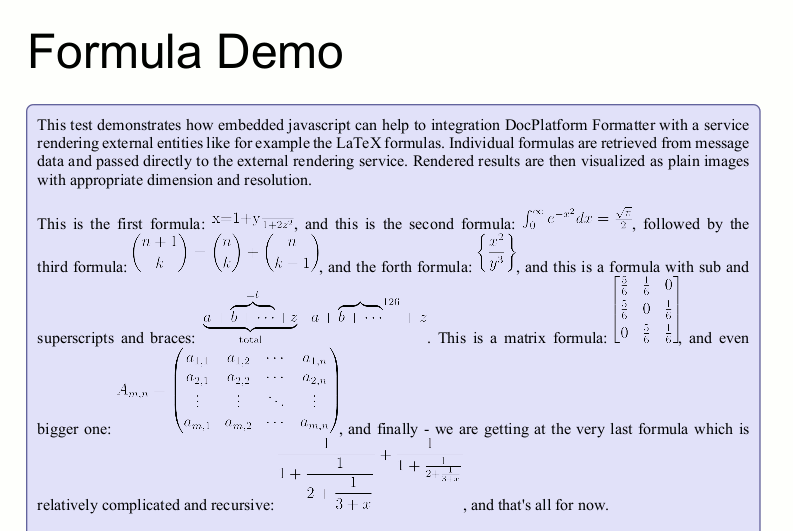
Let’s say we need to create a paragraph of text containing some inline formulas. For that purpose we can prepare following simple data structure with interleaving text and formula fragments:
<fragments>
  <text>This is the first formula: </text>
  <formula>$x=\frac{1+y}{1+2z^2}$</formula>
  <text>, and this is the second formula: </text>
  <formula>$\int_0^\infty e^{-x^2} dx=\frac{\sqrt{\pi}}{2}$</formula>
  <text>, followed by the third formula: </text>
  <formula>$${n+1\choose k} = {n\choose k} + {n \choose k-1}$$</formula>
  ...
</fragments>
The we create a repeater iterating over all the fragments above and a switch handling text fragments via substitution and equation fragments via an inline image.
The image contains relatively simple runtime script.
From current data cursor it retrieves the LaTeX markup representing
current equation and passes it the services.formula() helper function
to retrieve a corresponding URL.
var dpi = 300;
var formula = data.dump('string(.)');
var uri = services.formula(formula, {dpi: dpi, format: 'png'});
The resulting URL represents a PNG image with the equation rasterized in requested DPI.
For example the following equation markup:
$$
\frac{1}{\displaystyle 1+
\frac{1}{\displaystyle 2+
\frac{1}{\displaystyle 3+x}}} +
\frac{1}{1+\frac{1}{2+\frac{1}{3+x}}}
$$
… leads to the following rasterized image.
However unlike in the previous example, in this case our job is not as simple as just the resulting URL to the formatter; we must determine the dimensions of the PNG image first and update the current layout item to corresponding layout size.
So we fetch the PNG binary data right in the script and parse it with help of the png.js 3rd party library:
var data = repo.load(uri, null);
var header = png.PNG(data);
image.Uri = uri;
image.Box.W = header.width*72/dpi;
image.Box.H = header.height*72/dpi;
One may wonder if the HTTP based uri representing the rasterized
equation is retrieved twice (once in script to compute the image
dimensions and once again in the output driver). This duplication is
avoided in repository though - the repository is typically configured
to cash the remote streams in an adapter called sync repository.
If user wants to be sure to use the local stream instead of the
remote one, then he can always do the caching on his own - upload the
data to blob manager and use the local: (hash based) URI instead:
image.Uri = repo.upload(data, null);
The last piece to the puzzle is the services.formula( latex, options )
helper function.
It is implemented in the services.js helper module and it’s code looks as follows:
// LaTeX formulas (see http://latex.codecogs.com/)
exports.formula = function (latex, options) {
  var qs = require('querystring');
  function normalize (s){
    return s.replace( /^\s+|\s+$/g, '' ).replace(/\s+/g, ' ');
  }

  options = options || {};
  var format = options.format || 'png';
  var baseurl = 'http://latex.codecogs.com/';
  var query = '';
  if (options.dpi)
    query += '\\dpi{' + options.dpi + '} ';
  if (options.background)
    query += '\\bg_' + options.background + ' ';
  if (options.inline)
    query += '\\inline ';
  query += normalize(latex);
  return baseurl + format + '.latex?' + qs.escape( query );
};
The whole test implementation is available here: formulas.xml.
Here is the Resulting PDF.
Google Charts
This example is quite similar to the two examples above, except that it uses a different on-line service - the Google Image Charts.
Imagine that we are not satisfied with the functionality provided by native StoryTeller charts. This example demonstrates that with a reasonable effort it is possible to integrate with an alternative charting service providing the following chart design:
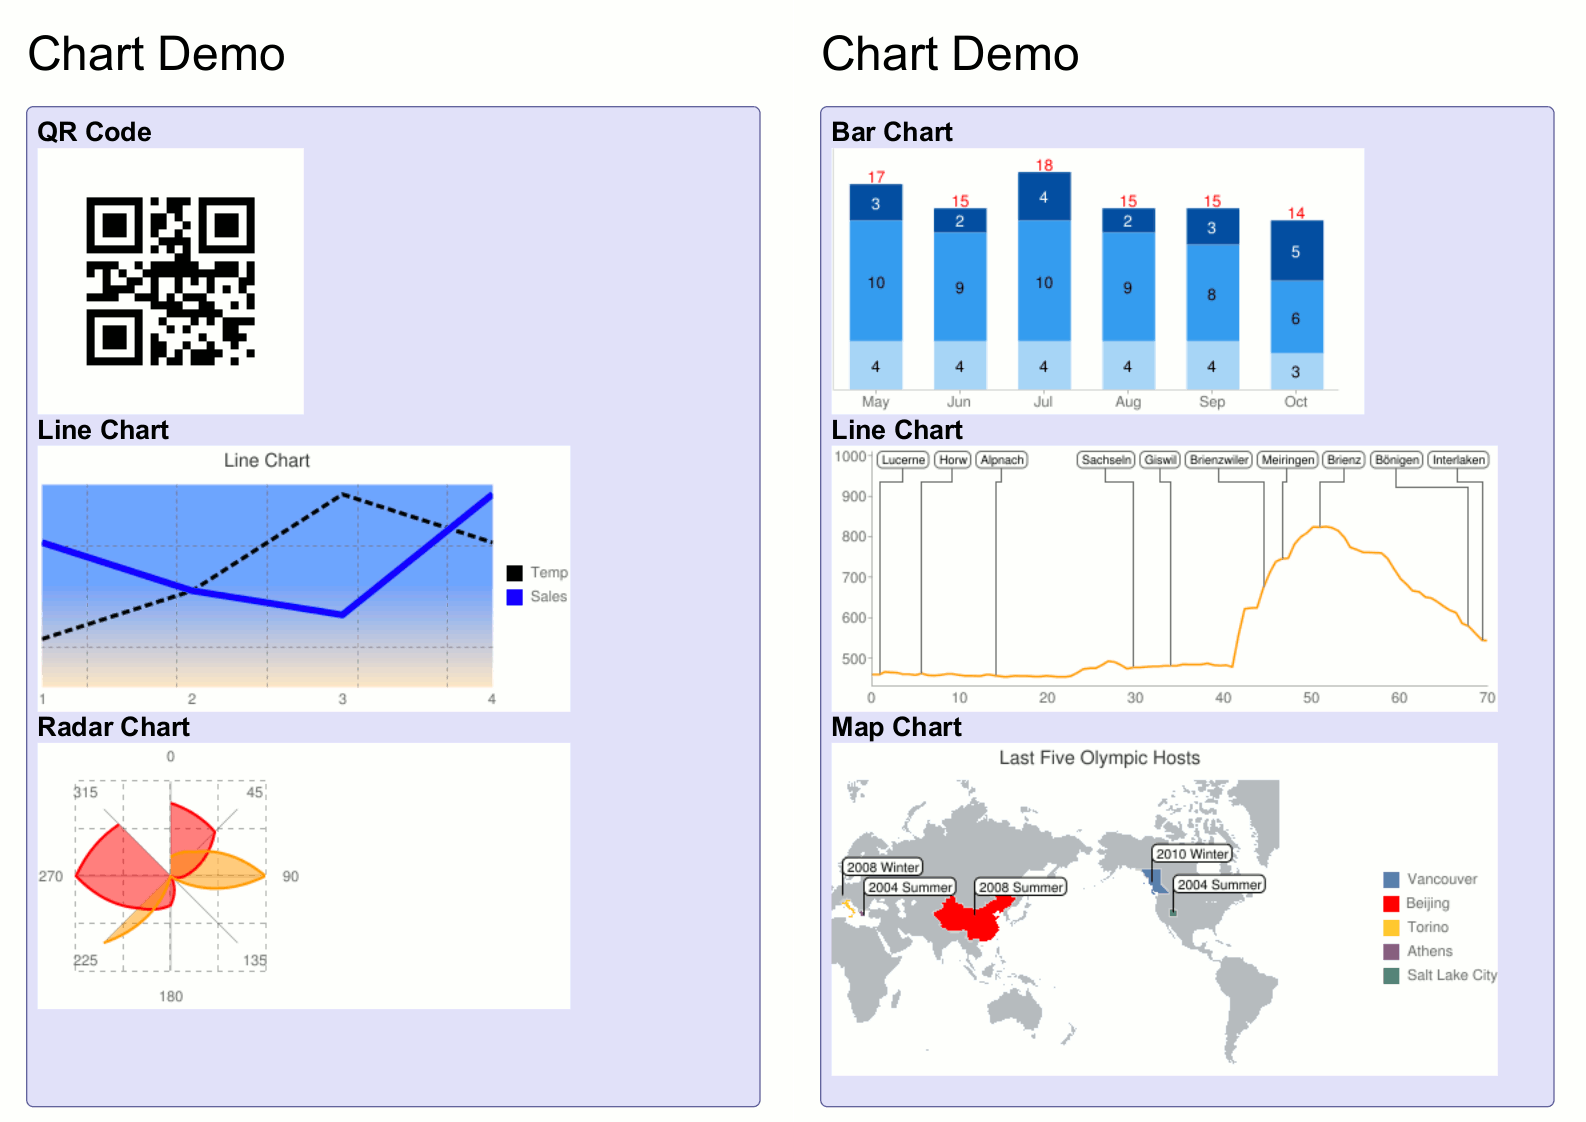
The heart of such integration is the services.chart( data ): string
helper function responsible for constructing an URI for given data
structure describing a chart.
var chart_types = {
    map: 'map',
    qr: 'qr',
    pie: 'p',
    ...
};
var chart_handlers = {
    output_format: {key: 'chof'},
    title: {key: 'chtt'},
    title_style: {key: 'chts'},
    type: {key: 'cht', fn: function (t) {
        return chart_types[t] || t;
    }},
    dimension: {key: 'chs'},
   ...
};
var url = require('url');

exports.chart = function (options) {
    var query = {};
    Object.keys(options).forEach(function (key) {
        var rec = chart_handlers[key];
        if (!rec) throw new Error('Unknown key: ' + key);
        var val = options[key];
        if (rec.fn) val = rec.fn(val);
        query[rec.key] = val;
    });
    return url.format({
        protocol: 'http',
        host: 'chart.googleapis.com',
        pathname: 'chart',
        query: query
    });
};
The full services.chart( data ) function is implemented in
services.js.
With such a function we have a flexible way to represent chart definition and we can hold such chart representations in a persistent way in XML form:
<charts>
  <chart label="QR Code">
    <type>qr</type>
    <dimension>200x200</dimension>
    <qrdata>Hello World</qrdata>
  </chart>
  ...
</charts>
It is obvious that data structure varies considerable for various chart types. Let’s look at data structure for a Line Chart:
<chart label="Line Chart">
  <title>Line Chart</title>
  <type>sparkline</type>
  <dimension>400x200</dimension>
  <label>1</label>
  <label>2</label>
  <label>3</label>
  <label>4</label>
  <solid_fill>bg,s,e0eded</solid_fill>
  <data_scale>a</data_scale>
  <grid>20,50,3,3,10,20</grid>
  <fill>c,lg,90,FFE7C6,0,76A4FB,0.5</fill>
  <series_label>Temp</series_label>
  <series_color>000000</series_color>
  <series_data>10,20,40,30</series_data>
  <series_line>3,6,3</series_line>
  <series_label>Sales</series_label>
  <series_color>0000FF</series_color>
  <series_data>30,20,15,40</series_data>
  <series_line>5</series_line>
</chart>
We can then iterate over such chart definitions via repeater and convert individual chart representations to a corresponding image URI like this:
var chart = data.js('.', {ignoreAttrs : true}).chart;
image.Uri = services.chart(chart);
For given URI we get image which looks like the following Image Chart.
The whole implementation is visible here: chart.xml
Here is the Resulting PDF.
Country Maps
This example is a variation of the previous one - it uses the Google Image Charts service to generate thumbnails for all world countries:
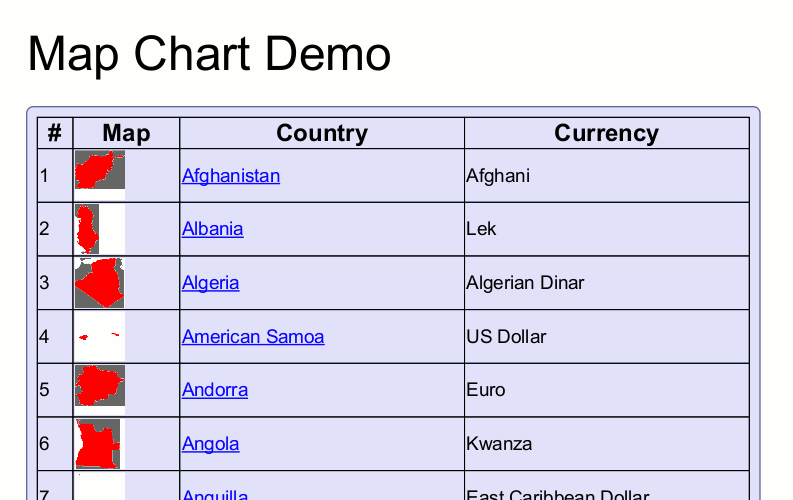
Initially we download and parse a JSON file containing all countries in the world:
countries.json (downloaded from this address)
var countries = JSON.parse(repo.load("wd:/countries.json"));
Then for each country we create a URL representing a thumbnail of the
country map (we use the chart() helper function from the
services.js
module for that purpose so that each country is associated with a single
map thumbnail like this
one)
and also add a link to Wikipedia article corresponding to the country:
var countries = JSON.parse(repo.load("wd:/countries.json"));

countries.forEach(function (country) {
  var code = country['ISO3166-1-Alpha-2'];
  country.map = services.chart({
    type: 'map',
    dimension: '200x200',
    series_color: '676767|FF0000|0000BB',
    region: code
  });
  country.info = 'http://en.wikipedia.org/wiki/ISO_3166-2:' + code;
});
Then we use the Markup.js Template Engine once again to create the resulting HTML table:
var template = repo.load("wd:/countries.html");
var html = '\ufeff' + Mark.up(template, {countries : countries});
We use the following HTML template for that purpose:
<html>
  ...
  <body>
    <table border="1">
      <tr>...</tr>

      <tr>
        <td></td>
        <td>
          <img src="" aligh="middle" height="50" width="50"/>
        </td>
        <td>
          <a href=""></a>
        </td>
        <td></td>
      </tr>

    </table>
  </body>
</html>
The resulting HTML is then uploaded to Blob Manager and local (hash based) URL is set to the Substitution Item:
subst.Uri = repo.upload(html);
The whole implementation is visible here: countries.xml
Here is the Resulting PDF.
HTML Post-Processing
In this section we demonstrate the possibility to post-process the HTML generated by StoryTeller HTML Driver. Right now it is not possible to associate a server-side script with the post-processing event, but it could be implemented with a reasonable effort if we find this concept worth the trouble.
Original HTML
Let’s say we have the followign XML data:
If we want to generate an HTML table presenting the data above, we can prepare a StoryTeller Design like this one:
Such design and data results in this HTML Document.
Current Post-Processing
But what if such static HTML is not something user needs?
Currently it is possible to inject some additional code to the resulting HTML and let client (typically a Web Browser) to make some post-processing.
For example the following code - html-table-post.js
- injects a TinySort Javascript Library and makes the HTML table sortable:
The result can be seen in this HTML Document.
Static Post-Processing in Javascript
But there are cases when a client side scripting is not possible (HTML e-mails, NoScript Browser Extensions, …).
With help of javascript and 3rd party libraries like cheerio it would be possible to post-process the resulting HTML right on server before it gets distributed to end users.
We could transform the StoryTeller generated markup while still access the Data Instance and so ooerate on actual source data instead of just on its presentation.
This particular Post-Processing Script namely does the following transformations:
(1) Change the label on the top of the page
var label = $('body > div > div > span').first();
label.text('Static Postprocessing of ' + label.text());
(2) Change the with settings to percentage to make the table layout responsive
$('table').each(function () {
  $(this).css('width', '100%');
});
(3) Change the cell background color (create a “zebra” effect for the table)
$('tr').filter(i => i%2).children('td').each(function () {
  $(this).css('background-color', 'white');
});
(4) Fetch data and prepare aligned columns of currency items
var accounting = require('accounting');
var items = data.js('/data/message/details/item').item;
// format currencies to columns
var amounts = accounting.formatColumn(items.map(i => +(i.amount)), options);
var balances = accounting.formatColumn(items.map(i => +(i.balance)), options);
(5) Iterate over all table body rows:
var bodyrows = $('table tr').filter(i => i!==0);
assert.equal(items.length, bodyrows.length);
// update all table body rows
bodyrows.each(function (row_index) {
  var cells = $(this).children('td');
  ...
});
(6) Modify each row:
(6.1) Completely replace & re-format the dates in each row
 var booking = cells.first().find('div span');
 var date = cells.eq(1).find('div span');

var bm = moment(items[row_index]['dt-booking'], "YYYY-MM-DD");
booking.text(bm.format('L'));
var cm = moment(items[row_index]['dt-currency'], "YYYY-MM-DD");
var diff = cm.diff(bm, 'days');
diff = diff ? (diff === 1 ? 'a day later' : diff + ' days later') : 'same day';
date.text(cm.format('dddd') + ' (' + diff + ')');
(6.2) Add hyperlinks to Receiver texts (use
html-table-lookup.json table for that purpose)
function make_link(link, label) { return '<a href="'+link+'">'+label+'</a>'; }
...
var link = cells.eq(3).find('div span');
if (link.text() in lookup.urls) {
  var markup = '<a class="' + link.attr( 'class' ) + '" href="'
               + lookup.urls[link.text()] + '">' + link.text() + '</a>';
  link.contents().replaceWith(make_link(lookup.urls[link.text()], link.text()));
  link.contents().addClass(link.attr('class')).css('color', 'blue');
}
(6.3) Change the text color - makes the negative balances red
var balance = cells.last().find('div span');
if (+(items[row_index].balance) < 0)
  balance.css('color', 'red');
(6.4) Completely re-format currency items
function make_pre(str) { return '<pre style="margin:0px;">' + str + '</pre>'; }
...
var amount = cells.eq(4).find('div span');
amount.contents().replaceWith(make_pre(amounts[row_index]));
balance.contents().replaceWith(make_pre(balances[row_index]));
The full implemetation of the Static Post-Processing example is available here:
The result can be seen in this HTML Document.
Dynamic Post-Processing in Javascript
To fully evaluate the power of the server-side HTML Post-Processing we demonstrate a completely different approach in this example.
With help of javascript is possible to inject Data Island in any form (be it XML, JSON or a hierarchy of JS objects) and then create a javascript working directly with data instead of just modifying the presentation.
In the sorting example above it was apparent that even though the TinySort tries to be clever (contains a heuristics to determine a type of individual columns) there still are the cases when it sorts a numeric column alphanumerically (e.g. the right-most column due to its hyphen character used for negative values).
On the other hand - if we use the original data instead of its
presentation then there is no such risk at all. All data can be sorted
and filtered before they get formatted for presentation. So it is even
possible to format dates correctly even though they get presented in the
Sun 06/02/2013 form.
For Dynamic Data Grid we are using the jqGrid jQuery Plugin, because it seems flexible enough for future enhancements of the Smart Grid concept, but there are lots of other possibilities available.
First we create jqGrid options:
var options = {
  height: 'auto',
  autowidth: true,
  shrinkToFit: true,
  sortable: true,
  rownumbers: true,
  colNames: ['Booking Date', 'Currency Date', 'Verification', 'Text/Receiver'...],
  colModel: [
    {name:'dt-booking',index:'dt-booking', sorttype:'date', formatter:'date',
      formatoptions: { srcformat:'Y-m-d', newformat:'D m/d/Y' } },
    {name:'dt-currency',index:'dt-currency', sorttype:'date', formatter:'date',
      formatoptions: { srcformat:'Y-m-d', newformat:'D m/d/Y' } },
    {name:'verification',index:'verification', sorttype:'int',
      summaryType:'count', summaryTpl:'{0} item(s)'},
    ...
  ],
  multiselect: false,
  grouping: false,
  caption: "Feed dynamic grid from embedded data island",
};
Then we are ready fetch data and inject grid to the HTML document skeleton:
var data = require('data');
var pp = require('./postprocessor');
// load HTML markup to postprocessor
var doc = pp.document(html);
// modify label
var label = doc.find('body > div > div > span').first();
label.text( 'Dynamic Postprocessing of ' + label.text() );
// fetch data and inject jqGrig-based presentation
var items = data.js('/data/message/details/item').item;
doc.table( 'table', 'main-grid', options, items );
// save resulting HTML markup
html = doc.save();
The full implementation of the Dynamic Post-Processing example is available here:
html-table-post-dynamic.xml + postprocessor.js
Two possible variants of resulting documents can be reached here: Sorting, Grouping
3rd Party Libraries
In core modules as well as in use cases demonstrated above several 3rd party libraries were used. Most of them have MIT license and so any kind usage should probably be ok (credits should always be given to the authors). Still the legal department should look at this list and consider if this kind or usage is ok from legal perspective. The same measures should be taken as in case of C/C++ libraries.
Libraries used in core modules
- Node.js Core Modules: console, util, path, punycode, url, querystring, assert, stream …
- Node.js-like Buffer implementation … buffer + base64-js + ieee754
- DOMParser, XMLSerializer (W3C XML DOM Level2 CORE) … xmldom
- XPath Expression Engine … xpath.js
- SAX style parser for XML and HTML … sax-js
- XML to Javascript Converter … xml2js
Libraries used in use cases presented in this section
- Template Engine … Markup.js
- Functional Programmming Helpers … underscode
- Date Manipulation … moment.js
- Color Manipulation … onecolor.js
- CSV Parser/Writer … papaparse.js
- Currency conversions and formatting … money.js + accounting.js
- PNG header parsing … png.js
- Server-side HTML DOM manipulation (jQuery-like interface) … cheerio with dependencies (htmlparser2, entities, domelementtype, domutils, dom-serializer, domhandler, css-select, css-what, nth-check, boolbase, lodash)
- …
Embedding Summary
Great Power is potentially available
The following areas were covered in this section:
- Modern Javascript language support
- CommonJS Modules
- Strict Mode
- ES6 Harmony
- JSLint
- Access to current Formatting State
- Layout (Items, Cursor, …)
- Variables (StreamServe, Shared)
- Access to Local File System and HTTP
- Really modular scripting approach (CommonJS)
- Access any helper data (Lookup, Translation, Conversion tables, …)
- Integrate with On-line Services (Charts, Formulas, Diagrams, …)
- Data Instance Access
- Utilize current Data Cursor
- Reading Data in various formats (XML Text, XML DOM, JS Objects, …)
- Output Post Processing
- Convenient creation of Data Island
- Convenient HTML Post-Processing
- Utilize 3rd Party libraries
- Various data formats supported (XML/XPath, HTML/CSS, JSON, CSV, PNG, …)
- Convenience libraries (Colors, Currencies, Dates, …)
- Templating (Produce content fragments in Text, HTML, yUML, … )
- …
With great power comes great responsibility – Uncle Ben (Spider Man)
… Do we really want to give such a great power to our users?
Open Questions
- 3rd party libraries - how to handle it?
- a) Let users handle it themselves
- b) Port and distribute a fixed set of libraries
- c) Provide a packaging system like npm
- Design Time
- Console
- Intellisense
- Running Runtime Scripts in Design Time
- …
- Data Modification Phase
- Separate pre-processing phase (read/write access to the data instance
- Output Post-Processing Phase
- Separate phase (access to the output stream)
- Performance Tuning
- Script pre-compilation
- v8 binary snapshots
- Broader Module Caching
- …