Table of Contents
StoryTeller Javascript Extending
This Section describes the motivation and technology behind the DocPlatform Extending by Javascript. It is the first part of the Javascript Documentation.
First we describe the environment used for DocPlatform extending, and list use cases how can such integration be exploited.
We will also discuss general conventions how to define the Javascript APIs and describe the resulting exposed API based on a convention we picked.
We will conclude this section with some example implementations of the API and proposals how to deploy and integrate them in real world scenarios.
Environment
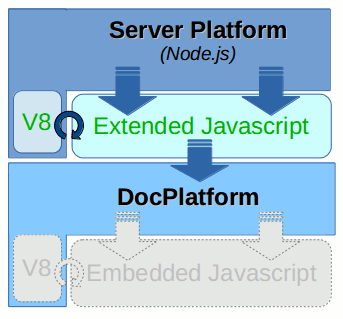
As an example of DocPlatform Extending by Javascript we use popular Node.js platform. It is a modern framework based on top of the Google v8 Javascript engine which allows to build fast, scalable distributed network-based (client/server) applications completely in Javascript programming language (on both server and client side).
Node.js is being adopted as a server-side platform by many big companies including Microsoft, Yahoo!, SAP etc.
Thanks to its event-driven, non-blocking I/O model Node.js based server solutions tend to be very lightweight, efficient and well suitable for data-intensive real-time applications.
At the heart of Node.js is an event loop. Event loops are widely used in GUI applications and allow them to responsibly handle incoming events (e.g. when a user clicks a button). When such event occurs GUI has to handle it somehow - it executes the logic associated with the particular event. Afterward, the application is ready to respond to next events (either queued ones that have already arrived, or ones that might arrive later, based on user interaction).
Node.js really shines for data-intensive applications. The method how it handles incoming requests is quite similar to the GUI implementation described above. Instead of user events (like a click to a button) it just handles HTTP requests of similar kinds of events. And it does it quite efficiently - just a single thread of execution and a single task queue is enough for responsible, real-time applications thanks to the fact that majority of Node.js internal APIs and libraries are non-blocking/asynchronous.
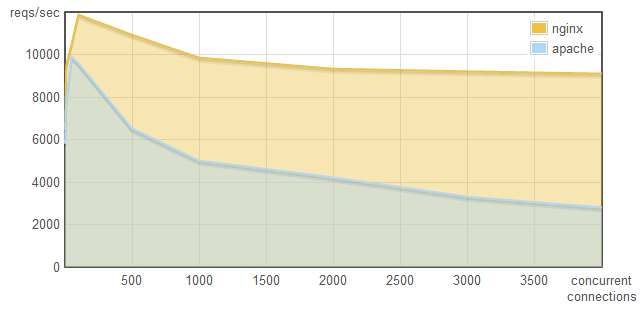
The Node.js event-based architecture is quite similar to the one of the NginX HTTP server (serving more than ~21% of busiest web sites in March 2015).
Here is the comparison of NginX and Apache HTTP servers under a heavy load (see this blog post for more detailed description):
Throughput (reqs/sec):
Memory consumption:
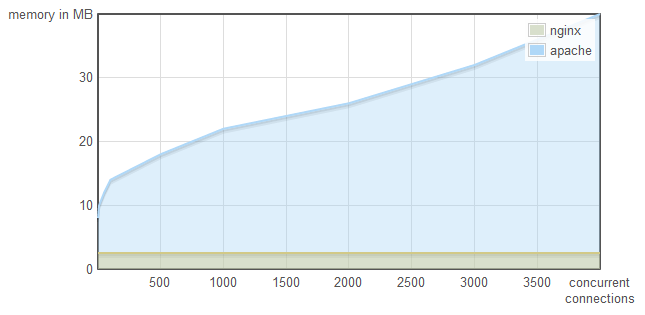
It is clearly visible that the NginX it scales much better than traditional (thread based) solutions (like Apache). It is especially true in high-throughput scenarios thanks to the asynchronous (non-blocking) approach. For I/O bound use cases the event-based solution is superior as there is no need to spare threads for busy-waining operations.
For CPU intensive application the event-loop approach does not work on it’s own. Such cases are typically solved by multiprocessing. We will show a draft of such solution at the end of this section.
Use cases
This chapter lists possible use cases how extending DocPlatform API to Javascript can be utilized.
Testing
Right now the main motivation was to prepare a suitable testing environment in order to be able to bring Document Platform & Javascript integration to a production quality.
The fact that the Node.js is a command-line tool and can serve as a REPL console makes it very suitable for both interactive and automated testing.
We used quite similar approach with CPython interpreter (with regard to the DocPlatform integration with Python programming language) and it subsequently lead to an explosion of automated testing (helped us to create more than ~5000 regression tests) and making sure the implementation quality is not compromised under a pressure of developing heavy load of new features demanded to every release.
Client/Server Applications
Another possible use cases include some runtime solutions based on Node.js platform. With help of Javascript there is a potential to rapidly create Web-based Viewers and Editors of SSD Documents, it should also be possible to create Server Clusters to scale the solution and Balance the Load and so better utilize the computing power available in contemporary hardware.
Multi-platform Desktop/Mobile applications
With modern frameworks like AppJS (or alternatively TideSDK/TideKit) it is possible to build multi-platform desktop (and mobile) applications based on web technologies. It shows that HTML5, CSS3 and Javascript are suitable not only for Web Pages and Web Applications but also for Desktop and Mobile Applications.
The AppJS uses at its core the Chromium browser engine and Node.js again. So the Node.js integration opens the door for DocPlatform to this area as well. With modern technologies like this we could possibly have a StoryTeller Editor and/or Viewer deployed to the Web, Desktop (Windows, Mac OS and Linux) and Mobile from just a single source code base.
Javascript Interfaces
Right now we are using SWIG Interface generator for automatic generation of interface wrappers to Javascript. With recent SWIG version (3.0.5 at the time of this writing) it works relatively well, but with notable limitation though.
The main problem we are facing is the lack of callback support (and inability to automatically prepare asynchronous interfaces associated with it).
An alternative would be to write v8 wrappers manually instead of generating them via SWIG. But the fact is that C++ interfaces are typically designed differently than the Javascript ones and so there is always a possibility to make one or more layers on top of the exposed “raw” C++ functionality.
That is exactly what we have done during the Javascript Extending POC. Simple callback based interfaces for Storage and Processor were created on top of current (blocking) C++ interfaces. Then corresponding REST interfaces were then created on top of that.
Before we dive into the actual interface details, let’s look at general possibilities how the whole DocPlatform Javascript API could be built namely in respect to Asynchronous method invocation.
Calling Conventions
Synchronous API
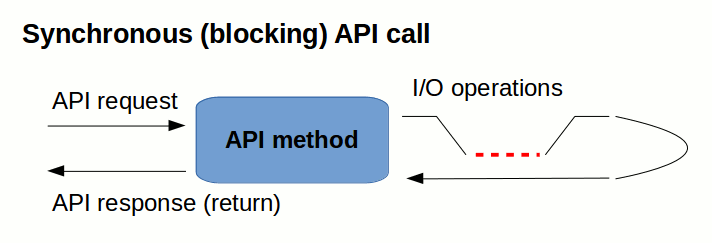
The most straightforward calling convention is the plain old Synchronous Call - passing input arguments and retrieving a result directly as a Return Value.
We call a storage.uploadSync() API method as follows:
var fs = require('fs');

funtion uploadXMLFileSync(filepath) {
  var data = {type: 'application/xml'};
  var content = fs.createReadStreamSync(filepath);
  return storage.uploadSync(content, data);
}

// upload XML file synchronously - wait for the result
var data = uploadXMLFileSync(xmlpath);
console.log(data);
… and the code above can result in a following output:
{ type: 'application/xml',
  hash: '4fbf890c4cf64a8900afb0589352ed2ef717b906',
  size: 438,
  time: Tue Apr 07 2015 10:40:16 GMT+0200 (CEST) }
If there is a chain of operation to be performed, we just do them all sequentially (to avoid “naked” loops we can use a helper library like underscore.js):
var _ = require('underscore');
var xmlpaths = [ 'file1.xml', 'file2.xml', ... ];

// upload all files synchronously and print the result
var data_array = _.map(xmlpaths, uploadXMLFileSync);

console.log(data_array);
We probably all agree that mentally this is the most simple concept that every programmer understands. We would be all happy if we could write a sequential code like this (like we did for past 20 years or so).
The problem is that such calling convention implicitly enforces blocking calls - the call sequence is tightly coupled with the current processing thread. The diagram above tries to demonstrate the problem.
If this was a convention we used for our API then parallelism would be achieved only by throwing more and more processing threads at the problem. Thankfully we can do better than that.
Asynchronous callback-based API
If we do not want to block the current processing thread with a (potentially) blocking operation we must somehow leverage a Callback mechanism.
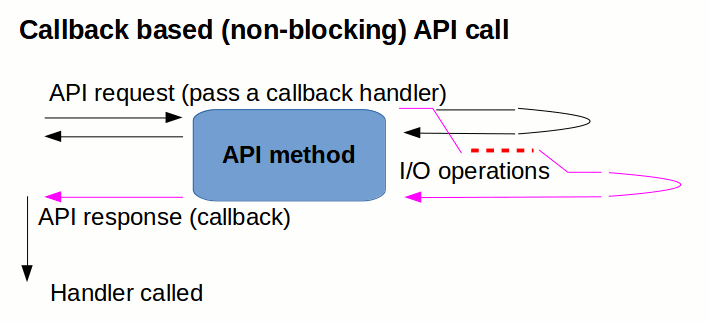
Such Asynchronous Operation is split to two phases - the first part just registers a request and passes a callback to be called as part of the response.
Such upload operation can look something like this:
funtion uploadXMLFile(filepath, callback) {
  var data = {type: 'application/xml'};
  var instream = fs.createReadStream(xmlpath);
  storage.upload(instream, data, callback);
}

// upload file asynchronously
uploadXMLFile(xmlpath, function (err, data) {
  if (err) throw err;
  console.log(data);
});
Very often we want to chain several API calls together.
It is always possible to simply nest the API calls - in every callback a next API request is called:
// upload two files asynchronously, but sequentially - callback nesting
uploadXMLFile(xmlpath1, function (err, data1) {
  if (err) throw err;
  uploadXMLFile(xmlpath2, function (err, data2) {
    if (err) throw err;
    console.log(data1);
    console.log(data2);
  });
});
But frequently there is no specific ordering needed (we just want to have all the methods finished) before doing something with the results. In such cases the situation slightly changes and we have to reorganize the code flow a bit. We typically collect the request arguments to an array and process the whole array in parallel. There exist many utility modules to make such operation easier, here we use the async.js library:
var async = require('async');
var xmlpaths = ['file1.xml', 'file2.xml', ...];
// upload all the files in parallel (use async.mapSeries() for serial upload)
async.map(
  xmlpaths,
  uploadXMLFile,
  function (err, data_array) {
    if (err) throw err;
    // all the files are uploaded now
    console.log(data_array);
  });
Admittedly the asynchronous calling convention is more complex than the synchronous one described in the previous section. But the great advantage of the asynchronous approach is that it is much more scalable and composable solution allowing much more efficient utilization of computing resources.
Many services we use to handle an API call are already natively asynchronous:
- Filesystem I/O
- Database engines
- Network communication
- …
… and so there is neither a need to block the main thread by just waiting for a result nor a need to create more processing threads. Instead we are actively using the main thread just for plumbing operations (connecting the callbacks) and then handling a result when it arrives.
More examples will follow to demonstrate how this approach is composable and able to scale up across the process and computer boundary.
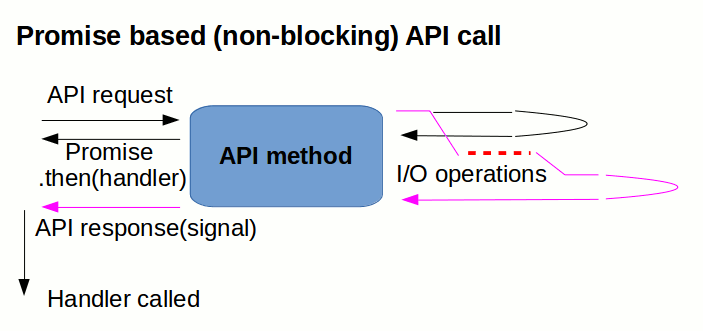
Asynchronous, promise-based API
Another alternative, how to implement Asynchronous Calls (one making asynchronous calls more syntactically similar to synchronous ones) is using Promises.
This relatively new approach is gaining popularity and there is even a standardization effort to make promises more inter-operable across various library implementations - Promises/A+.
A promise represents the eventual result of an asynchronous
operation. The primary way of interacting with a promise is through
its then method, which registers callbacks to receive either a
promise’s eventual value or the reason why the promise cannot be
fulfilled.
The callback approach is called an “inversion of control”. A function that accepts a callback instead of a return value is saying, “Don’t call me, I’ll call you.”. Promises on the other hand un-invert the inversion, cleanly separating the input arguments from control flow arguments. This simplifies the use and creation of API’s.
There are several A+ compliant implementations of promises; we are using the q.js library in our examples (an alternative would be for example the vow library).
With the q.js library it is even possible to convert a callback-based asynchronous function to a promise-based with help of just a single decorator call:
var Q = require('q');
// convert callback-based interface to promise-based one
var uploadXMLFile = Q.denodeify(uploadXMLFile);
Now we are ready to use the Promise-based API. The API call returns a
promise and we can attach callback handlers through it’s then
method.
// upload file asynchronously (we get the promise immediately)
var promise = uploadXMLFile(xmlpath);
// we can append deferred handlers
promise
  .then(console.log, function (err) { throw err; });
But where the promises really shine is the chaining of a set of operations. With promises it is really easy and does not require a different approach as it was in the case of callback-based asynchronous calls.
Here we can simply combine an array of promises to a single promise and the rest is exactly like it was with just a single operation.
var xmlpaths = ['file1.xml', 'file2.xml', ...];
// create promise representing upload of all files
var promise = Q.all(_.map(xmlpaths, uploadXMLFile));
// we append deferred handlers exactly like in case of a single call
promise
  .then(console.log)
  .fail(console.error);
As an alternative to passing error handler as a second argument of the
then method we can pass the error handler to a fail method (this
separation is beneficial namely in case of a longer chain of then
clauses).
The good news is that both approaches for asynchronous calls
(callbacks and promises) are compatible with each other and can be
converted back and forth. Just a simple decorator-based adapters
(denodeify and nodeify) must be created to interconnect the
callback-based and promise-based worlds.
Storage
The first facility we expose to the Javascript world is the Storage service. It simply serves as a Content Addressable Storage, it enables storing any blob of data (represented as a stream), retrieving a content based hash key for any data uploaded and then using the key for obtaining the same data back.
The SHA-1 cryptographic (20-bytes) hash function is used for key computation and so there is a very high collision resistance. This cryptographic function is very robust and future proof (other tools like Git Distributed Revision Control use the same function successfully), but of course it can be easily replaced by a more robust alternative (SHA-2, SHA-3, …) if there is such a need.
The Storage interface is asynchronous, and dual, supporting both callback and promise conventions described above. The callback convention dictates that the last method argument is always a callback whose first argument represents possible method call error. The promise convention always returns a promise. Usage examples using either convention are provided for each interface method.
storage.upload()
storage.upload( input: instream, data? : {...} ) : { hash: hash, size: number, ... }
Clients can upload any content stream and pass a callback which is called when the upload operation has finished.
It is possible to associate some meta-data with uploaded stream.
When the upload operation is performed, a dictionary of data is returned, namely:
hash… SHA-1 hash of the uploaded contentsize… Content length in bytestime… Time-stamp of the initial upload- […] … Other optional data given by client (type, encoding, …)
Example usage [callback]:
var fs = require('fs');

var instream = fs.createReadStream(filepath);
storage.upload(instream, {type: 'application/xml'}, function (err, data) {
  if (err) console.error(err);
  else console.log(data);
});
Example usage [promise]:
var fs = require('fs');

var instream = fs.createReadStream(filepath);
storage.upload( instream, {type: 'application/xml'})
  .then(console.log, console.error);
Output:
{ type: 'application/xml',
  hash: '4fbf890c4cf64a8900afb0589352ed2ef717b906',
  size: 438,
  time: Tue Apr 07 2015 10:40:16 GMT+0200 (CEST) }
storage.content()
storage.content( hash: hash ) : instream
This method retrieves content stream associated with given hash key.
Caller passes hash key representing content and a callback to be
called when the requested content is ready. The content is
represented as a readable stream.
Example usage [callback]:
var hash = '4fbf890c4cf64a8900afb0589352ed2ef717b906';
storage.content(hash, function (err, instream) {
  if (err) throw err;
  instream.pipe(fs.createWriteStream('/tmp/' + hash));
});
Example usage [promise]:
var hash = '4fbf890c4cf64a8900afb0589352ed2ef717b906';
storage.content(hash)
  .then(function (instream) {
    instream.pipe(fs.createWriteStream('/tmp/' + hash));
  })
  .done();
storage.info()
storage.info( hash : hash ) : { hash: hash, size: number, ... }
This method retrieves meta-data associated with given hash key.
Caller passes a hash key representing content and a callback to be
called when the requested meta-data is ready.
Meta-data is a dictionary consisting of the following items:
hash… SHA1 hash key representing content (equals to the hash input argument)size… Content length in bytestime… Time-stamp of the initial upload- […] … Other optional data given by client (type, encoding, …)
Example usage [callback]:
var hash = '4fbf890c4cf64a8900afb0589352ed2ef717b906';
storage.info(hash, function (err, data) {
  if (err) throw err;
  console.log(data);
});
Example usage [promise]:
var hash = '4fbf890c4cf64a8900afb0589352ed2ef717b906';
storage.info(hash)
  .then(console.log)
  .fail(function (err) { throw err; });
Output:
{ type: 'application/xml',
  hash: '4fbf890c4cf64a8900afb0589352ed2ef717b906',
  size: 438,
  time: Tue Apr 07 2015 10:40:16 GMT+0200 (CEST) }
Processor
Processor represents a collection of computationally intensive services provided by DocPlatform to a client. Right now we expose two such Services:
- TDT Transformation
- Document Formatter
Both services accept several inputs and produce outputs in form of a
content stream. For that purpose the Storage interface described
above is leveraged. Any content must be first uploaded to the Storage
and the resulting hash is then passed as an argument to the
corresponding service call.
All the Processor API methods are asynchronous. That way it is easily possible to use a separate process or even separate machines to do the actual work without changing the interface. As far as there is a local proxy available to a client he can stick with the interface and the computing load can be easily balanced and distributed to many worker processes and/or machines.
The Processor interface methods are dual, supporting both callback and promise conventions described above. The callback convention dictates that the last method argument is always a callback whose first argument represents possible method call error. The promise convention always returns a promise. Usage examples using either convention are provided for each interface method.
processor.transform()
processor.transform( inputs : { ... } ) : { inputs: {...}, result: hash }
This API method calls the TDT Transformation. More details about what the TDT Transformation actually is can be found in this document.
TDT transformation request consists of three parts:
- TDT Transformation Definition
- TDT Template
- Input XML Data
… and results in Output XML Data.
Client first uploads all the inputs and then creates a dictionary with
resulting hash values. The inputs dictionary must have the following
contents:
template… Hash value of the TDT Templatetdt… Hash value of the TDT Definitionsrc… Hash value of the Source XML Data
When the Transformation is finished (and the resulting XML data are uploaded to the associated Storage) the callback is called with following arguments:
The first argument represents a possible error. If there is no error,
then the next argument is a result dictionary with the following keys:
inputs… Copy of theinputsargumentresult… Hash of the resulting XML Data stream
Example usage [callback]:
var files = ["tdt.xml", "message.xml", "template.xml"];
async.map(
  files,
  uploadXMLFile,
  function (err, items) {
    var inputs = {
      tdt: items[0].hash,
      src: items[1].hash,
      template: items[2].hash
    };
    processor.transform(inputs, function (err, result) {
      if (err) throw err;
      console.log(result);
    });
  });
Example usage [promise]:
var files = ["tdt.xml", "message.xml", "template.xml"];
Q.all(files, uploadXMLFile)
  .then( function ( items ) {
    var inputs = {
      tdt: items[0].hash,
      src: items[1].hash,
      template: items[2].hash
    };
    return processor.transform(inputs);
  })
  .done(console.log);
Output:
{ inputs:
   { tdt: 'b156ccc9179423371c3cfd7f6e953848a62e58c5',
     src: '2e5477b74bc3ab43fa7aca50141fce595d601d5b',
     template: '174d6f0530d514ec389e863ace3933234d33faf2' },
  result: '65135dbf86200706b027b357c9b4c67591a3edf9' }
The content of the resulting XML Data (and meta-data associated with it) can be retrieved via separate calls to the associated Storage.
processor.format()
processor.format( inputs: { ... } ) : { inputs: {...}, pages: number, result: hash }
This API method calls the Document Formatter.
Document Formatter is part of extensive infrastructure, more details about it can be found in this document.
Formatting transformation request consists of several parts:
- Document Design
- Input XML Data
- Requested output format (
pdf,pngorsvgare now supported)
… and results in one or more Output Document Streams (in dependence on single-page or multi-page output format).
Client first uploads all the inputs and then forms a dictionary with
resulting hash values. The inputs dictionary must have the following
contents:
design… Hash value of the Input Document Design (SSD file)src… Hash value of the Source XML Dataformat… String representing output format (‘pdf’, ‘png’ or ‘svg’)
When the Document Formatting process is finished (and one or more result files are uploaded to the associated Storage) the callback is called with following arguments:
The first arguments represents a possible error. If there is no error,
then the next argument is a result dictionary with the following keys:
inputs… Copy of theinputsargumentpages… Number of pages in resulting documentresult… Array of hashes representing output document streams
Example usage [callback]:
var files = [ "design.ssd", "data.xml" ];
async.map(
  files,
  uploadXMLFile,
  function (err, items) {
    var inputs = {
      design: items[0].hash,
      data: items[1].hash,
      format: 'pdf'
    };
    processor.format(inputs, function (err, result) {
      if (err) throw err;
      console.log(result);
    });
  });
Example usage [promise]:
var files = ["design.ssd", "data.xml"];
Q.all(files, uploadXMLFile)
  .then(function (items) {
    var inputs = {
      design: items[0].hash,
      data: items[1].hash,
      format: 'pdf'
    };
    return processor.format(inputs);
  })
  .done(console.log);
Output:
{ inputs:
   { format: 'pdf',
     design: '1096961af9eeafbd7b6512c841263dfad7c19a9f',
     data: 'ab55929e779f38ed1437300230875568dbb39934' },
  pages: 5,
  format: 'pdf',
  result: [ 'c424d57b7691669b0e055d002e6f00c25b88042e' ] }
The content of the resulting Output Document (and meta-data associated with it) can be retrieved via separate calls to the associated Storage.
REST Interfaces
On top of the asynchronous Javascript interfaces it is easy to build a corresponding REST interfaces. That way the whole service becomes language independent and also process independent. With REST interfaces we can provide our services across environments and programming languages, processes and even machines.
We wrap both Storage and Processor to a REST interface and also provide a Javascript HTTP/REST Client Proxy for completeness. That way we have many possibilities how to combine the available elements without changing the client code very much. It is just a matter of configuration whether we call the service locally (in-process) or remotely (in a separate process), or whether we use the client code in web browser and communicate with a server via network connection.
Hopefully the following diagrams clarify the whole concept.
Storage
In this section we describe the higher layers built on top of the basic Storage implementation. On top of the actual implementation there is a REST interface wrapper and the REST client proxy. All three layers are depicted in the following diagram:
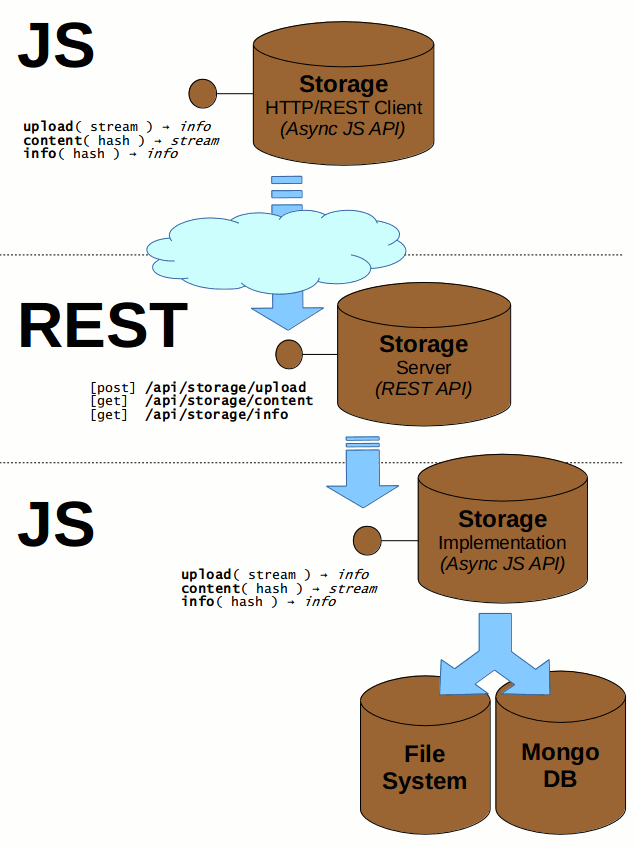
For the REST server implementation we use the express.js framework (we could probably use more lightweight library like node-restify as well).
The REST API wrapper on top of the actual implementation is very simple. We just implement all the necessary handlers and register them for appropriate REST method URIs:
var express = require("express");
var app = express();
...
function content(req, res) {
  var hsh = req.params.hash;
  var metadata = null;
  storage.info( hsh )
    .then( function (info) {
      if ( !info ) throw 404;
      metadata = info;
      return storage.content(hsh);
    })
    .then( function (stream) {
       var mimetype = metadata.type || 'application/octet-stream';
       res.writeHead(200, {
          'Content-Type': mimetype,
          'Content-Length': metadata.size
          'Cache-Control': 'public, max-age=3600'  // cache it for one hour
       });
       stream.pipe(res);
    })
    .catch(server_error(res))
    .done();
  }
  function info(req, res) {
    var hsh = req.params.hash;
    storage.info(hsh)
      .then(function (body) { res.json( body ); })
      .catch(function (err) { res.sendStatus(404); })
      .done();
  }
  function upload(req, res) {
    req.busboy.on('file', function (field, stream, filename, encoding, mimetype) {
      var data = {encoding: encoding, type: mimetype, name: filename};
      storage.upload(stream, data)
        .then(function (body) { res.json(body); })
        .catch(server_error(res))
        .done();
    });
    req.pipe(req.busboy);
}

app.get('/api/storage/content/:hash', content);
app.get('/api/storage/info/:hash', info);
app.post('/api/storage/upload', upload);
...
app.listen(port, function () { console.log('Listening on port ' + port); });
For HTTP-REST Client implementation we use the request.js library. With help of that library the task is really easy. The following code snippet represents a complete implementation of the client code:
exports.create = function (url) {
  var urlbase = (url || 'http://localhost:9000') + '/api/storage';
  var request = require('request');
  var Q = require('q');

  function handle_response(err, res, body, callback) {
    if (err) return callback(err);
    if (res.statusCode === 200) return callback(null, body);
    var href = res.request.uri.href;
    if (res.statusCode === 404)
      return callback(new Error("File not found ("+href+")"));
    callback(new Error("HTTP status: " + res.statusCode + " ("+href+")"));
  }
  function is_valid(hsh) { return /\b([a-f0-9]{40})\b/.test(hsh); }
  function upload(instream, data, callback) {
    var url = urlbase + '/upload';
    var data = {url:url, formData:{file: instream}, json:true};
    request.post(data, function (err, res, body) { callback(err, body); });
  }
  function info(hsh, callback) {
    if (!is_valid(hsh)) return callback(new Error("Invalid hash: " + hsh));
    var url = urlbase + '/info/' + hsh;
    var data = {url: url, json: true};
    request.get( data, function (err, res, body) {
      handle_response(err, res, body, callback);
    });
  }
  function content(hsh, callback) {
    if (!is_valid(hsh)) return callback(new Error("Invalid hash: " + hsh));
    var url = urlbase + '/content/' + hsh;
    request.get(url)
      .on('error', callback)
      .on('response', function (res) {
         handle_response(null, res, res, callback);
      });
  }
  return {
    upload: Q.denodeify( upload ),
    info: Q.denodeify( info ),
    content: Q.denodeify( content )
  };
}
The whole job of the REST Proxy code is to create the a Javascript Storage interface (identical interface to the one described above) on top of the HTTP Client code. This way all possible clients can use exact same constructs regardless of the actual Storage implementation (local or remote).
Processor
In case of the Processor API the situation is quite similar:
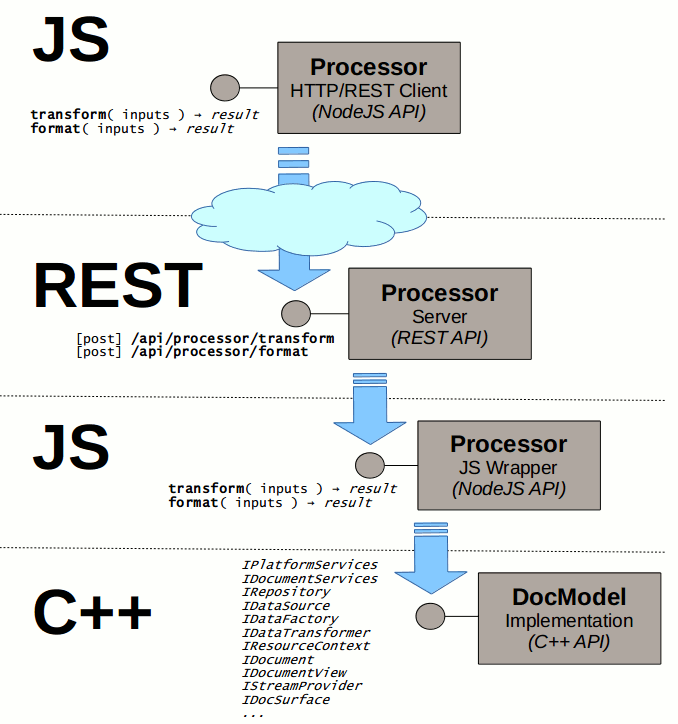
We have taken the C++ implementation (a lot of individual interfaces) and exposed those interfaces to Javascript. On top of those Internal interfaces we created a Processor Service providing user friendly asynchronous Javascript Interface.
On top of that we created a wrapper providing a REST interface.
Then we provided the identical Javascript Interface on top of the HTTP/REST client code.
Applications
This section briefly describes the possible applications of the infrastructure built so far.
Server Load balancing
With the framework described above it is possible to make scalable server solutions using Load Balancing between multiple working processes and possibly even machines.
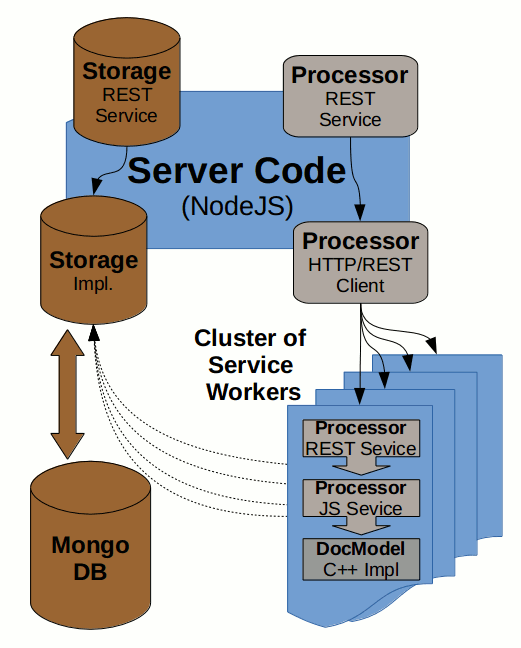
The Processor service is heavily CPU bound and so we create a cluster of Service Workers to utilize multiple CPUs. Whole cluster is visible at the bottom-right part of the diagram above.
For that purpose we are using the cluster.js library, launching several instances of REST server all listening on a single HTTP port. The source code is really simple, it can look something like this:
function start_server( port ) {
  port = port || 9000;
  var express = require("express");
  var app = express();
  ...
  app.listen(port, function () { console.log('Listening on port ' + port); });
}
function fork_server(workers) {
  workers = workers || require("os").cpus().length;
  for (var i = 0; i < workers; i++) cluster.fork();
  cluster.on('exit', function (worker, code, signal) {
    // worker crashed => log the event and restart the worker
    console.error(
      'worker %d died (%s). restarting...', worker.process.pid, signal || code);
    cluster.fork();
  });
}

var cluster = require("cluster");
if ( cluster.isMaster )
  fork_server();
else
  start_server(process.argv[2]);
Such Clustering not only addresses the Load Balancing problem, but also makes the code more isolated and so more robust and reliable. Thanks to the isolation to separate processes it is possible to workaround possible incidental memory leaks and/or crashes. Even in case a worker process crashes the main process still lives and so is able to launch a new Worker instance. It can also monitor the memory footprint of individual workers and renew the ones exceeding certain limit.
The Storage service is not CPU bound (it is rather I/O bound) and so it is not necessary to load-balance it (like it is in case of Processor service). All the Processor worker instances running on a single machine can share a single Storage instance (as all use the local file system). Due to it’s asynchronous nature the Node.js based file system implementation is optimal for such cases and it is not necessary to waste more threads or processes on that.
The fact is that if our Load Balancing solution spreads to several machines then of course some Data Replication strategy would be necessary.
Web Applications
The following diagram demonstrates a simple Client-Server Web application, communicating with a RESTful service.
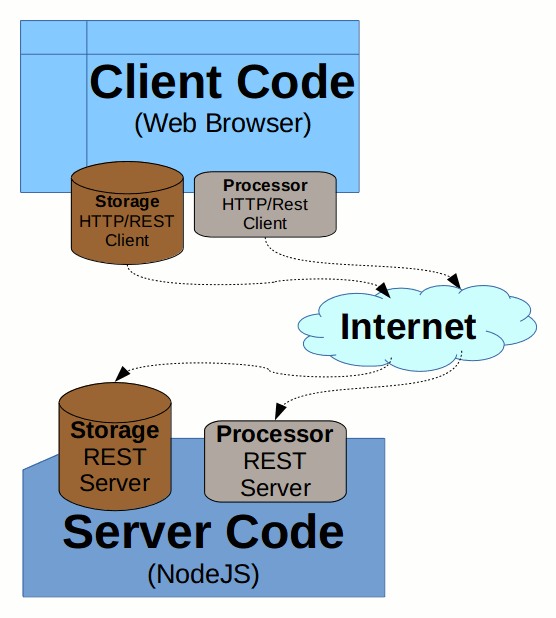
This way it is possible to easily implement a simple Document Viewer or Document Editor just via utilizing the exact same interfaces as we do on Node.js server side - all this just built on top of available StoryTeller services.
For actual Web Application GUI code we would probably use some modern technology like React or AngularJS.
To be more concrete we have created a very simple web application as a simple proof of the concepts discussed in this section. The application demonstrates a possibility to interactively edit content fragments in a web browser and see an immediate preview of the resulting document formatting by StoryTeller formatter.
Fragment Editor
For HTML fragment editing we use the Guardian’s HTML editor called Scribe. Code initializing the editor (together with its toolbar and several plugins) is really simple:
function create_editor(editor_selector, toolbar_selector) {
  var Scribe = require('scribe');
  var scribe = new Scribe(document.querySelector(editor_selector));
  var Toolbar = require('scribe-plugin-toolbar');
  scribe.use( Toolbar(document.querySelector(toolbar_selector)));
  var HeadingCmd = require('scribe-plugin-heading-command');
  scribe.use(HeadingCmd(1));
  scribe.use(HeadingCmd(2));
  scribe.use(HeadingCmd(3));
  var SmartLists = require('scribe-plugin-smart-lists');
  scribe.use(SmartLists());
  return scribe;
}
The rest of the application application simply leverages StoryTeller concepts like Variables, Repository Substitutions and Repository Mounting to achieve a limited dynamic content processing in real time.
Client REST Proxy
For REST/HTTP proxy allowing access to the Storage and Processor services discussed in the previous sections we use the rest.js library. The source code of the proxy is very simple and looks as follows:
function create_proxy(server_uri) {
  server_uri = server_uri || '';
  var rest = require('rest/browser');
  var mime = require('rest/interceptor/mime');
  var client = rest.wrap(mime);
  var baseuri = server_uri + '/api';
  var post_headers = {'Content-Type': 'multipart/form-data'};
  function get(uri) {
    return client(server_uri+uri).then(function(res) { return res.entity; });
  }
  function upload(data, type) {
    type = type || 'text/html';
    return client( {
      path: baseuri + '/storage/upload/',
      entity: {file: new Blob([data], {type: type})},
      headers: post_headers,
    }).then(function (res) { return res.entity; });
  }
  function metadata(hsh) {
    return client(baseuri + '/storage/metadata/' + hsh)
      .then(function (res) { return res.entity; });
  }
  function content_uri(hsh) { return baseuri + '/storage/content/' + hsh; }
  function format(inputs) {
    return client({
      path: baseuri + '/processor/format/',
      entity: inputs,
      headers: post_headers,
    }).then(function (res) { return res.entity; });
  }
  return {
    get: get,
    content_uri: content_uri,
    upload: upload,
    metadata: metadata,
    format: format
  };
}
Client Formatter
Higher level of the application is relatively straightforward. Whenever user modifies a Content Fragment, it’s HTML source code is uploaded to the server and formatting of the document is requested.
Right now there are just two hard-coded Content Fragments available for editing, but naturally it is really easy to extend the concept and allow users to edit any number of HTML fragments (we can either allow users create unique fragment identifiers used as individual variables, or alternatively we use array variables).
Content Formatter maintains its internal state - params dictionary. It contains all the necessary formatting properties (design, data, …) so clients can pass just changes (e.g. a different output format) and get a meaningful result.
The code implementing the Document Formatter looks as follows:
function create_formatter(inputs, server_uri) {
  var when = require('when');
  var keys = require('when/keys');
  var proxy = create_proxy(server_uri);
  var normalize_html = html_normalizer();
  var storage_prefix = 'storage:/';
  var sequence = 0;
  ...
  function html_normalizer() { ... }
  function format(changes, callback) {
    function init_inputs(changes) { ... }
    function update_params(inputs, output) { ... }
    function upload_fragments(inputs) {
      var fragments = get_new_fragments(inputs);
      // upload content fragments if there are any
      if (fragments) {
        return keys.map(fragments, function (html) {
          // convert incoming HTML to XHTML and reformat the document
          var xhtml = normalize_html(html);
          return proxy.upload(xhtml, 'text/html');
        })
        .then( function (fragments) {
          for ( var attr in fragments ) {
            inputs[attr] = storage_prefix + fragments[attr].hash;
          }
        });
      }
    }
    function upload_fixture( inputs, key, type ) {
      if (inputs[key][0] === '/') {
        return proxy.get(inputs[key])
          .then( function (data) { return proxy.upload(data, type); })
          .then( function (info) { inputs[key] = info.hash; });
      }
    }
    // update params and make a local copy with unique sequence number
    var inputs = init_inputs(changes);
    // upload all necessary data and call formatting
    upload_fragments( inputs )
      .then(function(){ return upload(inputs,'design','application/octet-stream');})
      .then(function(){ return upload(inputs, 'data', 'application/xml'); })
      .then(function(){ return proxy.format(inputs); })
      .then(function (output) { return update_params(inputs, output); })
      .then(callback)
      .catch(console.error)
      .done();
  }
  function uris(hashes) {
    return hashes.map(function (hash) { return proxy.content_uri(hash); });
  }
  return { uris: uris, format: format };
}
Client Event Handler
For handling user events and updating DOM there is a relatively straightforward class called Event Handler. It basically handles three categories of events:
- Fixture Selection (SSD Design or XML data)
- Fragment Selection (primary or secondary fragment)
- Change of the current fragment content (HTML editing actions)
- New window (user wants to open a new window containing full document in one of the supported formats)
The implementation looks as follows (shortened for brevity):
function event_handler(formatter, fragments, preview_fmt, coalesce_timeframe) {
  preview_fmt = preview_fmt || 'png';
  coalesce_timeframe = coalesce_timeframe || 150;

  function change_skipper(timeout) { ... }
  function preview_updater(formatter) { ... }
  function new_window(selector, format) {
    document.querySelector(selector).onclick = function () {
      formatter.format({format: format}, function (output) {
        window.open(formatter.uris(output.result)[0]);
      });
    };
  }
  function fixture(selector, fixture, path) {
    var element = document.querySelector(selector);
    element.addEventListener("change", function () {
      var inputs = {format: preview_fmt};
      inputs[fixture] = path + element.value;
      // request formatting document in PNG and update the DOM
      formatter.format(inputs, update_preview);
    });
  }
  function fragment(editor, markup_selector, fragment_selector) {
    function content(changes) {
      var inputs = {format: preview_fmt};
      copy_dict(inputs, changes);
      // request formatting document in PNG and update the DOM
      formatter.format(inputs, update_preview);
    }
    var markupElement = document.querySelector(markup_selector);
    var fragmentElement = document.querySelector(fragment_selector);
    // register event - select fragment for editting
    fragmentElement.addEventListener("change", function () {
      var html = fragments[fragmentElement.value];
      editor.undoManager.clearUndo();
      editor.undoManager.clearRedo();
      editor.setHTML(html, true);
      markupElement.value = html;
    });
    // register event - current fragment updated
    editor.on('content-changed', function () {
      var html = editor.getHTML();
      var fragment = fragmentElement.value;
      fragments[fragment] = html;
      markupElement.value = html;
      // we coalesce overzealous changes coming
      // in a preconfigured time window (like 150 ms)
      skip_eager_changes(html, function (html) {
        inputs[fragment] = html;
        // request formatting document in PNG and update the DOM
        formatter.format({format: preview_fmt}, update_preview);
      });
    });
  }
  var update_preview = preview_updater( formatter );
  var skip_eager_changes = change_skipper( coalesce_timeframe );
  return {window: new_window, fixture: fixture, fragment: fragment};
}
Integration Layer
Top level integration code just initializes all main components (Formatter, Editor and Event Handler) and connects them together:
// initialize formtter with hardcoded fragments, initial design and data
var fragments = {'$primary': '', '$secondary' : ''};
var inputs = {design: "/static/ssd/n_areas.ssd", data: "/static/xml/empty.xml"};
copy_dict( fragments, inputs );

var formatter = create_formatter(inputs);
// png used as preview format
var handler = event_handler(formatter, fragments, 'png');
var editor = create_editor('#fragment-editor', '#editor-toolbar');

// register events - select fragment for editting & current fragment gets updated
handler.fragment(editor, '#fragment-markup', '#fragment-selection');

// register event - fixture (design & data) change
handler.fixture('#design-selection', 'design', "/static/ssd/");
handler.fixture('#data-selection', 'data', "/static/xml/");

// register event - open formatted document in a new browser window
handler.window('.pdf-output', 'pdf');
handler.window('.svg-output', 'svg');
handler.window('.png-output', 'png');
handler.window('.html-output', 'html');
handler.window('.docx-output', 'docx');

  // trigger initial formatting
  editor.trigger('content-changed');
User Interface
The application consists just of a single full-screen window. On the left side of the application are the fragment content related controls:
- Fragment selection
- WYSIWYG editor window
- HTML markup window
On the right side there are formatter related controls:
- Buttons triggering formatting in various formats (PDF, SVG, PNG, HTML and DOCX)
- Selection of the Document Design (SSD) used for formatting
- Selection of the Document Data (XML) used for formatting
- Preview of the formatted document (PNG)
The HTML markup of the application directly reflects the simple structure described above:
<!doctype html>
<html>
    <head>
        <title>StoryTeller Viewer</title>
        <script data-main="app" src="lib/requirejs/require.js"></script>
        <link rel="stylesheet" type="text/css" href="static/css/style.css">
    </head>

    <body>
      <div class="left">
        <div>
          <label for="fragment-selection">Fragment:</label>
          <select id="fragment-selection">
            <option value="$primary">Primary</option>
            <option value="$secondary">Secondary</option>
          </select>
        </div>
        <div id="editor-toolbar">
          <button data-command-name="h1"><b>H1</b></button>
          <button data-command-name="h2"><b>H2</b></button>
          ...
        </div>
        <div id="fragment-editor"></div>
        <textarea id="fragment-markup" readonly></textarea>
      </div>
      <div class="right">
        <div class="output-toolbar">
          <div>
            <label for="design-selection">Design:</label>
            <select id="design-selection">
              <option value="n_areas.ssd">N areas</option>
              <option value="geometry.ssd">Geometry</option>
              ...
            </select>
            <label for="data-selection">Data:</label>
            <select id="data-selection">
              <option value="empty.xml">Empty</option>
              <option value="ChannelMarathi.xml">Marathi</option>
              ...
            </select>
          </div>
          <div>
            <label>Export:</label>
            <button class="pdf-output">PDF</button>
            <button class="svg-output">SVG</button>
            <button class="png-output">PNG</button>
            <button class="html-output">HTM</button>
            <button class="docx-output">DOC</button>
          </div>
        </div>
        <ul class="preview">
          <li><img src=""/></li>
        </ul>
      </div>
    </body>
</html>
Here is a screen-shot of the web viewer/editor application:

Network Communication
The application provides interactive preview of the document while user write his changes. Simplicity of the design stems from the fact, that the server is stateless while the client maintains the whole state of the user session (position of the cursor, incremental changes, undo/redo, etc). Server has no information about such low-level state properties. Whenever anything is updated in a fragment, client uploads the whole fragment to the server and requests the document reformatting. When it receives a formatting response, all the necessary information (array of the preview image hashes) is available. As the preview images are served with a long expiration age (currently set to one hour) browser uses a cached image whenever possible. It is very easy but valuable optimization for cases like undo/redo (we return to a previous state of the document), or for multi-page documents (not all pages get changed on a typical user action).
Here is an example session containing all the REST/HTTP messages annotated with individual user actions. It is clearly visible how in some cases there is no need to fetch an image or it is possible to use a cached version:

If there would be still a concern that the network traffic is too high, it is possible to introduce some kind of delta encoding algorithm for image transfer.
Instead of always transferring full images, server would rather compute a difference (delta) and transferred a { <hash>, <base-hash>, <delta> } troika whenever practical. Client would then pick its cached old data (corresponding to the <base-hash> and applied given <delta> on it and ultimately checked the result against the <hash>). This way the incremental transfer would be relatively efficient from the traffic standpoint, while preserving the stateless nature of the server (all this mechanism would be implemented as some kind of a middle-ware and would be totally transparent to the rest of the implementation).
Relatively easy approach would be to use SVG format instead of PNG and utilize some existing diff & merge solution. For example there is an interesting node-delta library usable on both server (Node.js) and client (browser) side - it is another demonstration how great it is to have the same language on both sides of the network).
Extending Summary
The following areas were covered in this section:
- An example server-side hosting Platform (Node.js)
- Various kinds of Javascript Interfaces
- Synchronous
- Asynchronous Callback-based
- Asynchronous Promise-based
- REST Interfaces
- Server side
- Client side
- Use cases
- Server Load Balancing
- Client-Server Communication in a Web Application